Showing posts with label Liquid Pearls. Show all posts

Saturday, May 31, 2014

Camping


Welcome to the Sparkle N Sprinkle June New Release.  This month, FIVE new stamp sets are being introduced. Until June 3, the sets are 20% off their regular price (no promo code needed). The Camera Life rubber stamp set is available on Cling Mounted Rubber, as a digital image, and is also included in Technique Video Kit for this month.


The sets are:


Travelin (camper) #630 (Digital Stamp Set available)

plus


 Cruisin' Digital Stamp Set #Digi629, which contains all the cars and trucks, including a VW Beetle #Digi629.2, is available. 


My card features two of the new sets, Vintage Pickup and Travelin'.  I actually used the digi versions as I wanted to reverse the direction of the pickup truck (plus I made them a little larger).  I could have also used a reversing stamp to get the same results, but this was quicker for me.


After printing all of the images, including the picnic table and umbrella from the Travelin' digi set, I colored the images with Copic markers and fussy cut them out.  I added a couple of strips of 1/4" Tear-ific tape to the camper and covered the exposed adhesive with Blue Jewel glitter.  Dimensional Glue was added to the hub caps on the Vintage PickUp and covered with Sonic Silver velvet glitter.  All of the windows on both vehicles are covered with Glossy Accents.  Glossy Accents was also added to the picnic table tablecloth and Starfire glitter was immediately sprinkled into the wet adhesive, reminiscent of those old sparkly plastic tablecloths that were used for outdoor eating :-).


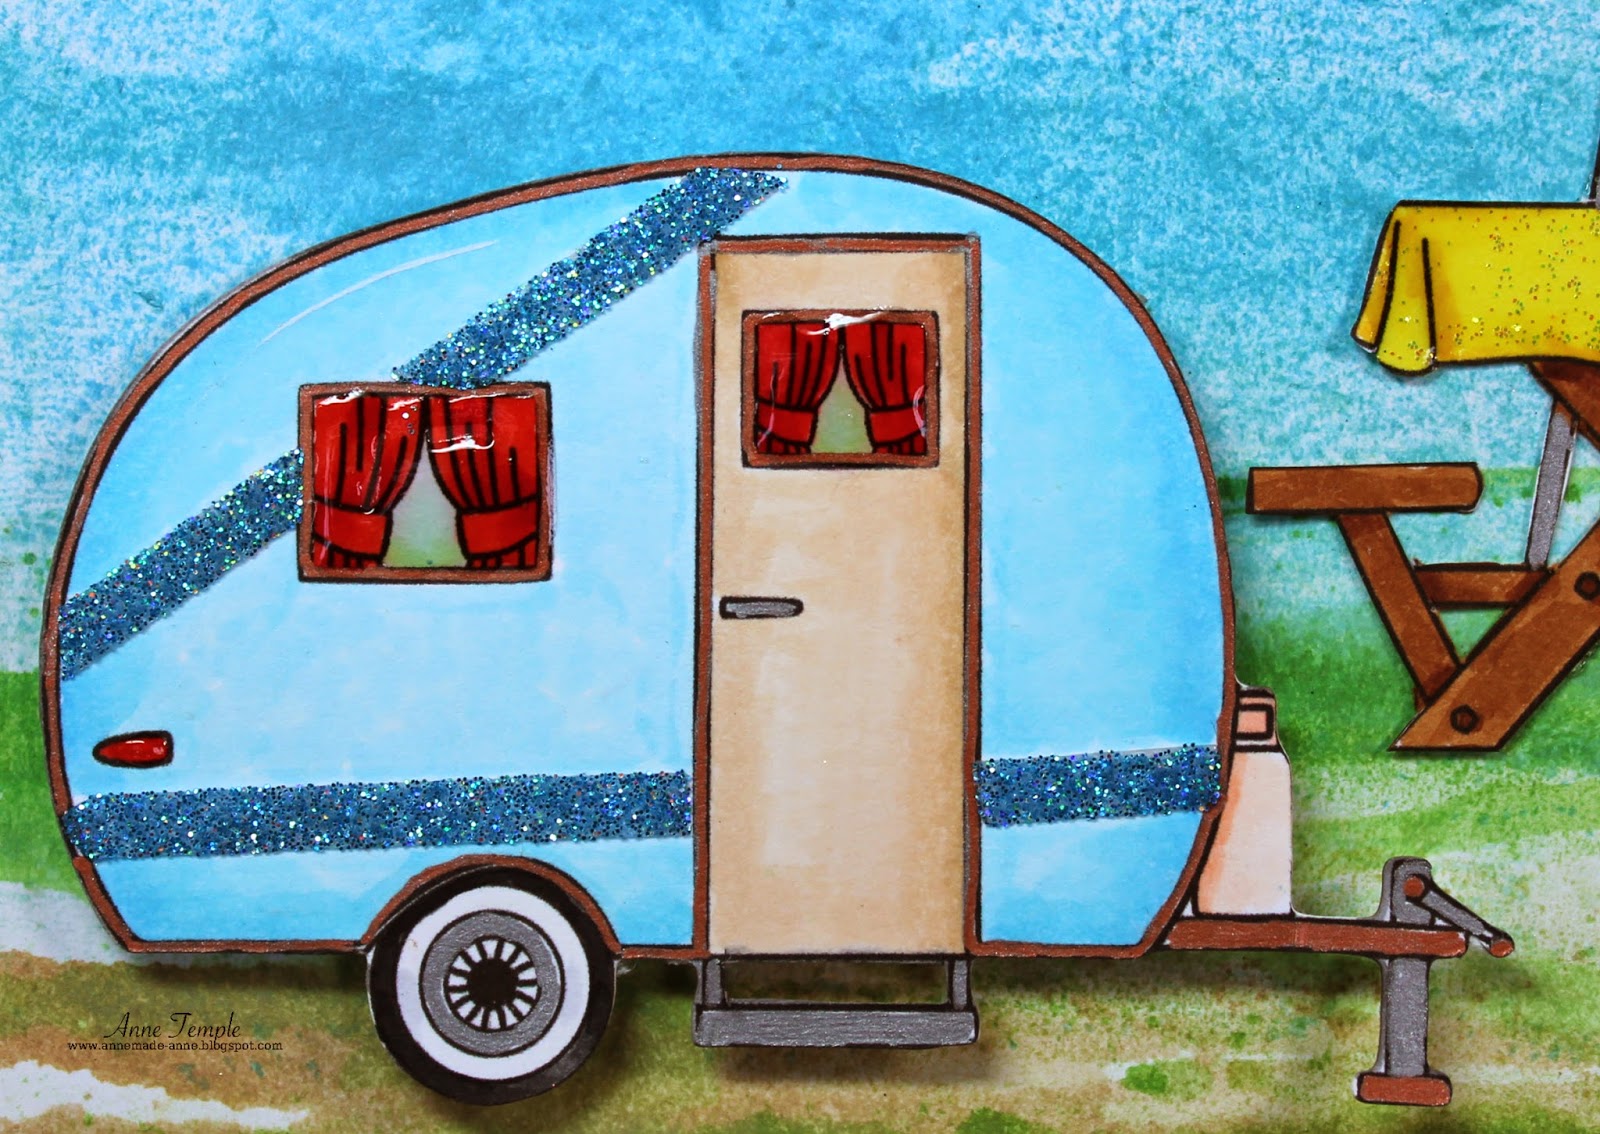
The background was created by brayering Distress Inks onto white cardstock.  The tree in the background is by Die-Versions (Spring Tree) and the birds are part of the die.  I've added blossoms to the tree using Sizzix's Flower, Forsythia die.  The flowers were cut from Sticker paper and Bubble Gum glitter was added to the adhesive portion of the paper.  I saved the backings from each of the die cut flowers and these became the white blossoms on the tree.  Liquid Pearls was added to each of the centers.  All of the leaves are covered with Dimensional Glue and Lator Gator velvet glitter.

The new SNS Creative Challenges also begins today, with lots of prizes and recognition badges. 

The winners of the blog hop will be announced on June 3 on Facebook, the SNS blog, and on our blogs:


Enjoy checking out all the great creations from the Designers and don't forget to leave a comment for each of us to be eligible for winning one of these fabulous new sets.

Saturday, February 15, 2014

Carnival


Carnival is the theme for this bi-weekly challenge from Time4Scrap.  We have two sponsors, Sassy Studio Design and Aurora Wings.  My digi is by Sassy Studio and is Classic Marie Antoinette.  She just looked like she was going to a masquerade ball to me.  

Normally, I color my images with Copic markers and then find paper to coordinate.  I happened to be going through my scraps and discovered this masquerade masks paper and decided this would be perfect.  And her ball gown colors were instantly decided upon.  I didn't really add many embellishments because I though her dress spoke volumes :-).  


The bow at the top was created with a WR Memory Keepers envelope punch board (thanks Brenda for the idea).  You can find the You Tube tutorial here.

Now it's your turn.  You've got two weeks to upload your projects to Time4Scrap.  Don't forget to check out what the rest of the team has created (they've used some really cute images).

Saturday, January 4, 2014

I Heart U


For my very first project for Time 4 Scrap, we have a color challenge: incorporate Silver or Gold into your project.  Our sponsors for this challenge are Robyn's Fetish and Delicious Doodles.  I've chosen the I Heart U digi by Robyn's Fetish for my tag.


After printing the image a couple of times and printing just the sentiment in the center, I fussy cut out the heart from the scalloped edge.  Silver Lightning embossing powder from Sparkle N Sprinkle was used for the scallop border and Firecracker Red embossing powder was applied to the center heart.   Both of these have glitter mixed in with the embossing powder for a sparkly look.  Using a Memory Box die, I cut out the sentiment separately and applied Velvet Sparkle embossing powder for even more glittery goodness.  

After pop dotting the center heart, I added some red fibers behind the entire piece for more definition.
The tag was then covered with silver foil (aka Reynolds Wrap) and dry embossed with the Hearts M-Bossabilities embossing folder.  I highlighted the swirls and the edges with a Copic marker.

I also added the Hanging Hearts, from Die-Versions, to the top and bottom of the tag and heat embossed it with Silver Lightning and Firecracker Red.


So head on over to Time 4 Scrap and submit your card, tag, ATC, or a Fat page (a 4"x4" card, layout or mini album).  The winner will receive her/his choice of 3 digis.


Tuesday, November 6, 2012

Bells and Holly Wreath


The Die-Versions November release debuted Sunday evening and is now available for you to purchase.  This is the new Bells and Holly Wreath die and I've whipped up a couple different ideas for you using this fun die.

The first one is all about glitter - and let me tell you, it really shimmers and sparkles in person.   My second card is a "mixed media" example where I've combined cardstock, fun foam, and Liquid Pearls for a very textile card.  I also tweaked it a little by cutting out the bells and adding one of the ornaments from the new Ornament Trio die. (I'll have additional projects using this die throughout the month.)


Here's a closer view so you can see all the dimension and the different elements that I combined together.

You are definitely going to want to update your Christmas list to add these dies.  Also, be sure to head on over to the Die-Versions Blog for more great ideas using all of the new releases.  You'll need to bookmark it and keep going back to see all the new things.  (Susan is sneaky that way in that she doesn't reveal everything on day one :-P.) I've had a sneak peek and there are some projects that you definitely don't want to miss!

Tuesday, October 30, 2012

Blood Hound Christmas


Front of card - closed
Gate fold card - open
The end of October is already here and that means it's time for the Dude Time Doodles blog hop.  This month we are doing something a little different - we're having a 50% Off Anniversary Blog Hop just in time for Christmas.  There are over 35+ Christmas images in the DTD store that are 50% off starting at 10am EST.  The sale goes through 11/13 and no coupon code is needed.

One of the many images on sale is Bloodhound Christmas.  I've created a gate fold card with a belly band.  You can just see the tree peeking out when the card is closed.  Open it up to reveal the entire image and a couple more glittered ornaments.  (All three of the ornaments are part of the November Die-Versions release and will be available Nov 4.  You are getting a sneak peek!)   The frame is a Cheery Lynn Designs die and the gate fold openings were cut using a scalloped oval die from Lifestyle Crafts.  The background behind the image is a vintage book page.  Liquid Pearls were used to create dimensional ornaments on the tree itself.

As most of you know, the Dude Time Doodles blog hop is circular - no specific beginning or ending.  Just keep hopping around to all the Dude/Dudettes until you've hit each one of us.  As always, one of us is the Mystery Host.  Whoever leaves a comment with that Host will be the winner of a DTD image.  So be sure and leave comments with all of us.  Your next stop is Kevin.

Here's the hop order, just in case.  You'll definitely want to visit each of us to see more fabulous images that are on sale, not to mention lots of inspiration.

Esther, our guest designer

Start hopping and have fun.

Monday, October 1, 2012

Woofie Under the Christmas Tree


I'm so excited to share my first project as one of the new designers at Sparkle N Sprinkle.  It's one of their new digi images, Woofie Under the Christmas Tree, by Michelle Perkett and it also incorporates this month's sketch challenge.  Sparkle N Sprinkle has created a brand new site just for the SNS challenges: Sparkle N Sprinkle Creative Challenges Blog. (They still have the blog site, which can be seen here.)

Here is this month's sketch so you can play with us too.  As you can see, I followed it pretty closely.


Woofie is colored with Copic markers and fussy cut out.  I've added touches of Evening Glow glitter here and there and Liquid Pearls (gold) for the ornaments.  Some of the presents were given a bit of sparkle with various Spica glitter pens.

I created the background using wax paper from a similar technique I came across a few years ago.  (Unfortunately I didn't write down from where.  I'd love to give proper credit, if anyone knows.)  For those of you who want to re-create it, here's how to do it.  I'm calling it the Wax Paper Embossing technique.

I  used an older Sizzix Texture plate, but an embossing folder works just as well too.  Ink your plate (I chose Memento - Bamboo Leaves) and lay down a piece of wax paper slightly larger than the plate.  Run it through your Big Shot/Big Kick machine using the impressions plate and silicone rubber mat.  The ink is transferred to the de-bossed areas, leaving the embossed portions of the plate clear.  The only hard part about this technique is that you have to let it dry for a few hours (I try and let it dry over night - just to be sure).  Once the ink on the wax paper is dry, cut it to the size you want and continue embellishing from there.  I added a layer of green cardstock between the card base and the wax paper.

You can also find this card with complete instructions in the Sparkle N Sprinkle Art Gallery as well.

The rules for the sketch challenge are on the challenge site, but basically, you need to use a Sparkle N Sprinkle stamp (either rubber or digi), no back dating, and link to that specific post (not your entire blog).  The sketch challenge starts today and you have an entire month to complete the challenge.  The winner will receive some fabulous product from Sparkle N Sprinkle.  (It truly is a joy to work with!  I think once you try it you'll be hooked and not want to use anything else - just like I was.)

I can't wait to see what you come up with!

Copics used: G14, G17, G19, G89, R14, R24, R29, E40, R21, R22, E31, E33, E35, E51, Y11, Y08, V12, V17, B01, B05, B06, C6, YR02, YR04, BV01, BV02, BV13, BV34, BV25, YG99, B63, B66, YG06, Y06, Y28, FY1, N0, N2


Thursday, September 6, 2012

Our Lady of Guadalupe


I'm so excited to share the news that I was chosen to be one of the new Sparkle N Sprinkle designers.  I discovered SNS this summer when I went to the Atlanta Scrapbooking Expo and bought a couple pots of glitter.  When I got home and used them, I loved them.  So I went online to see about purchasing more and discovered that a design team call was in progress.  I just knew I had to enter - and as they say, the rest is history.  

After making it to the semi-finals, we had to choose a digital image from the SNS store and submit it.  I chose Our Lady of Guadalupe by Michelle Perkett and colored her with Copics and added touches of glitter to the shining rays, the edge of the shawl and the stars on her shawl.  The background was created using gold cryogen cardstock and Cheery Lynn Designs (French Lattice large frame).  I added the negative pieces back to parts of the frame, exposing parts of the lattice work to the red background.  Liquid Pearls (gold) was added to her necklace for a more dimensional look.

Here is the link to the Sparkle N Sprinkle store and one to the SNS blog.  You can see the rest of the design team by clicking on the website's Info/Links button or click on my design team page on the top right corner of my blog.


Copics used: E00, E01, E11, E13, BV20, R11, R20    E50, E57, E77, E49    BG0000, BG01, BG05   Y000, Y00, Y02    Y06, Y28    R35, R37, E81, Y28    B23, B24, B26, B39
glitter: Sparkle N Sprinkle glitter (Evening Glow); PK Glitz glitter (honey)

Friday, August 24, 2012

Happy Birthday to You


Today's challenge #51 from Pattie's Creations is Birthdays.  And how appropriate since two of us on this design team are celebrating their birthdays today (Charlene and me).

Happy Birthday Charlene!

I've used Allie With Cupcake and printed the image twice, for both birthday celebrants.  (I have an older version that didn't include the stool.)  I fussy cut out the second cat and pop dotted it next to the first cat for added dimension.  The Cuttlebug embossing folder was a wonderful surprise from Tammy (thanks!) and was perfect for today's theme.  The images are colored with Copics and Spica glitter pens for added sparkle.  The candy dots on the cupcakes were given extra dimension using Liquid Pearls (white opal).  My background was done in chalk and some Washi tape, buttons, and twine were a final touch.

So when you visit the challenge blog to see what the design team has created for you, be sure to wish Charlene a very happy birthday too.  You have two weeks to upload your birthday card and you can use either a digi image or a rubber stamp as long as you follow the theme.  Don't forget to check out the rest of Pattie's wonderful images at her Esty store.  I'm sure there will be something there that strikes your fancy.

Copics used: W5, W6, W8, BV29, 110, R20    YR23, YR24, YR27    R81, R83, R85    Y15, Y18, FYR1    BV01, BV13, FV2    YG01, YG07
Spica pens: pitch black, lemon, orange, blossom