Showing posts with label River City Rubber Works. Show all posts
Monday, March 23, 2020
Rock Out
Hey everyone, I have a fun birthday card to share with you today that is perfect for the music lover in your life 😀.
The recipient of this card is a drummer and I didn't have any drum kit stamps or dies. So I googled free clip art and found this wonderful silhouette. I brought it into my editing software and added a blue shadow as well as creating a space on the large drum center to add a message. The papers behind the image are also digital.
Next I printed it out and then stamped my Happy Birthday sentiment from Create A Smile (Vinyl Greetings) onto the drum. Next I used a stamp from My Favorite Things (For the Record) and stamped it on white cardstock, die cut it using the Skinny Strips dies by My Favorite Things, and added the upper sentiment onto the card. Both sentiments were stamped with VersaFine and heat embossed with Clear embossing powder.
For the inside of the card, I added this snarky stamp by River City Rubber Works that I've had for a very long time. I added a touch of color to the candles using my Spectrum Noir Sparkle markers.
Until next time.....
Friday, July 26, 2013
Hip Hip Hooray
One of the Sweet Spots released this month from Die-Versions is "Hip Hip Hooray". I was in a restaurant in Franklin, TN and the first thing you see when you walk in is a sign that reads "Hip Hip Hooray - the Gang's All Here". As soon as I saw it, I knew what I wanted to do with this new Sweet Spot.
This easel card used a lot of stamps (six in total) and quite a bit of masking, but it was fun to create. I started off by cutting the sweet spot in fabric (just to see if it would work. I didn't have any problems but you might if there were more intricate details.) Then I scribbled a Spica glitter pen on the letters for a bit of bling. Next I started stamping and masking to create my scene. All of the images were stamped with Memento Black Tuxedo and colored with Koh-I-Nor woodless pencils for a more vintage feel.
The first stamp with the three ladies sitting in front and the man in the back to the right are by River City Rubber Works. The man and woman image in the back on the left is from I Brake for Stamps and the trees/shrubs in the very back are by Beeswax Stamps. The large watermarked sentiment is an older background stamp by Hero Arts and the "Happy Birthday you old bird" is retired stamp from Prickley Pear. The rest of the sentiment was die cut from the Die-Versions Mister Micro font.
Want to see more great projects from the DV Dynamos? Then check out the Die-Versions Blog and the DV Facebook page.
Labels:
Beeswax Stamps,
Die-Versions,
DV Dynamos,
easel card,
fabric,
glitter,
Hero Arts,
I Brake for Stamps,
Koh-I-Noor,
masking,
Prickley Pear,
River City Rubber Works,
Spica glitter pens
Thursday, December 27, 2012
Party Time
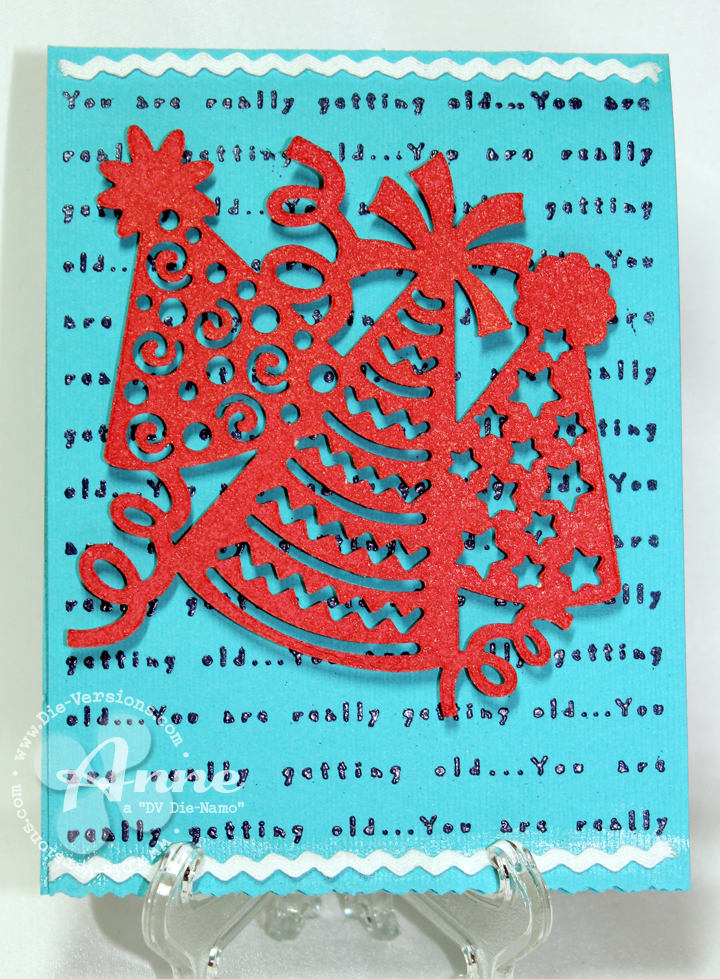
It's time to start counting down till the New Year and to help you Die-Versions has some great New Year's dies. Since Die-Versions dies are so die-verse (thanks Suz!) I decided to create a bithday themed card and layout with a couple of the December new release dies.
First up is the Party Hats and I created a simple and quick card for someone of any age. (I really love that subtle background stamp from River City Rubber Works.) I pop dotted the image for added dimension. I didn't stop with decorating the outside either. On the inside of the card, I used the Sparkler font and some of the negative portions for the hats.Next up are the Party Horns and again, I thought of birthday instead of New Year's celebrations. Just shows how versatile these dies really are. I created a layout of my husband's birthday a couple years ago (I'm really behind on my scrapbooking). To create the title, I used the Party Pennants 1 banner and the Tick Tock font. I carried the pennant idea down to anchor my party hats that are closer to the photos.

I also used all the negative portions of the die and colored them with Smooch inks. The finishing touch is some tomato red tinsel glitter from Sparkle N Sprinkle for lots of bling and added dimension.
Head on over to the Die-Versions Blog to see the fabulous New Year's projects the rest of the team created!
Sunday, July 11, 2010
Age Takes Its Toll
This card was created for The Color Throwdown's 100th challenge and the adorable little old lady is from River City Rubber Works . (Don't you love the way her hand hangs over the edge of the frame?) The Copic markers I chose were B91 (for Baja Breeze), R29 (for Real Red), R81 (for Regal Rose), and YG11 (for Certainly Celery). All the papers that coordinated beautifully with this challenge are from Basic Grey's Euphoria collection. I also used my Spellbinder's Scalloped Edge Frame dies to cut out my frame. I cut this out twice, using two different pieces of patterned paper. I chose the blue for my background here and I used the green insert on the inside of my card. Finally, I accented her ears and around the frame with tiny pearls.
The inside of the card looks like this:
I distressed the inside of the card base with Antique Linen and Tea Dye Distress Inks before adhering my green insert with my stamped message, which is also from River City Rubber Works. I created my own colored paper for the quilled flowers using glossy paper and alcohol inks.
You still have a little time to enter this challenge (11:59pm Monday). So go have fun and get creative!
Thursday, May 13, 2010
Looking Ahead
This is the card I came up with for the RubberStampChat May vendor sponsored sketch challenge. The sponsor this month is Smeared Ink, a new rubber stamp company. They've got some unique and fun stamps, so go check them out!
The stamp I chose is from River City Rubber Works (I don't own any Smeared Ink stamps - yet) and there are four layers to this card. I used the Flourish Impressibilities from Spellbinders on the background (purple) patterned paper and then used Distress Inks (Dusty Concord) and a sponge dauber to highlight the impressions. Next up is beige patterned paper with writing already on it. The only alteration to this layer was embellishing the four corners with heart brads. Luckily, the color matched well (or I would have had to bring out my Copics to fix it!).
I cut the woman image out and colored with Copic markers (of course) and pop dotted her onto paper that I created a background on by using sponge daubers and dye based inks. I die cut the paper with an oval die from Spellbinders. The inks I used were Distress inks and the colors I used were Spun Sugar, Victorian Velvet, Milled Lavender, and Dusty Concord. The Copic markers used to color her in were: E000, E00, E11 (skin tones); E31, E35 (hair); Y00, Y02, Y08 (dress).
One of the fun things about this image is the (almost) unlimited sayings you could add to your card with her. It could be sarcastic, or funny, or thoughtful. My girl is looking to see if she is going to win the random drawing for this challenge (hope so).
Wednesday, April 28, 2010
Twilight

Here is another example of a sponged background. This time, I was trying to create a twilight effect. In order to produce this type of effect, you need three shades of blue dye ink (light, medium, and dark) and one shade of dark purple. I used Distress inks. Begin by sponging the lightest blue with a sponge dauber around the edges and top of your paper. Follow with the medium blue, then the dark purple. Finally use the dark blue to blend everything in. Be sure to use light pressure and go in a circular motion. It's easy to put more color on, but you can't take it off. I also sponged black ink under the bottom of the car.
The roadster, which is a River City Rubber Works image, was stamped on Neenah cardstock and colored with Koh-I-Noor woodless color pencils. Next time, I'll probably switch to Copics because I like more vibrant colors. I also used the Sakura Gelly Roll Star Dust pen to make my twinking stars in the night sky.
Friday, April 9, 2010
I'm not cheap...
I'm trying lots of new mediums out (not just always reaching for my Copics). This guy was colored using Koh-I-Noor woodless pencils (I purchased mine at Michaels, but I'm sure other craft chains carry them as well. You can always get them on the internet too). I must confess that I did use Copics for his skin because there wasn't any skin tones in my set of pencils. The saying came from River City Rubber Works and the man came from My Heart Stamps For You.
For the base card, I used my Scor-Pal to score a subtle diamond pattern in the cardstock. I began by lining up opposite corners of the front panel on the 6" mark line and scoring down. I then scored every 2" across the cardstock. I then turned it, lining up the other two corners, and scored again. Finally, I scored around each of the four sides about 1/4" in from the edge.
The banner was made by using Spellbinder's Fancy Tags. I colored the edges of the tag with the Koh-I -Noor pencils as well and stamped my saying in the center. I pop dotted the tag to make it stand out more.
Subscribe to:
Posts (Atom)