Showing posts with label Smooch. Show all posts

Saturday, April 2, 2011

Extra Special Blog Hop


Today the Dudettes are celebrating our Fearless Leader's birthday.  So, we decided to surprise Boni with an extra special blog hop.  Hopefully you hopped over from Ginny.  Here's the list of Dudette's helping Boni celebrate, so be sure to visit each one and see what they have in store for Boni too (the hop goes live at 6am EST):


I wanted to make a birthday card having her celebrate in style and all dressed up for this special occasion.  This bombshell babe is a rubber stamp from Bombshell Stamps and the dress and sentiment are one of several digital image add-ons for the rubber stamp image.  Both images are on Cryogen paper, which gives it a shimmery look in person. The solid cardstock is by Core'dinations and I embossed the black strip with the Sizzix Dot Matrix folder and the red is cut with Spellbinder's Labels One (#6) die and emboseed with the Diamond & Stars Impressibility from Spellbinders.  The patterned paper is by Doodlebugs.  The shaped card (also used the red Core'dinations) was cut using the Labels One Grand Nestabilities (#3).  I added some Smooch Spritz for a bit of glitz, a row of pearls, and some flowers (to coordinate with the flower in her hair).  The inside of the card is embossed with "happy birthday" and is also sprayed with Smooch Spritz.

Now it's time for you to hop on over to Tammy.

Hope you have the best day ever, Boni. 
HAPPY, HAPPY BIRTHDAY!!!!


I'm also entering this card in the One Stop Craft challenge this week where the theme is spots and dots.  Plus Dude Time Doodles is the sponsor.

Copics used: R24, R39, YR15, BV00, E00, E11, E47, E49, B63, B79

Monday, March 28, 2011

More Please!

Hambo Stamps is doing it's eighth Hambo Hoedown this week.  If you participated last week, you would have gotten Coffee Girl free this week (or you can buy it).  If you participate this week, you get a free image for next week's hoedown...you get the idea.  I don't always have time to participate, but I try when I can because their images are so fun and versatile.

I printed the image twice since I wanted to pop dot the top of the coffee cup and the sentiment.  (You can see the dimensions better in the next photos.)  I colored both the sentiment and the image with Copic markers and I also used quite a few Spellbinders dies for this project (Standard Circles large #6, Ribbon Tag Trio 2, Lotus Pendant).


Smooch Spritzs (I just grabbed colors several colors to combine) were used to spray the cardstock that I cut the Lotus Pendant out of and the seam binding ribbon used on the sentiment.  It's so easy to tint your own seam binding ribbon or twill (Just spritz with water to get it moist, drop in a plastic baggie and spritz on the color(s) you want. Wrinkle it up to get it all saturated, then either let air dry or use your heat tool.)

Copics used: E30, E33, E29, R05, R08,RV29    Y11, Y13, Y15    R20, E00, E01

Wednesday, March 23, 2011

Weightlifter Wayne


Weightlifter Wayne might be a skinny little guy, but he's definitely trying hard to seize the day (or at least the dumb bell).  He's a digital image from Bonibleaux Designs and can be found at Dude Time Doodles.  This week, Dude Time Doodles is sponsoring Cheerful Stamp Pad and their theme is Be A Sport.

I colored Wayne using Copic markers and followed a sketch design from Scrapbook News and Review.  I did my own funky kind of easel card too. The number and the yellow stripe are colored with Smooch pearlized ink (Sundance) and Spellbinder's standard circles, large (#3) die was used to cut the mat for the sentiment sticker.

Go out and seize your day.

Copics used: YR09, R29, R39, R59, R89, RV99    T2, T3, T5, Y28    E00, E01, E11, R20    E30, E18    E53, E43

Tuesday, March 22, 2011

Celebrate


It's all about celebrating with sparkle and glitz for this week's Hambo Hoedown challenge (and a chance to be a guest designer) and all about the sketch (and a chance to be on their design team) at Cards for Men.

My celebratory mouse is a digital image from Hambo Stamps and he has lots of sparkle and glitz.  The balloons and all the dots are purple Stickles; the purple triangles are spritzed with Sheer Shimmer Spritz (Frost) by Tsukinko; Smooch (illuminate) pearlized top coat was added to the mouse's ears, nose, and tail;  Liquid Pearls was used for the balloon reflections and the scarf fringe; and a Spica glitter pen was used to highlight the sentiment.  (I didn't realize I had so much to choose from when given the chance to add sparkle  :-). )  The sentiment is actually part of the patterned paper that I cut with Spellbinder's Deckled Mega Rectangles, small and pop dotted for more dimension. 

Copics used: R39, R59, RV99    R81, R000    Y32, Y35, Y38    N0, N2

Thursday, March 17, 2011

Owl be there 4 You


This week's AiFactory Challenge is Things with Wings.  There are tons of possibilities with this theme, so get creative.  I've chosen the owl party printables and made a couple of different projects. 


The first is a gift box where I also used my Cricut Imagine (Imagine More Cards cartridge) to coordinate with these cute party printables.  After printing and adhering the papers and sentiment, I wrapped pink tulle around the box.  I enhanced the AiF Owl using Spellbinders Standard Circles (#3,4) for layers and the Eyelet Circle (#3) for the base.  Some light pink paper floss is also threaded through the eyelets.  Here's a close up, so you can see the details I added (Spica glitter pen and a pearl in her bow).


The second party favor I made is a tube filled with candy.   I chose a different owl from the printable and accentuated it with a Spellbinders Beaded Circle (#3) and a Spica glitter pen to give more sparkle to the feathers and the eyes.  I used the same light pink paper floss to tie it onto the candy tube.  Smooch Taffy highlights the beads around the outside of the circle.  


Don't forget to check out all the other great creations the Design Team has made for you (see tabs above for blog addresses).  Be sure to link up your winged creation at the AiFactory Challenge Blog.  I can't wait to see what you come up with.  

Monday, February 14, 2011

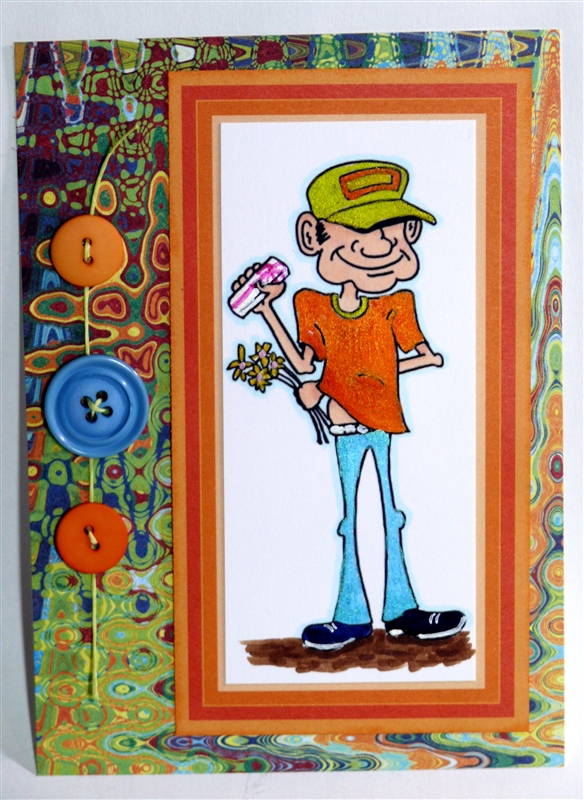
Smooch-y Gary


Gary is ready to give his girl a big Valentine's bouquet of flowers and something special in that little white box (but it's too long for an engagement ring and it's not Robin's Egg Blue - so it's not from Tiffany's).  I'm sure his girl will like it though.  How could you not like getting something from Gary Giftbearer, a digital image from Bonibleaux Designs Digis?

By the looks of things, he's about ready to go disco dancin'.  His shimery, shiny duds are colored with Smooch pearilized accent inks (carrot, kiwi, pool, nautical navy, sundance, moonlight, and taffy).  Copic markers were used for his skin tones (E00, E01, E11, R20).  The background paper is by Basic Grey.

Here's a closer look at those cool duds:

Happy Valentine's (or un-Valentine's, if you don't like celebrating) Day to all.

Wednesday, January 12, 2011

Driftin' Denton

Today is the day for the Guest Designer challenge at DTD.  Keep reading for more info about this.


Driftin' Denton is a dude by Bonibleaux Designs and he has no worries; he's doing his best to simplify his life - by going to his favorite fishing hole!  Little does he know it, but Sashimi and Sushi II are watching him sleep.  (Both of these cuties can be found in the Digi sets at the DTD store.) 

I colored everything with Copic markers and then came back with LuminArte's Twinkling H2Os for the sky, boat, water, and the fish.  They really shimmer in person!  I cut out and pop dotted Sashimi and Sushi II (he looks really bored) for added dimension.  Here's a better look at all that sparkle and shimmer.
 How cool is that? 

The paper and stickers are from Creative Memories and I've had them in my stash for quite a while.  I also pop dotted the stickers so they looked more realistic as well.  The philosophy tag, "simplify" is by Tim Holtz.   I added a little Smooch Moonlight ink to the tag to make the letters stand out better.

Copics used: E07, R89    YR20, YR12, YR23, YR21    B91, B93, B97   yg93, YG97, C3, N5    E00, E01, E11, R20    R17, R29, W1    BG15, BG45, BG18

Now, there's a lot going on over at Dude Time Doodles!  It's even easier to remember what's going on (you can always look at my side bar to see the events calendar too) - all the challenges will be weekly and are on Wednesdays. 

DTD Calendar of Events

Monthly Challenges

1st Wednesday -
Sketch Challenge

2nd Wednesday -
GDT Challenge

3rd Wednesday -
Inspiration Challenge

LAST Wednesday -
NEW Release Blog Hop


Since today is the 2nd Wednesday of the month, that means it's time for you to head on over to DTD and submit your project to be our Guest Designer for next month!  You get to see all the inner workings of this fun group of Dudettes! 

Thursday, December 30, 2010

DTD Jan New Release Blog Hop

Happy New Year's Eve!
Hard to believe another year is quickly on it's way out and it is time to
 ROCK 2011
We welcome 2011 with tons of excitement. Our new store is up and running and we are offering a:
 New Year SPECIAL -
11% off your entire purchase! Use promo code: HAPPY2011. Limit one coupon per customer and the sale is valid December 31, 2010 through January 2, 2011.
We also have tons of fun stuff going on in our forums on CDAC and PCP - be sure to join either place and get in on all the action coming your way for 2011. We are also hosting the CDAC Color Challenge this week so you will want to run over there and pick up the freebie and join in the fun for a chance to win a gift certificate to the store.
UPDATE: We are turning some of our digis to clear polymer stamps this year! We have drafts at the manufacturer as we type this and are so very excited to be able to offer stamps to those customers who love the feel of a stamp! Stay tuned - more to come soon!

Now as you know once a month we hold the "NEW RELEASE" Blog Hop and today is the day. We have eight new images and several new sentiments by Sassy Say'n's by Marlooney available starting today. Be sure to use that coupon code and getting in on some fabulous savings at the same time!
For your viewing pleasure we have some fun for you today! All of us on the design team are so excited about these new images!  While you are hopping be sure to leave some love - one of the Design Team Members will be secretly chosen as the "MYSTERY HOSTESS" of the blog hop and one lucky commenter will receive one of our new release images for free or any individual image of their choice.


Now on to my project.


Hey Dude, meet Waylon Waves; he's one cool surfer dude and is one of the new releases over at the Dude Time Doodles store.  He's colored with Copics and then I cut him out so he could be ridin' those waves.  The sun is the smallest die from the Eastern Rectangle set by Nellie Snellen and the caption is cut with the smallest die from the Deckled Edge Classic Ovals set from Spellbinders.  I used my Spica glitter pen to accent each letter.


Here's how I did the background.   (I got the idea from HERE.)  I took some tissue paper and spritzed it (a lot) with Glimmer Mist and Smooch Spritz.  Next, randomly place adhesive onto the cardstock and then begin placing the tissue paper on top.  I wanted bumps and waves (that's why you don't have adhesive everywhere).  After I was happy with it, I placed Waylon in the middle, tucking parts of the image under portions of the paper.  I also pop dotted his head, so it would look like he's riding a curl.  The white water was created using liquid applique.


Here's a side view, so you can see all the dimension.  Also, check out the board.  I covered it with glossy accents, which really made it look like it was wood (if you see the actual card).  I really didn't like the way the surf board looked until I added the glossy accents; it looked too dull and lifeless to me.  Now, I'm really happy with the way Waylon turned out.  What do you think?
Copic used: BG01, BG32    BG18, YR16, YR18    E35,E07, E43, C8, colorless blender     E000, E11, R20    YR20, YR31, YR21    B91, B93, B95 

Now it's time to check out what the rest of the design team has in store for you today.  You'll be able to see all the new releases worked up in projects and you'll be able to purchase any of the new images today in the store!


This Blog Hop doesn't have a starting and ending point, so no matter where you Hop, you are in the right place!  Just keep going until you've come full circle.  Be sure to leave some love everywhere you land, including here!
I'm so excited to link you to Miss Cleota next! 
I hope you enjoy all the projects we've designed for you!  Everyone on the DTD Design Team certainly had a blast putting it together for you!!
Don't forget all the images you see will be for sale in the Store by 10:00 am EST today!  Also, don't forget to leave each of us comments - we love to know what you think about our artwork (plus it just makes us HAPPY).
ENJOY!!
Thank you and have a Happy New Year!! 


Blog Hop Chain    [in case you get distracted by all the art]

Dude Time Doodles


We want to invite you to help us welcome Lynn as our newest design team member. She joined us as the Guest Designer winner in November and we absolutely fell in love with her and decided to keep her! 
Have an awesome 2011!!
Thank you for joining us! 
Anne and 

Friday, December 17, 2010

Christmas Mail


This shaped card was created using Spellbinders Classic Scalloped Ovals.  It's pretty easy to do.  Just make sure part of the die is hanging off your pre-scored paper so that it won't cut that part out.  When you open it up, your card is ready to enhanced.

I chose Heartfelt Creations' Cardinal Holiday Mailbox pre cut rubber stamp set for both my image and the sentiment inside.  I stamped my image with Memento ink and colored it in with Copic markers.  I highlighted the berries and the bow on the package with Smooch pearlized inks for added sparkle.  After cutting it out, the mailbox was layered onto a piece of patterned paper that was cut with a smaller Classic Scalloped Oval. 

For the cardinal, I stamped him onto glossy cardstock that I had applied alcohol inks to and embossed him.  Next I cut the cardinal out using the Cardinal Family dies made by Spellbinders for Heartfelt Creations.  Then I layered him on top of the mailbox for added dimension.


Here's a close up so you can see how sparkly the Smooch inks are.


And this is what the inside looks like.  Although the photo doesn't capture it very well, I chose a pine branch stamp from the Holly Berry Filler stamp set and used VersaMark ink to watermark the center and then stamped the sentiment on top of this monochromatic image with Memento inks.

Thursday, December 2, 2010

Christmas Morning


Who wouldn't want to wake up Christmas morning to a gorgeous Christmas tree with lots of packages underneath?  I think just about everyone, no matter your age : ).


This card uses two different digital images from Bonibleaux Designs.  The first is            O' Christmas Tree and the other is Presents!  Both are located under the "Christmas" section.  Copics were used to color in all the images.  After coloring the presents, I cut them out and adhered them under the tree.


After cutting the tree out with Spellbinders Curved Rectangles (#5, assumes #1 is the smallest), I outlined the edge with Scattered Straw Distress Stickles.  The ornaments and the star also have Scattered Straw on them.  I used Crystal Stickles to highlight the blue garland going around the tree as well as the center of the star.


This top layered is adhered to patterned paper from Creative Memories (that I had in my stash), which I corner rounded and added pearl accents to each corner.  Next, I adhered this layer to my base red cardstock and as a finishing touch, I spritzed Smooch Spritz all over the front.


Since the basic red cardstock looked so plain on the inside of the card, I used my Stampers' Anonymous Merry Christmas stamp and Versamark ink pad and randomly stamped on both panels.  Then I stamped the image again with Memento Tuxedo Black ink and highlighted it with a clear glitter pen.  I also randomly stamped a present in empty-looking areas (not sure of the manufacturer of this stamp) to fill out the inside.


Copics used (left in the groupings I used them in): YG17, YG67     E74     B12, B14, B16     Y06, Y08, Y13    B02, B04, B05, B18    G14, G17    RV08, RV09, YG00, YG01, YG21    V04, V05, Y19, Y38    R14, R17,    B39, B63      E07, E09     FRV1     R59,YR0000     BV01, BV02, BV04, BV17

Tuesday, November 9, 2010

Ms. Fluzzie - Sex Goddess


Ms. Fluzzie (also known as the Sex Goddess), as I affectionately dubbed her, is a rubber stamp image from I Brake For Stamps and she's located in the humorous seniors section.  I used a sample of the new Copic XpressIt blending paper and loved working with it!!  (It even cuts like a dream too.)  I'll definitely have to go buy some.

  As usual, I chose Copic markers to color her in.  I decided she has a very pale complexion, since she entertains inside most of the time.  It's hard to tell in the photo, but I used E000 and R20 for her skin tones, using E000 multiple times and letting the ink dry each time, thereby giving it a little darker look each time.  The other colors I chose are listed below.  I also highlighted the feathers with a Pink Star Gelly Roll pen by Sakura.

I was a bit trigger happy with my Smooch Spritz too.  Both the base card, which was cut using the new Grand Scallop Circle (#2 - assuming #1 is the smallest) by Spellbinders, and the intricately cut paper lace (from the new Cricut cartridge called Paper Lace) was sprayed with Pink Sprinkles Smooch Spritz.  The background for the paper lace was sprayed with Gingersnap Smooch Spritz.  

On the inside of the card, I stamped my sentiment with Rocket Red Gold, a very shimmery, shiny pigment ink by Brilliance.


All in all, a VERY glittery sparkly card - sort of like I would image Ms. Fluzzie's personality to be.

Sunday, August 29, 2010

Tag, you're it!


For this butterfly tag, I used part of a Tatter Angels Glimmer Screens (Fanciful Screens) butterfly mask and spritzed Midnight Blue Glimmer Mist and Cherry Ice Smooch Spritz all over.  After removing the mask, I colored in the butterfly with Sundance (yellow) Smooch Pearlized Ink.  The final step was to thread deep red  ribbons through the tag opening.

This is a fun and quick way to make a tag.  You can use almost anything for a mask - just be sure it doesn't move when you are spraying your color.  This tag is very shimmery and glittery in person.

Head on over to Let's Ink It Up's first challenge:  have yellow in your design.  Also check out Stamping Vacation's challenges.

Monday, May 17, 2010

Hogs & Sketches Challenge #8


I recently discovered Hambo Stamps and saw they had monthly challenges, not to mention really cool stamps.  For this month's challenge, I downloaded a couple of their digital stamps and went to work coloring them. 

The background is a sponged technique using Distress Inks for both the sea and the clouds.  I cut out my images and layered them onto my background.  I also pop-dotted the yellow fish because I wanted him to look like he jumping out of the water. 

I combined Copic markers and Smooch pearilized accent ink (paint) for my coloring.  The Copics I used were E00, E01, E11, R20 for the skin tone; E27 and E37 for the hair; E07, E09, E17, W1 for the boat; B000 and colorless blender were used for the sail. 

Although you can't see the shimmer and glimmer on the fish and the guy's shirt and hat, they look pretty cool in person.  I just received some of the newest colors of Smooch and was so excited to find they would work for this project.  The fish have Sunshine, Carrot, and Sassy Pink; the hat is Siren red; the guy's shirt is Olive Twist and Sunshine; the mast is Molassas and Silver Fox; and the rope is Snickerdoodle.


Monday, March 22, 2010

Smooch direct to stamp technique

For this card, I applied Smooch (Pool) ink directly to my stamp and then stamped it onto my cardstock.  The stamp is from Stampers' Anonymous and line stamps work better than solid stamps.  (At least to me - I don't have the patience it takes to color that much of a stamp in.  I started one and quickly found a different stamp to experiment with!)   It worked really well.  You get a lot of shimmer and the image is actually raised on the cardstock, so it feels a little like you embossed it.  It is much cooler in person than in the picture (you'll have to take my word for it, unless you live near me and want to see it).

I cut the stamped image out and layered onto Core'dinations cardstock and then layered on black cardstock.  I used a new purchase to cut this image out - Color Bee scissors by EK Success - LOVE THEM!!!!  I was using precision cut scissors from Fiskars and thought I really liked them.  I had been searching other blogs and noticed a few had mentioned the Color Bee scissors (these are in the same family as the Cutter Bees, but with titanium blades).  What an amazing difference!! It was like cutting butter with a hot knife. 
One other thing I tried before cleaning my stamp (just used soap and water) was stamping it multiple times without reapplying ink in between stampings.  From left to right: the first image is the first time I stamped it, the middle is the second time and the right is the third time.  As you can see, they do get progressively lighter.  The last one would be good for a subtle background.

So, I experimented with two new things today and I loved them both - a lot!  When you have a chance, definitely try out this technique (I think you'll like the results)  and you'll be really happy if you purchase the Color Bee scissors as well.  Enjoy!

Wednesday, March 17, 2010

Lady in Yellow

Shades of purple and yellow.  This week, I'm experimenting more with Smooch inks and spritz.   The image is from Dog Gone Stamps and I colored her in with Copic markers (my favorite).  After coloring, I made a mask of the image and used Smooch Spritz (grape) to create the background.  I love Smooch Spritz' because of the glimmer you get without lots of splotchiness and you can always make it darker by spraying more layers.  The jewel toned brads match the shades in the dress perfectly (almost like I bought them specifically for this image).  Enjoy.

Monday, March 8, 2010

Happy St. Patty's Day

May the luck of the Irish be with you.....So what could be more lucky than to find a pot of gold at the end of a rainbow?  This card is a little different because none of the stamps were originally intended to be for St. Patrick's Day.  The cauldren was for Halloween, the money for a pirate theme and the rainbow was just that.  It's really fun to think of new uses for existing stamps...try it and let me know what you come up with!

I airbrushed the background, pale blue for the sky and pale greens for the grassy area, using my Copic markers.  I stamped  and cut out all the images, including stamping the coins and the rainbow (for the clouds) several times..  I made a slit in the lip of the cauldren so I could tuck some of the coins inside, so it would look like they were overflowing.  Smooch inks were used to highlight the coins and to color in the rainbow.  Distress stickles (Rock Candy) was used to make the clouds look more dimensional.  My original intent was to use Flower Soft for the clouds, but I didn't want THAT much dimension.  (Isn't that why we have so much product ...so we can change our mind?).  I also stamped a couple of shamrocks on the inside of the card as well.