Showing posts with label fun foam. Show all posts

Wednesday, September 19, 2018

Moonlight {Scrapy Land #98}


Hey everyone!  It's the third Wednesday of the month (already!) and that means it's time for a new Scrapy Land Challenge.  As always, the theme is Anything Goes using any brand of die that Scrapy Land sells.  Here is a complete list of over 55 brands of dies sold and here is the list of the newest arrivals.

The dies used for this watercolor project were:


Hero Arts: Trellis (here are some other options)
Spellbinders: Grand Dome 3D Card (any type of die with an oval top will work)
Sue Wilson Designs: Noble dies-Double Pierced Rectangles, Set B
Sizzix: Tim Holtz-Funky Floral #3
My Favorite Things: Fresh Cut Grass (here are other options)


This project started out by my stamping and watercoloring various watercolor stamps from Art Impressions to create this kitty in the moonlight.  After this was completed and dry, I used the 3D Dome die to cut out the image.  I cut off the side pieces that make this die cut into a dimensional card.


Next I die cut the Hero Arts Trellis from black cardstock and heat embossed it using Clear embossing powder.  I wanted a wrought iron type of look.  I die cut it a second time from brown fun foam to add dimension to the gate.  I love how these gates can actually open and reveal what's behind them.

The blue background mat behind the focal point was dry embossed using a Crafters Companion embossing folder (Distress) and then I went over the raised areas with Nuvo Embellishment Mousse (Cornflower Blue).  To me, it resembled stars in the night sky😀.

Once these were adhered to my black card base (die cut using the Sue Wilson die), I began building my layers of flowers and greenery along the sides of the gates.  I die cut several of the dies from the Funky Floral set from white cardstock and colored them with Copic markers.  Although it's hard to tell in the photo, I added Spectrum Noir Sparkle marker to the grass.

Now it's your turn to play along.  You have until Sunday, Sept 30 to upload your crafty project to the Scrapy Land Challenge.  It can be anything from CAS to grungy to mixed media and everything in between.


The count down has begun.... only two more challenges before we celebrate our 100th Challenge!  Mark your calendars for Oct 17 because you're definitely going to want to get in on the fun and win some fabulous prizes!

Wednesday, July 4, 2018

Fireworks


Happy 4th of July to all my American friends!

It's also the first Wednesday of the month and time for a new Scrapy Land Challenge.  The theme is always anything goes using any brand of die that Scrapy Land sells.

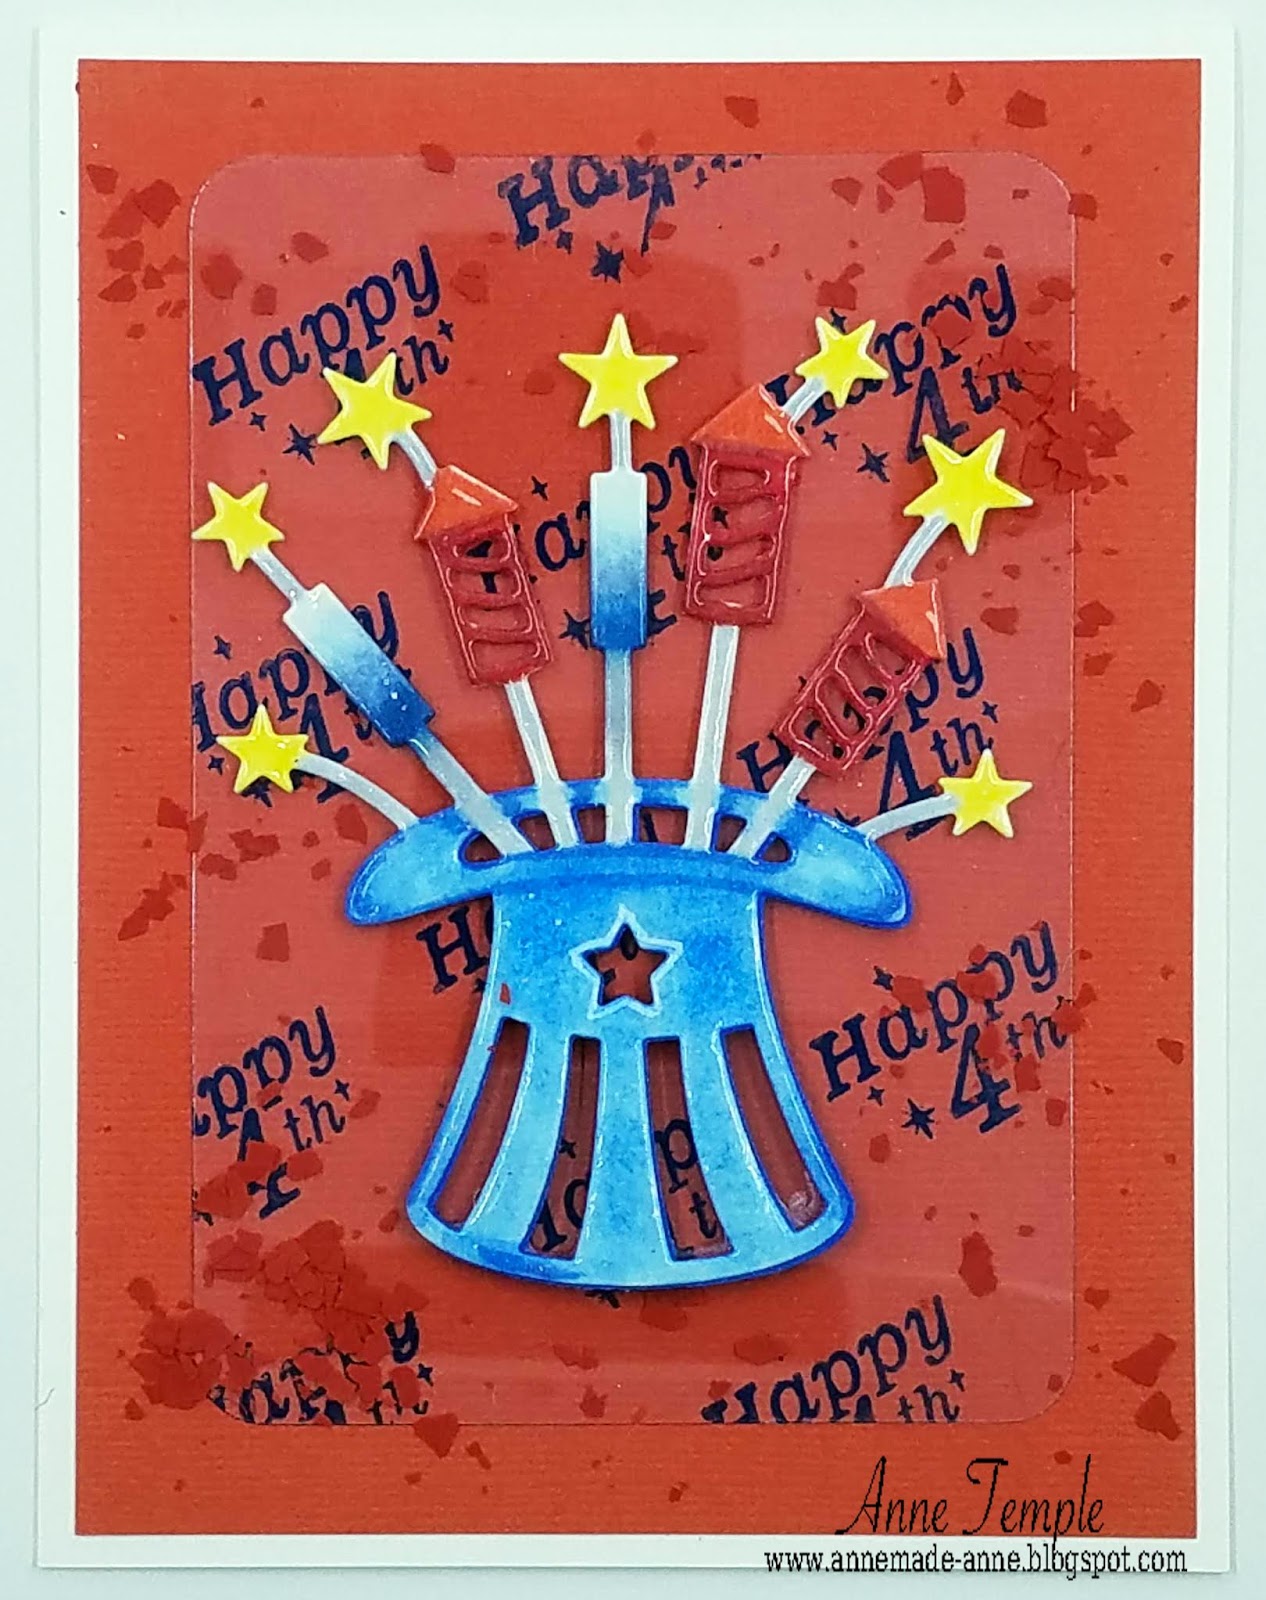
As you can tell, I went with a Patriotic theme and used the following dies:
Die-Versions: Fireworks (other patriotic choices are here)
Memory Box: Rectangle Basics set

Start off by die cutting a solid piece of cardstock with the larger rectangle die.  Then go down a couple sizes and die cut a piece of acetate (or recycled packaging material like I did) and use a corner rounder to round the corners.

Next I added the sentiment to the acetate by stamping in Archival ink (Manganese Blue).


I die cut the Fireworks die cut twice, once from fun foam and once from white cardstock.  I colored the cardstock using Copic markers and then added Clear embossing powder over the whole thing for a shiny look.  After this was completed, I adhered this to the fun foam for added dimension.

As a final step, I added more texture by adhering Scarlet Fragments (by Stampendous) randomly around the background.

Now it's your turn to join in on the fun.  There are two winners and both will receive a $10 gift certificate to go shopping at Scrapy Land.  You have until July 15 to upload your projects.  


Wednesday, April 4, 2018

Happy Mail {Scrapy Land #87}


It's the first Wednesday of the month and that means it's time for a new Scrapy Land Challenge.  The theme is always Anything Goes using any brand of die that Scrapy Land sells.

For today's project, I used the following dies:


Impression Obsession: Mail Box
Impression Obsession: Grass
Sue Wilson Designs: Just A Note
Sue Wilson Designs: Backgrounds-Swirly Vine

We will be moving in a few weeks and I think this design will be perfect to send our change of address to all our friends that live near and far.

The background is a scrap of fabric that I adhered to a piece of cardstock.  The Mail Box die set is a three piece set, so you can easily cut as many envelopes as you like.  The top envelope is decorated with Nuvo Crystal Drops (Red Berry) to form the heart.

The post is also separate, so you can quickly run that specific die cut through an embossing folder.  I used the Sizzix (Woodgrain) embossing folder and colored the cardstock with Distress Inks (Ground Expresso, Tea Dye).

The sentiment was cut twice, once from fun foam (for dimension) and once from cardstock.  I added the white dots to the solid cardstock using a Sharpie white paint marker.

The Swirly Vine die was also die cut from white cardstock and adhered to the fabric.  The mailbox and tall grass was then tucked in the back of the frame.


All in all, this card came together fairly quickly and I think it will be easy to make lots of multiples of.

Now it's your turn to create a project and upload it to the Scrapy Land Challenge.  You have until April 15 to upload your project.  Two winners will be chosen from all the submissions and each will receive a $10 gift certificate to Scrapy Land.  Happy Crafting!


Wednesday, May 17, 2017

Just A Note {Scrapy Land Challenge #66}


Today is the start of a new Scrapy Land Challenge.  The theme is Add Pearls and/or Lace, plus use any brand of die that Scrapy Land sells.

For my project, I created a very simple, yet elegant card using just two dies.


I die cut the Petite Arched Adornment die five times and then adhered the pieces together.  This is what the adornment die looks like I was finished with my arrangement.


The sentiment was die cut from white cardstock and then white fun foam (for added dimension).  I colored the sentiment with Zig Watercolor Brush markers.  Pearls were added to the four corners of the Adornment piece as well as the corners of the first mat.


We hope that you will join us for this Scrapy Land Challenge.  You have until June 4 to upload your project.  The winner, which is chosen by the Design team members,  will receive a $15 gift certificate to go shopping at Scrapy Land.

Wednesday, February 15, 2017

Peacock Feathers


It's the third Wednesday of the month and that means it's time for a new Scrapy Land Challenge!  The theme for this challenge is Add Texture, plus use any brand of die that Scrapy Land sells.

Now that's a pretty broad field and can mean anything from added glitter, dry embossing, cheese cloth, embossing paste, and the list can go on an on.  For my card, I added dry embossing, heat embossing with glitter, and Nuvo glimmer paste for my various textures.

The following dies were used to create my shadowbox style card:


Die-Versions: Love Frame
Impression Obsession: Tied Line
Sue Wilson Designs: Italian Collection Background

The arch behind the Peacock Feathers is also a die cut, but I had borrowed it from a friend and for the life of me I can't remember who made it.  If you know who the manufacture is, please let me know so I can give them credit.

To create this shadowbox card, I started out by spritzing a piece of watercolor paper with water and then randomly adding yellows, reds, and oranges of Color Bursts.  This was spritzed again with water and I kept adding and drying until I was happy with the results.

Next I die cut the Sue Wilson background die and then ran it through my die cutting machine a second time with the embossing mat to dry emboss it.  This step really brings out the veins on the leaves.  I lightly spritzed this layer with a homemade glimmer mist (water and Perfect Pearls).  Unfortunately, the added bling is so subtle that I can't get the camera to pick it up (but it looks great in person 😃).  I then added a double layer of dimensional foam tape to the back of the die cut so that it would look like a shadowbox with the watercolors in the background.

Another option would have been to add a piece of acetate sheeting to the back before adding the dimensional tape and then adding some sequins to make a shaker card.  That would have really given it lots of texture.


To create the Peacock feathers, I began by taping down the Peacock Feather stencil from Stampendous/Dreamweaver down onto a piece of acetate.  Then I randomly added three different colors of Nuvo Glimmer Paste (Tanzanite Lavender, Peridot Green, Blue Topaz).   After the Glimmer Paste was dry, I cut around the outside edges of the feathers. I had so much fun making these that I made several and will use them in some future projects coming up.

The backdrop for these feathers is a die cut piece of patterned paper that I enhanced with a little Distress Ink (Mustard Seed, Vintage Photo).  This helped the feathers to be more of a focal point.

The "Love" sentiment is part of the Die-Versions Love Frame die that I cut out of fun foam and then heat set it to make it shrink.  Once it was shrunk down to a smaller size, I applied VersaMark and Royal Violet embossing powder and heat set it again.

For the bow and string, I die cut the Tied Line from Impression Obsession twice and fanned out the strings on either end and glued the two pieces together.  I then added VersaMark and heat set this with more Royal Violet embossing powder.

Now it's your turn to join us for some fun.  Maybe try a new technique that gives texture, or use one of your tried and true formulas.  Either way, I hope you join us for this Scrapy Land Challenge.  You have until February 26 and the winner (chosen by the design team) will win a $15 gift certificate to go shopping at Scrapy Land.  New Arrivals are added all the time!


Thursday, February 9, 2017

LOVE


I have a Valentine's card to share with you today and it features the new Love Frame die from Die-Versions as well as the Love You Sweet Spot, also by Die-Versions.


This was a fairly quick and easy easel card to create.  I knew I wanted lots of layers and I started out thinking I would make one of those collapsible boxes. But as I was playing around with the layers and figuring out how many I wanted, I decided my idea would be too heavy and went with the easel card instead.  The papers are digi papers from Crafters Companion (Love themed papers) that I've had for a while.

I die cut the Love Frame four times - three times from white cardstock and three times from white fun foam.  I wanted to show lots of dimension, so I adhered one of the white cardstock pieces onto one of the fun foam pieces.  Next, I cut out the word "love" from the center of both a fun foam and a cardstock piece.  I adhered these together and then adhered this to the original layer.  The final layer is just the roses, which I cut from the last fun foam piece.  I colored the roses with Copic markers and added Lavender Iris glitter by Sparkle N Sprinkle to the petals for lots of sparkle.

When you open the card and stand it up, the "you" both completes my sentiment and gives the top a place to rest and remain upright.  For this piece, I used the Sweet Spot love you die.  I die cut it from white fun foam and cut off the word I wanted.  To finish it off, I used the top portion of the Love Frame die cut from the last piece of cardstock and used it to frame the word "you".

Would you like a discount on your Die-Versions purchases?  Who wouldn't, right!?  Use the code "anne15" when you check out and you will receive a 15% discount on the everyday prices on everything you purchase.

Be sure to visit the Die-Versions Blog to see what the rest of the team has been up to.

Wednesday, October 19, 2016

Skeleton Cowboy {Scrapy Land #52}


It's the third Wednesday of October and that means it's time for a new Scrapy Land Challenge.  The theme for this challenge is Halloween (plus use any brand of die that Scrapy Land sells). Halloween is only a couple weeks away.  We usually get lots of trick or treaters and it's always fun to see the little ones dressed up.

This Halloween card was a lot of fun to create as I decided to use a Western theme for my card.  The following Die-Versions dies were used to create this card:


Die-Versions Western Horse (temporarily out of stock)
Die-Versions Black Cat Wishes (retired - image from my blog)


I started out by die cutting the skeleton out of white cardstock and then colored him with a Spectrum Noir Sparkle marker (clear).  After die cutting the cactus, the horse, and the stagecoach,  all were colored with Pan Pastels.  I also die cut the cactus multiple times from fun foam so that I could add dimension to the one on the left.

To create the background, I used various Pan Pastels to replicate what I image a setting sun in the desert would look like.  In real life, the lower portion of the background is browns (like dirt) and the rest is reds and oranges.  Unfortunately, the photo didn't capture a lot of the details and the die cuts covered up much of the horizon line.  But I think you get the idea :-).  My photo did manage to capture a skeleton "ghost" in the sky.  (It's really the shadow of the skeleton on the horse as he is on the saddle side-ways.)

The sentiment is from the Black Cat Wishes die (no longer available).  I fussy cut out the part of the sentiment that I wanted and then added Spectrum Noir Sparkle markers to it for sparkle.  The card base is heavy glitter paper cardstock that I had I had in my stash.

This is a very dimensional card and I'm going to enclose it with my son's Halloween goodie box.  (You're never too old to receive Halloween treats :-). )

You'll have until October 30th to upload your Halloween project to the Scrapy Land Challenge.  It's always really helpful if you let us know which dies you used in your projects.  The winner, which is chosen by the Design Team, will receive a $15 gift certificate to go shopping at Scrapy Land.


Wednesday, March 23, 2016

Easter Blessings


As Easter is only a few days away, I'm sharing a card created with the new Holy Bible die from Die-Versions.  I die cut it first in white cardstock and then fun foam.  Be sure to save the small crosses as they are the perfect accent size.  (You can see where I used one on them by the sentiment on this card.)

I colored the pages and the fun foam small crosses with a gold leaf pen and the rest with Spectrum Noir Sparkle markers.  The cardstock piece was adhered to the fun foam for added dimension.   


Once the gold leaf was dry on the fun foam, I inlaid them back into the Bible.  The sentiment was created on my computer and printed onto vellum.  I heat set the ink with Clear embossing powder.

After adding a strip of ribbon across the focal panel, it was pop dotted and adhered to the card base for even more dimension.  This CAS card is pretty straightforward and would be quite easy to create multiples of.   I think this die would also be great on a First Communion card, a sympathy card, or even a Newlywed card, just to name a few other ideas.

Remember to use the code anne15 to get a 15% discount on all your dies at Die-Versions.  Add the code to your shopping cart when you're ready to check out.  And don't forget to visit the Die-Versions Blog to see what the rest of the team is creating with these new dies.


Wednesday, February 24, 2016

Mr and Mrs


Today's card showcases the new Nesting Flowers die set and the new Heart Border die from Die-Versions, plus a few of the DV Sweet Wordlets.  One of the things I do when I receive any new die is to die cut it from scrap cardstock.  Then I go from there.  Today's card idea all started with the negative pieces (the tiny hearts) from the Heart Border die.

I also recently received a couple new colors of Nuance pigment powder (Hot Pink and Red) and I wanted to create a sample for future reference.  I had left overs and decided to die cut the Heart border from a piece of this to see what it looks like actually cut.  I was pushing the negative pieces together in a pile and immediately thought how fun these would be in a shaker card. That's how it all started.

The Nesting Flowers die set makes a fantastic shaker.  I created more of the watercolored cardstock with the Nuance powders so that I could cut out the shaker piece as well as the "flower" next to it.  A quick trick to making sure all the curves are secure and that none of your shaker pieces will escape is to die cut the same shape from fun foam and adhere that to the cardstock.  The clear acetate is actually from some packaging material that I had saved.  (If it isn't too scratched, then I cut it down and save it for projects like this.)

Before adhering the acetate top to the base, I die cut the Sweet Wordlet "Love" from the watercolored cardstock and adhered that to the base.  The hearts move, but the word does not.

The second "flower" idea came about from seeing a Spirelli tutorial and thinking that the nesting flower die could be used for a variation of this.  More of the negative hearts were also adhered to this piece.

Instead of creating a Valentine's type of card with these dies, I thought they would also be perfect for a couple just getting married.  The "Congratulations" and "Mr. & Mrs." are more DV Sweet Wordlets.  Although the camera didn't capture it, the black cardstock was spritzed with a homemade spritzer (Marion Smith Designs Whisper pigment powder and water) for added shimmer.

Be sure to visit the Die-Versions Blog to see what the rest of the talented team has created.  And remember, if you'd like to receive 15% off your next Die-Versions order, use the code anne15 when checking out.  This code works for the everyday sales price and you can use it every time you order :-).  Have fun shopping!


Wednesday, February 17, 2016

With Sympathy {Scrapy Land #36}


It's the third Wednesday of the month and that means it's time for a new Scrapy Land Challenge.  Don't forget there is a guest designer call going on too.  The theme is Tie One On (include either a ribbon or die cut bow on your project). Plus, include any brand of die that Scrapy Land sells.

The dies used in this project are:

Elizabeth Craft Designs: With Sympathy
Elizabeth Crat Designs Stitched Ovals
Elizabeth Craft Designs: Garden Notes-Hydrangea
Sue Wilson Designs: Trailing Ivy


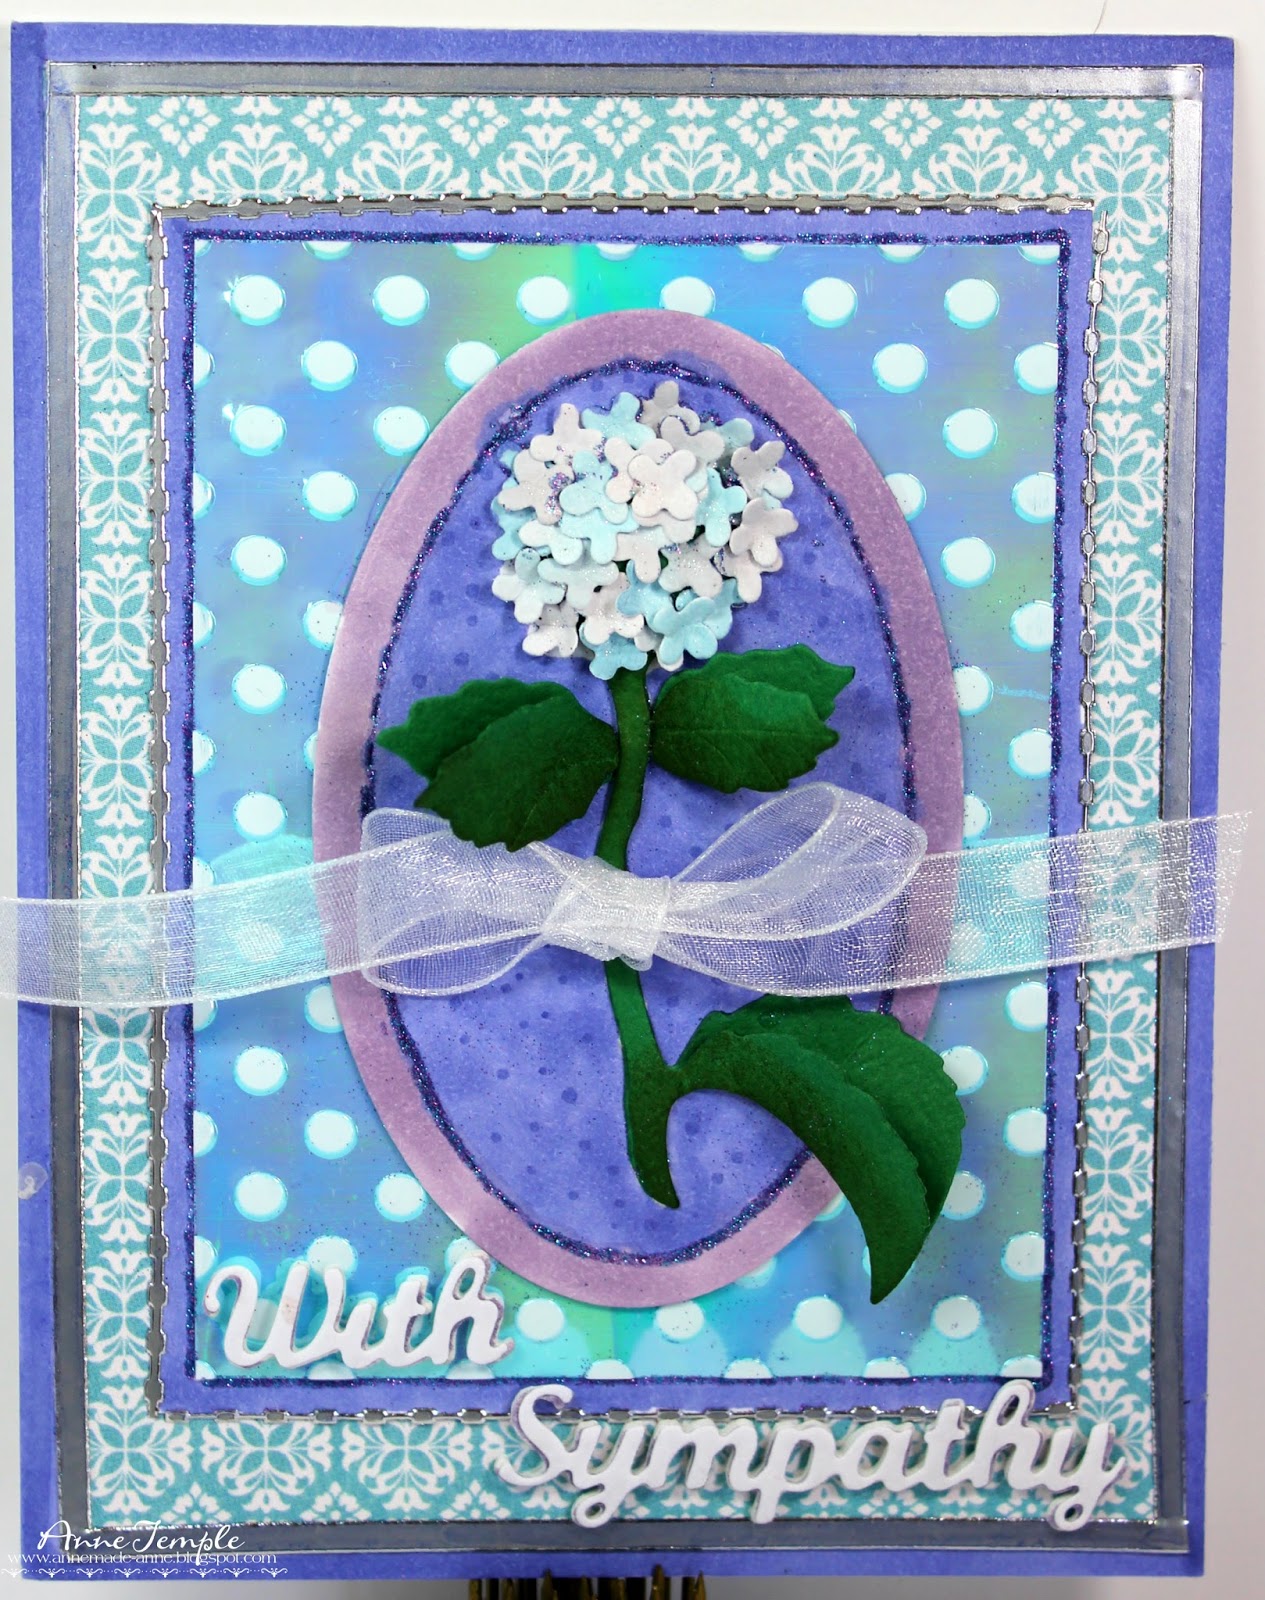
This is a sympathy card that was created using dies and Copic markers.  The focal point was created using Elizabeth Craft Designs die (Susan's Garden: Garden Notes - Hydrangea).  The Stitched Oval background (by Elizabeth Craft Designs) was die cut from white card stock and then colored with coordinating Copic markers.  I added glue around the stitches with a Sakura glue pen and covered it with Sparkle N Sprinkle's Pixie Violet velvet glitter.

A piece of Elizabeth Craft Designs shimmer sheet was dry embossed for the background piece and the With Sympathy sentiment, also by Elizabeth Craft Designs, was die cut from white card stock and then layered onto fun foam for added (and easy) dimension.

A sheer bow was added for the finishing touch.


For the inside of the card, I added a stamped sentiment from I Brake for Stamps and framed it with a Sue Wilson Designs (Trailing Ivy) die cut.  These were colored with Copic markers.


Monday, February 15, 2016

Disco Fever


Disco Fever is one of the three new stamp sets revealed this month by Sparkle N Sprinkle.  All four of the new Neon Glitters - Energized! (orange), Electrified! (yellow), Exulted! (hot pink), and Exhilarated! (green) were also incorporated in this fun card.  

I started out by printing out the digi version and coloring her with Copic markers.  I also drew in the fish net stockings. Energized!, Electrified!, and Exulted! were added to her outfit.  Gold Detail embossing powder cover her belt and earrings while Ebony Spark embossing powder was used to cover her disco boots.


I wanted the card to look like a night club so the walls had to be dark.  To achieve this look, I took a piece of black cardstock and covered it with Sparkle embossing powder.  I love how this embossing powder looks so different depending on what color cardstock you use it on.   What disco club doesn't have a Disco Ball?  The Retro Disco Ball (by Die-Versions) was covered in Silver Dreams glitter.  This has a kaleidoscope of colors in the glitter and is perfect for this die cut.

The swirly background was created by die cutting the Scribbles Cutting Plate (by Taylored Expressions) from a piece of Super Adhesive Sheet.  After exposing the adhesive, I covered it with Exhilarated! neon glitter.

I also printed the sentiment and added Dimensional Glue and Energized! to part of it.  The Exulted! glitter ribbon was added a finishing touch to this very bright and vibrant card.


Friday, January 15, 2016

Pagoda


Have you seen the new Asian dies recently released from Die-Versions?  If not, you should definitely check them out.  I want all of them :-).

For today's card, I used the new Pagoda die.  I started out by die cutting it out of white cardstock and a piece of red fun foam.  I used my Copic markers to color the pagoda. Bright yellow paper was adhered to the back of the die cut for the little cut outs.

Once I was happy with the coloring, I heat embossed the entire thing with Clear embossing powder by Ranger.  I love how this makes it look like the pagoda is painted with glossy paint.  Then I adhered this to the fun foam for more dimension.

For the background, I started out with a piece of watercolor paper and used a Dreamweaver stencil (Cherry Blossoms) to add the flowers using Zig Clean Color Real Brush markers.  I free-handed the mountains in the background using the Zig markers.  The sky was also watercolored with these Zig markers and a aqua brush.

Remember you can use the code anne15 to receive 15% off your Die-Versions purchase.  So what are you waiting for?  Have fun shopping :-).