Showing posts with label tag. Show all posts

Wednesday, June 17, 2015

Key to my Heart


This week's Scrapy Land Challenge was an easy one for me.  The theme is Use Your Favorite Color plus any brand of die that Scrapy Land sells.  Hope that it's obvious that my favorite color is RED.

The dies I used for this tag were all from Die-Versions:
Die-Versions: Vintage Heart Locket
Die-Versions: Vintage Keys
Die-Versions: Frank font
Die-Versions: Heart Doodles

Deco Foil is such a hot trend right now and I wanted to join in on the fun.  There are lots of You Tube videos out there showing you how to use a laminating machine, how to use embossing powder, how to use Thermo-Web's specifically designed adhesive, and the list goes on and on.   Well, I didn't feel like fooling with my laminating machine and I didn't have the special adhesive, but.....I thought "Why won't it work with my SNS Tear-ific Tape?  It's super sticky and holds just about anything."  So I gave it a go and am so happy with the results.

I used my 2 1/2" double sided Tear-ific Tape and adhered one side to cardstock and die cut out my Vintage Locket, Heart Doodles and my letters.  Next, I peeled off the protective liner from the die cuts and placed the Deco Foil (non colored side) against the adhesive.  I burnished the foil into the adhesive with my fingertip and peeled off the remaining piece of Deco Foil.  I didn't have any bare spots or gaps or wrinkles.  Worked like a charm!  (Of course, after I did this and created my project, I saw yet another blog where that person thought the same thing I did and used the adhesive she had on hand.  Great minds.... :-).)

If you frequent my blog, you'll know that one of my favorite ways to add dimension to a die cut is to use fun foam.  What if you don't have any fun foam handy?  What do you do then?  Well, die cut 3 or 4 pieces of the shape you want and glue them together.  That's what I did today for the key.  I then covered the top layer with Versamark, sprinkled a heavy amount of Silver Lightning embossing powder on it, and heat setting it (after replacing the excess embossing powder back into my container.

I did use fun foam to add dimension to my KEY letters and adhered them to the fun foam after applying the Deco Foil.


For the background on my manilla tag, I started out by adding Distress Ink (Spun Sugar) to the entire thing.  Then I used my Falling Snow stencil and added Tattered Rose and Victorian Velvet Distress Inks.  It left a soft background which made the red Deco Foil pop even more.   A couple layers of lace and ribbon finish off my vintage looking tag quite nicely.  The ribbon was white and I dyed it using the same colors of Distress Stains.

Now it's your turn to upload your project using your favorite colors to the Scrapy Land Challenge #20.  Be sure to include any brand of die that Scrapy Land sells.  You will have until June 28th and the winner will receive a $15 gift certificate to go shopping at Scrapy Land.


Monday, March 16, 2015

Express Yourself


Expresso Yourself is one of the March new reveals from Sparkle N Sprinkle.  I used the digi version (DIGI699) and created a tag.

After printing and coloring the image with Copic markers, the image was die cut using a Spellbinders die (Labels Four) and the edges distressed with Distress Ink (Tea Dye).  Caramel embossing powder was added to the swirl on the coffee cup and Gypsy Red velvet glitter was sprinkled over SNS Dimensional Glue added to the steam.

The tag was created using Wendy Vecchi's Splattered Plaster Technique by combining Archival inks (Manganese Blue and Saffron) with rubbing alcohol and spritzing with Dylusions Ink Spray (White Linen).  Once this dried I stamped images from the SNS Journal Mixed Media set.  The coffee rings were stamped with VersaMark and heat embossed with more Caramel embossing powder.  The other images were stamped with the Archival inks.

I created a ribbon flower and added twine for a finishing touch.

Monday, February 9, 2015

Stanley Valentine


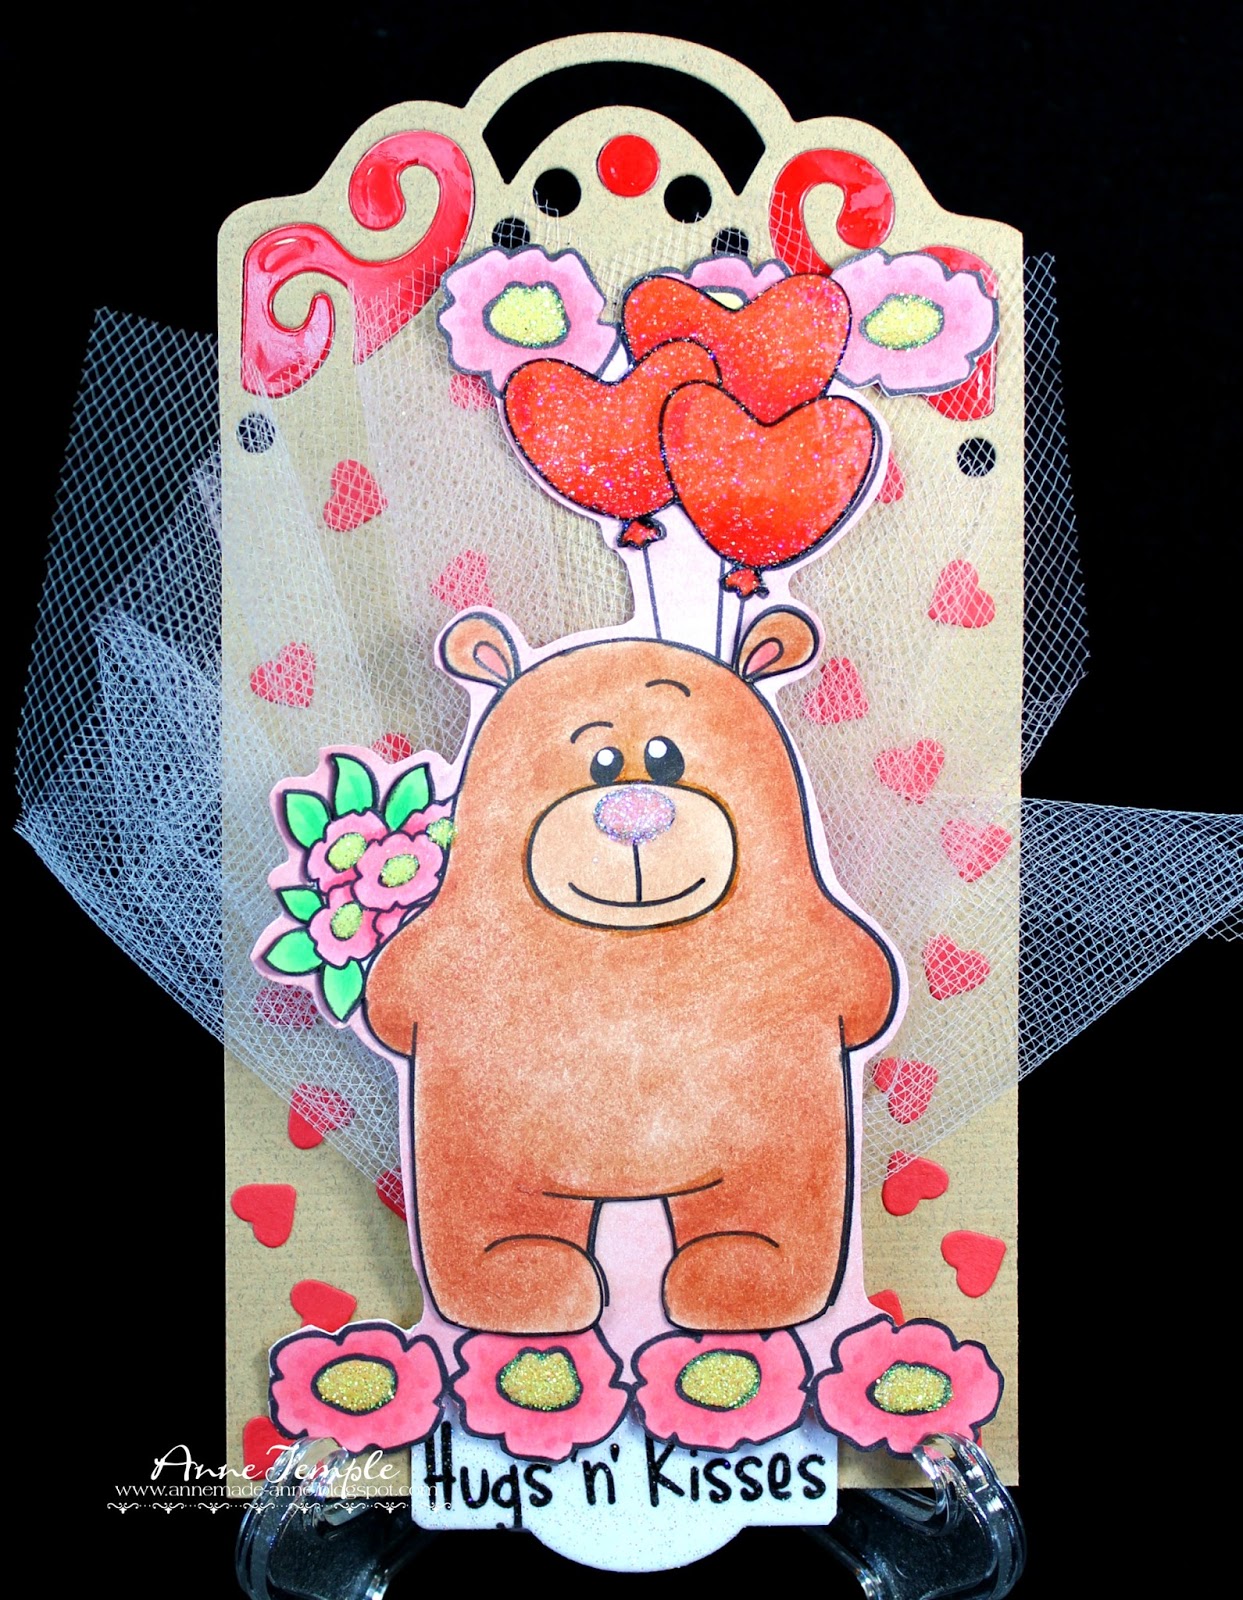
Today I'm showcasing Stanley Valentine, one of two digi-only sets released this month from Sparkle N Sprinkle.

I started off by combining the flower borders and Stanley in my Word software and printing the image twice. The second Stanley is layered directly on top of the main one, as are the heart balloons.  Both the image and the flower borders are colored with Pan Pastels (Burnt Sienna, Red Iron Oxide, Pearlescent Red, Pearlescent Yellow) and then layered on top of some tulle.

 I decided to create a tag using one of my new dies from Elizabeth Craft Designs (Tags and More 1 - Lace) which die cut the top and intricate cut outs at the top of my kraft paper.


The small hearts behind the focal point are actually the negative pieces die cut from the Die-Versions Love Doily.  Bubble Gum glitter was added to his nose and Caution Yellow glitter creates the sparkle in each of the flower centers.  

I printed the sentiment, part of the set, onto cardstock, die cut it with a Taylored Expressions die (Simple Tabs), and heat set the tag with Sparkle embossing powder.  The balloons were also covered with VersaMark and heat set with Sparkle embossing powder for a shimmery look.


Thursday, February 5, 2015

Gift Tags


The Winter Wonderland coordinating Die-Stamp sets (Winter Wonderland dies; Winter Wonderland stamps) from Die-Versions were used to create today's card.  It's a quick and easy one, so you could create multiples in no time flat.  In addition to the Winter Wonderland images, the Sweet Wordlet "To: From:" was also added to each of my tags.  These little tags would also be great to add to presents as well as on a card front.

The images were stamped with Mementio ink and colored with Copic markers.  These small manilla tags were purchased at a scrapbook convention and I added A Wink of Stella (Silver) along the edges.  Spica glitter pens added sparkle to the snowflakes on the last tag.


Monday, August 11, 2014

Witchy Gerty


Witchy Gerty, from Sparkle N Sprinkle loves Halloween and her favorite costume is a witch (surprise, surprise).  She loves going all out, including adding glitter to her fingernail polish :-).


Gerty is colored with Copic markers and then fussy cut out.  The apron is paper pieced.  Orange Surprise glitter was added to her nails and her hat band, as well as for the background.

The spider webs are dry embossed using an old QuicKuts embossing folder (appropriately named Spider Web), and then heat embossed using a Versamarker and Silver Pearl embossing powder.

The spider shaped buttons were enhanced using the Customize your Brads/Buttons technique and Ebony Spark embossing powder.  This is such a fun way to add sparkle and bling to your embellishments.

Thursday, May 22, 2014

Floral Flourish


This new rubber stamp set, Floral Flourish, from Sparkle N Sprinkle just screamed to be heat embossed.  So that's what I did :-).

I stamped the image with Adirondack ink (Meadow), quickly heat embossed it with Clear embossing powder (since it is a dye ink and dries faster than pigment inks), and colored it with Copic markers.  I actually stamped the image twice and fussy cut both out, so it would have a bit more dimension on the tag without adding any pop dots.

The background for the tag was created using another soon-to-be-released set from Sparkle N Sprinkle called Journal Mixed Media.  I stamped the journaling stamp multiple times (and in random directions) all over the tag and then heat set it with Clear embossing powder.  Next I dug out my rarely used Chiffon White pigment ink (by Color Box) and randomly stamped the second image (it sort of reminds me of fencing or chicken wire).

Before the pigment ink was dry, I sprinkled Starfire glitter over and it stuck (even when I brushed it with my fingertip).  Just to make sure the glitter stayed in place, I also sprayed the tag with a matte sealer.  This did darken the background kraft cardstock slightly.  But the good news is that the darker background does make the image pop off the tag even more.

The sentiment, also part of the Floral Flourishes set, was stamped onto a sentiment banner from Simon Says Stamp.  I added a bit more Starfire glitter around the edges of the banner using a Sakura glue pen.

Scroll down (or click here) to see the winners of the SNS May Release.  Nana Connie was the commenter who won from my blog.  :-) Congrats to all the winners.


Monday, March 31, 2014

You Are my HERO


I hope you've enjoyed seeing the Die-Versions new releases this month.  As I mentioned in the Die-Versions/Operation Write Home Blog Hop (you can see that post here), these dies are a fundraising product to help OWH.

For my last project this month, I created a fun tag using a digi from Bugaboo Stamps (kidlet army) and a few Die-Versions dies.  These include the new Hero with Star Sweet Phrases die, the You Are Express Edge, and the A Little Mint font.


As you can see from the close-up of the digi, I printed him a couple of times so I could add dimensional dots behind his helmet, arm, and shoe.  He's colored with Copic markers (as usual for me).  One thing I did, but it doesn't show up very well in the photos, is that I used pop dots with different thichness to give it a more realistic look.  On his arm, I used a thicker pop dot near his hand and a thinner one by his elbow.  I also used thinner pop dots on the sides of the helmet and a thicker one in the middle.  This gives a great effect, so you might think about varying the heights of your pop dots in the future too.

 The tag background was created using a variety of Distress Stains.  I just kept adding colors until I was happy with the results (so I didn't write any of them down).

For the Hero with Star Sweet Phrases die, I die cut it in several colors and paper pieced the inside, so it still looks flush.  This photo shows the shiny mirrored cardstock the best.  Since you can't use glitter on any OWH project, this was one way I could still give it a lot of shine.


Saturday, March 29, 2014

Earth Day


Today, we're celebrating Earth Day over at Time4Scrap.  The sponsors for this challenge are Delicious Doodles and Dilly Beans.  I've used Tula's Heart from Dilly Beans.

I started off by dry embossing a tag with the Enchanted embossing folder by Spellbinders and then adding a bit of color with pearlescent chalks.  The image was colored with Copic markers and then fussy cut.  I also used an exacto knife to cut out the bottom portion of the heart, so I could slip it on top of my world globe (by Die-Versions).

The sentiment was cut out of an old magazine (talk about recycling) sort of like a "Ransom" letter would be cut from various letters.  A Simon Says Stamps die banner was used to add dimension to the bottom part of the sentiment.

As there were 5 Saturdays in the month of March, you'll only have one week to upload your Earth Day creations to the Time4Scrap Challenge.


Monday, February 24, 2014

Vintage Irish


Today I'm sharing fairly large card (5"x7") using the Vintage Irish stamp set from Sparkle N Sprinkle.  This sweet little boy was fussy cut out and colored with Copic markers.  Then various portions of his outfit were covered with Spirited Green glitter (the suspenders, the hat band, and the centers of the shamrocks).


The Shamrock Flourish is from Die Versions and is also covered with Spirited Green glitter.  Portions of the shamrocks were also colored with Copic markers for added depth.  You can check out the SNS tutorial on Coloring on Glitter here.

The sentiment is heat embossed with Irish Spring embossing powder and cut out using a MFT die (Sentiment Strips).


The tag was then layered onto solid cardstock that was dry embossed with the Dainty Dots M-Bossabilities folder from Spellbinders.  I adhered 1/4" Tear-ific Tape all around the edges and heat embossed with more Irish Spring embossing power.  This layer was adhered to the yellow card base and a touch of lace was added to the bottom.

Saturday, January 4, 2014

I Heart U


For my very first project for Time 4 Scrap, we have a color challenge: incorporate Silver or Gold into your project.  Our sponsors for this challenge are Robyn's Fetish and Delicious Doodles.  I've chosen the I Heart U digi by Robyn's Fetish for my tag.


After printing the image a couple of times and printing just the sentiment in the center, I fussy cut out the heart from the scalloped edge.  Silver Lightning embossing powder from Sparkle N Sprinkle was used for the scallop border and Firecracker Red embossing powder was applied to the center heart.   Both of these have glitter mixed in with the embossing powder for a sparkly look.  Using a Memory Box die, I cut out the sentiment separately and applied Velvet Sparkle embossing powder for even more glittery goodness.  

After pop dotting the center heart, I added some red fibers behind the entire piece for more definition.
The tag was then covered with silver foil (aka Reynolds Wrap) and dry embossed with the Hearts M-Bossabilities embossing folder.  I highlighted the swirls and the edges with a Copic marker.

I also added the Hanging Hearts, from Die-Versions, to the top and bottom of the tag and heat embossed it with Silver Lightning and Firecracker Red.


So head on over to Time 4 Scrap and submit your card, tag, ATC, or a Fat page (a 4"x4" card, layout or mini album).  The winner will receive her/his choice of 3 digis.


Monday, September 2, 2013

Dec 25th


Here's a fun tag using the brand new Dec 25th Express Edge and the Holly Sweet Petite from the latest release by Die-Versions.  

I started off by adhering some Christmas wrapping paper to a tag.  I then dry embossed the entire tag with a DIY embossing folder created with the Snowflake Sweet Petite.  (Click here to see my post showing how I made my DIY embossing folder using this die.)  Next, I die cut the edge and cut the Holly out of fun foam.  Some Distress Stickles were added for the berries.  To complete the tag, the beginning of my sentiment was die cut using the Die-Versions Little Lizzie font.

Be sure to visit the DV Blog and the DV Facebook page to see what the rest of the team has created with this new Christmas release.  Also, don't forget to mark your calendars for the first ever Die-Versions Blog Hop on Sept 17.  There will be fabulous prizes to be won!

Friday, August 16, 2013

Space...the final frontier


This Baby Bot Sweet Petite die from Die-Versions is so darn cute and fun to play with.  

The one on top is cut from regular cardstock and his features came from the negative portions of the Super Robot (also a new release).  He's colored with Inka Gold metallic rubs.  The bottom guy is actually cut from a soda can.  This is the first tie I've tried cutting a can because I always thought it would be too hard to get the top and bottom of the can off.  Nope - I was wrong.  Easy, peasy!  And these dies cut the soda can like it was butter.

The background is a Tim Holtz technique - layering acrylic paint, Distress Stains and Distress Ink onto your craft mat, spritzing with water, and dabbing the tag into the puddles.  The stamped globe is actually made from fun foam and the DV Old Globe West die and stamped with Archival Ink.  The title/sentiment is a combination of DV fonts Tick Tock and Little Lizzie


Wednesday, July 24, 2013

Get Well Bookmark


Swirls, one of the new stamp sets from Sparkle N Sprinkle is so versatile.  I've created a Get Well Soon bookmark using a few of Tim Holtz's techniques.

To start off, I created the background by smearing Distress Ink, Distress Paint, and Distress Stains on my craft sheet and then ran the tag through the colors.  I heat set it after I was happy with the results.  Next I stamped the flowers with Archival Ink (Sienna and Saffron).  Goosebumps Texture Spray was added to create texture and interest and a little Smooch Spritz (Vanilla Shimmer) was added for a subtle bit of sparkle.

Next I stamped the flowers again with VersaMark and heat embossed them with Black Detail embossing powder.  After fussy cutting out each of the flowers, I applied Viva Decor's Inka Gold (Cobalt Blue and Green Yellow) to the flowers.  You need to use embossing powder instead of just ink so the Inka Gold won't cover up (obliterate would be a better description) the design.  Ask me how I know :-).    Love the metallic look of these paints.

One of the things I love about fussy cutting images is that the paper naturally curls.  You can really see it in on the blue flower.  Since I wanted to keep that natural curl, I only adhered the center of the flower to the tag base.

The bookplate is part of the Sizzix (Tag and Bookplate) die I used.  I inked it up with  some metallic Distress Stains and a little Distress Ink.  The sentiment, which is part of the set, is heat embossed with Black Detail embossing powder as well.

Lastly, I coordinated the seam binding ribbon by using the same color combination as the background.  A few randomly placed pearls complete the bookmark.


Friday, April 26, 2013

Thinking of You


Today's Challenge #66 from Pattie's Creations is Anything But A Card.  This image is Thinking of You and can be found in Pattie's Etsy store.


I printed the image twice so I could pop dot the daisy and the butterfly and then colored it with Copic markers.  I also added a bit of sparkle with Spica glitter pens.

I also want to remind you of the 30% off sale going on now at Pattie's Etsy store.  It goes until April 30.  Be sure to use the code PATTIEBOOP1 (in CAPS) at checkout.  The store has a brand new feature where you can now download your images as soon as the payment has been processed!  No more waiting!  Yea!

Be sure to visit the rest of the team to see what they've created for you as well.

Sunday, March 17, 2013

Dance a Jig


Happy St. Patty's Day to ya!  How about this for a fun tag to get you in the spirit?  The image is one of several from the Free Spirited Hat Ladies stamp sets from Sparkle N Sprinkle.  When I saw her, I knew she'd be perfect for what I had in mind.  The image is colored with Copic markers and fussy cut out.  For the shamrocks, I used a (very) old die from Sizzix that has long since been retired (one of those chunky Originals) and covered them with Luau Green velvet glitter.  The sentiment is the My Micro Die-Versions font and is adhered to the stitched sentiment flag die cut from Lil' Inker Designs.

As you can see from the close up, I applied pop dots to certain portions of the image, usually opposite sides (one foot and the opposite hand) as I wanted her to really look like she was dancing.  All of this was adhered to a tag covered with patterned paper.  For the base, I ran some green cardstock that I cut to resemble a larger tag, through my crimping tool.  I randomly added a bit of Distress Inks (Vintage Photo, Gathered Twigs) to the raised areas.

This tag is really sparkly and glittery in person and makes me smile every time I see it as she looks like she's having so much fun.