Showing posts with label Hero Arts. Show all posts

Saturday, September 16, 2023

Autumn Greetings


Hey everyone, I had so much fun playing with the new Hero Arts monthly project kit. The classic kit includes inks, a die, layering stencils, stamps, and more.

For this project, I die cut everything in white cardstock and blended the inks that came in this kit. I kept the negative piece from the die cut and inked it yellow and then stamped my sentiment.

I wanted a faux shaker card, so I added dimensional tape to the focal layer so that  the greeting was recessed onto the card base. I added some sequins and a cute button to my sentiment strip.

I'm entering this into the Stay Crafty with a Blog Named Hero: September 2023 Challenge.


Until next time,


Friday, January 27, 2023

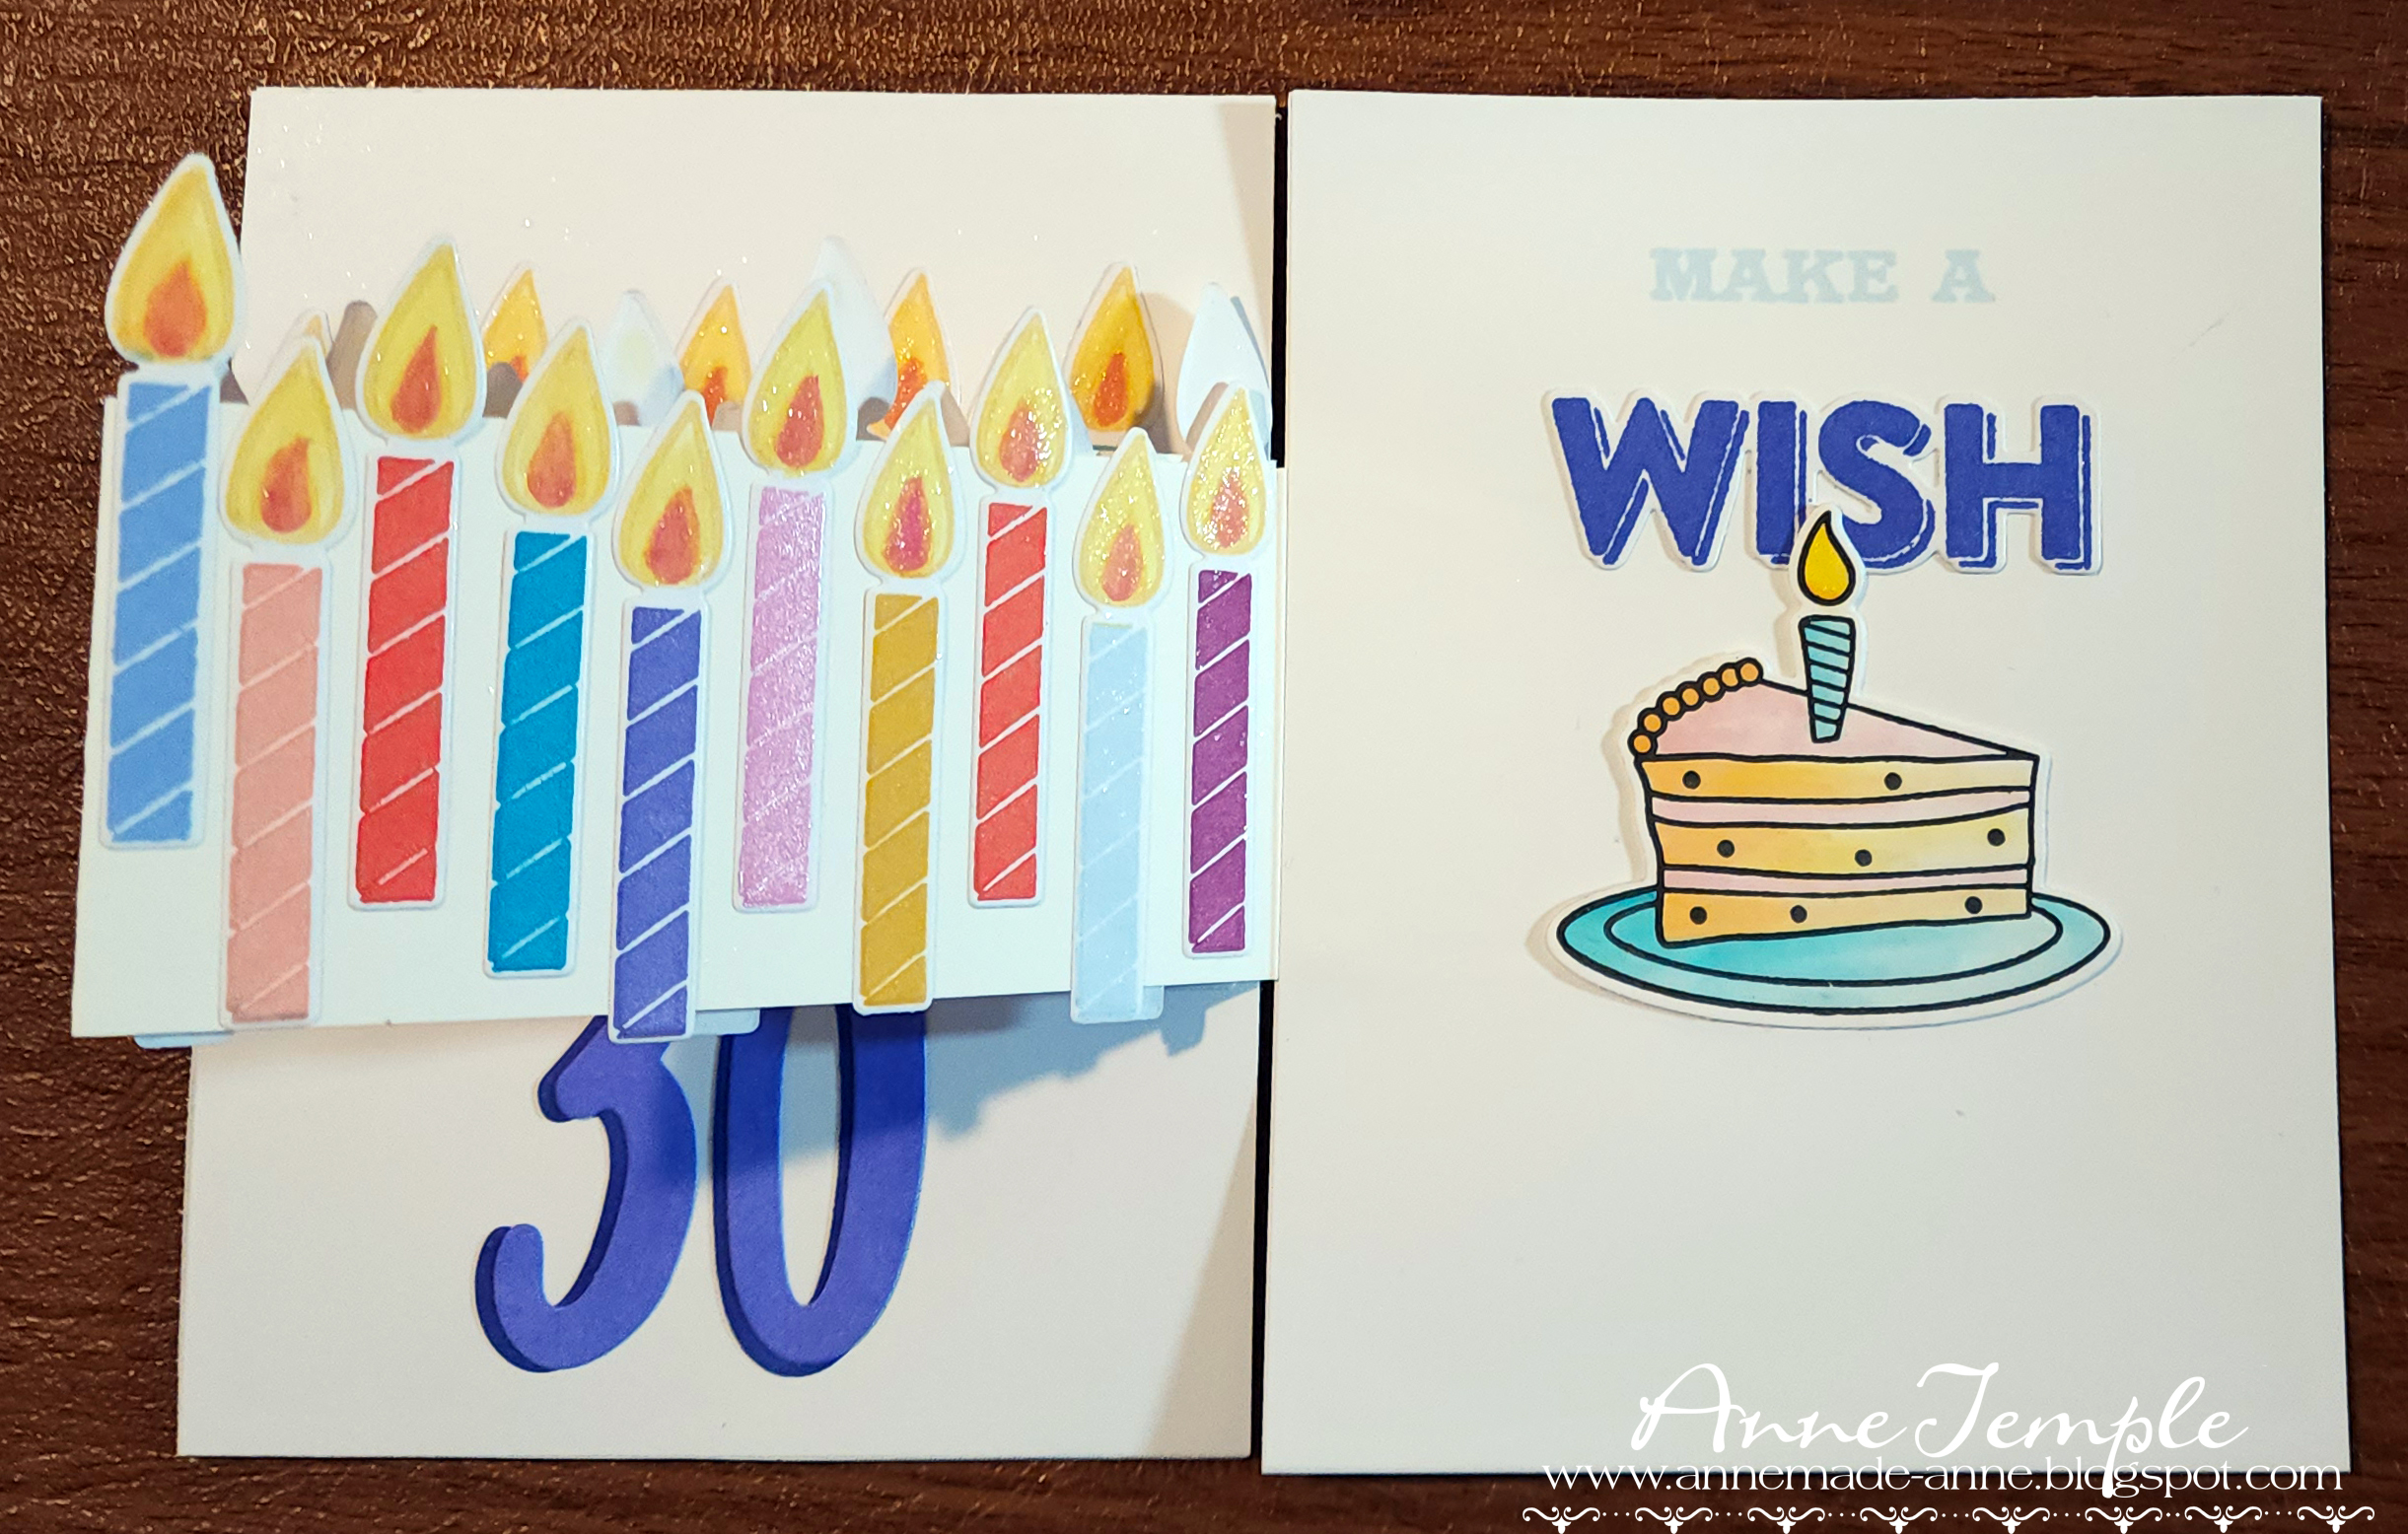
Retro Birthday Pull-Apart Card


Supplies used:

Altenew - Mid Century Festivities die set; Mid Century Festivities layering stamp set; Mid Century Cover die

Honey Bee - Inside: Birthday (sentiment on front of card)

My Favorite Things - Potted Plants; Cat and Plant Perches

Hero Arts - Yay Birthday

Crafter's Companion - Happy Birthday (numbers)

I got the idea of creating an accordion card using the birthday candles as the bridge from my friend Bonnie. (She found the idea in one of her Facebook groups.)


Until next time,


Monday, August 24, 2020

Luna and Moon Fairy {DRU Insp}


Today I'm sharing a slimline card I created for the Dies R Us Inspiration team.  I love making these long, slim cards. 😀


But before we get started, I wanted to share that the DRU Inspiration team is having a DT Call. All the details about this call can be found here.


Now for more about today's project. The following dies were used to create this slimline card:

Memory Box: Big Splash Border 
(Any of these wave dies would work but this Frantic Stamper die or this Joy! Craft die are the most similar.)


I started out with white cardstock and die cut my slimline focal point.  Then I die cut the waves border and adhered it to the cardstock, making sure to not adhere the actual curly cue waves.  VersaFine Clair inks were used to create my background.  Next I die cut the mini sea shells and the sea birds to get ready to add them to my scene.  


I stamped the Moon Fairy by Lavinia stamps in the upper right hand corner of the card. Since the moon portion of the stamp is open, I added white paint within the border of the moon and once that was dry, I added yellow marker.  I also added white paint to the large stars on the stamped image.


I stamped Luna, the whale (a Fairy Hugs stamp) onto a piece of white cardstock and fussy cut her out so I could position her under the ocean waves and looking up at the moon.  (This Poppystamps die would also work well.)  The Berry Wreath stamp (also by Lavinia) and more VersaFine Clair ink was used to stamp on the ocean floor.


I wasn't quite happy with everything and decided I needed a few more stars in the sky.  I reached for the Stars Miniature stamp from Lavinia and stamped them with Hero Arts Unicorn pigment ink. 

I adhered my focal piece onto a purple layer and then to the black card base.

One final look at today's project:


I hope you've enjoyed today's project.  Head back to the Dies R Us Blog tomorrow for more fabulous inspiration from the DRU Inspiration design team.


Don't forget to come join in the fun at the Dies R Us Challenge Blog.  There's a new challenge theme offered on the 1st and 15th of each month and one lucky randomly drawn winner will receive a $10 gift certificate to the Dies R Us Store.  For your convenience, all the important Dies R Us links are provided below.

click below for:


Thanks so much for stopping by.


Wednesday, December 4, 2019

Winter Wonderland {Scrapy Land #127}


Welcome to Scrapy Land Challenge #127!  I have a pretty quick and easy Christmas card to share with you today. The theme is always Anything Goes using any brand of die that Scrapy Land sells (hint: there are over 55 brands, so more than likely you have a few of these brand in your stash 😀).

The following dies were used to create my card:


Sue Wilson Designs: Festive Collection-Snowflake Background (these would also work well)
Sizzix: Tim Holtz Holiday Words Script

I stared out by die cutting the Snowflake Background from Gold embossed cardstock, leaving the center oval intact.  Next, using the smallest oval that came in the set (or any oval you have on hand), I die cut white cardstock and then stamped my tree.  This is a Hero Arts stamp set (Color Layered Christmas Tree) and it was stamped with Distress Oxides (Shabby Shutters, Mowed Lawn, Lucky Clover, Pine Needles).  Once this was completed, I decided it was a little too bright for what I had in mind.  So using the next smallest oval, I die cut a piece of vellum and adhered it on top of my tree.  The Christmas tree was then adhered to the center of my Snowflake Background.

A piece of glitter cardstock was used for the card base and the sentiment die cuts.  As I said, pretty quick and easy.  This would be an easy design to mass produce. 😀

Now it's your turn to join us for the Scrapy Land Challenge #127, which ends on Dec 15.  The winner of the challenge will receive a $15 gift certificate to Scrapy Land and is chosen by random.org.  The Designers choose the Top Three and Honorable Mention categories.


Until next time......


Wednesday, May 1, 2019

Feel Better Soon {Scrapy Land #113}

It's the third Wednesday of April and time for a brand new Scrapy Land Challenge #113!  There are two winners chosen to receive gift certificates to Scrapy Land and the theme is always Anything Goes using any brand of die that Scrapy Land sells.


The following products were used to create this card:
Elizabeth Craft Designs: Dancing Butterflies (any of these would work as well)
Elizabeth Craft Designs: Lacy Poppies (most of these would work)
Paper Rose: Stitched Square Frame (most of these would also work)
Reverse Confetti: Word Up stamp set
Hero Arts: White embossing powder
Nuvo glitter: Chestnut Brown
Stampendous glass glitter: Champagne
Distress Oxides: Squeezed Lemonade, Mowed Lawn, Blueprint Sketch
Copic markers

I have to say, I really like the bright colors of this card.  It was also one of my most difficult cards because this card had three different iterations.  At first, it had a clear acetate cover with this image being placed on the inside of the card.  I was touching up a small spot on the front of the card with a Copic and my hand slipped.  No way to repair that.  So.... I cut off the front of the card to salvage the inside.  I decided to make this the front of the card and adhered it to a 6x6 piece of white cardstock for the base.  Well, I guess I scored and folded against the grain and when the card was opened and closed a couple times, it ripped.  So, on the third day of trying to salvage this card, I decided to go with a black card base and made sure I scored and folded it on the grain!


Other than my boo-boos, this is a relatively easy card to create.  Everything was die cut from white cardstock and colored with Copic markers.  Glass glitter was used to accent the large poppy center and Chestnut Brown glitter accents the butterfly body.


I also decorated the inside of the card as this is going to a friend about to have surgery.  I added the negative piece of green cardstock when the Stitched frame was die cut and I added a different butterfly from that die set.  His body also has glitter and sparkle.

Now it's your turn to head on over to the Scrapy Land Challenge and upload your project (or two).  You have until April 28th to be in the running for one of the prizes from Scrapy Land.

Wednesday, April 3, 2019

You Brighten My Life {Scrapy Land #111}


Hey everyone, it's the first Wednesday of the month and time for a brand new Scrapy Land Challenge #111. The theme is always Anything Goes using any brand of die that Scrapy Land sells.

Today's project is a CAS card, but looks pretty elegant in person.  And it was so quick and easy to make!  There were only two die sets used to create this card: Tonic Studios: Swirling Frame Layering die set (most any of these would also work) and Sue Wilson Designs: Triple Layer Collection Dragonfly.

I started out by layering the frame dies onto a piece of white cardstock and die cutting them out.  I would recommend doing one or two dies at a time instead of all the white pieces like I did.  It was very hard to crank my plates through with everything on them.  I pop dotted the top layer and added colored cardstock behind it.


For the dragonfly, I used the same green, white, and black cardstock and then layered it together.  (Have I mentioned how much I 💖these new Triple Layer Collections?!!! Let's just say my collection of dies has recently grown 😆.)

Once the dragonfly was layered, I wanted to add a bit more sparkle to it.  I covered the entire piece with VersaMark, making sure to get the lower layers covered too, and then added Hero Arts Sparkle embossing powder over it and heat set it.  This piece is also pop dotted above my sentiment, which was computer generated.

Now it's your turn!  Create any type of project you like (CAS, layout, mixed media, altered art, etc.) and upload it to the Scrapy Land Challenge #111 by April 14.  There are two winners picked for each challenge.  While you're there, be sure to say hello to all our brand new Designers!  I know they are looking forward to meeting you too.

Wednesday, September 19, 2018

Moonlight {Scrapy Land #98}


Hey everyone!  It's the third Wednesday of the month (already!) and that means it's time for a new Scrapy Land Challenge.  As always, the theme is Anything Goes using any brand of die that Scrapy Land sells.  Here is a complete list of over 55 brands of dies sold and here is the list of the newest arrivals.

The dies used for this watercolor project were:


Hero Arts: Trellis (here are some other options)
Spellbinders: Grand Dome 3D Card (any type of die with an oval top will work)
Sue Wilson Designs: Noble dies-Double Pierced Rectangles, Set B
Sizzix: Tim Holtz-Funky Floral #3
My Favorite Things: Fresh Cut Grass (here are other options)


This project started out by my stamping and watercoloring various watercolor stamps from Art Impressions to create this kitty in the moonlight.  After this was completed and dry, I used the 3D Dome die to cut out the image.  I cut off the side pieces that make this die cut into a dimensional card.


Next I die cut the Hero Arts Trellis from black cardstock and heat embossed it using Clear embossing powder.  I wanted a wrought iron type of look.  I die cut it a second time from brown fun foam to add dimension to the gate.  I love how these gates can actually open and reveal what's behind them.

The blue background mat behind the focal point was dry embossed using a Crafters Companion embossing folder (Distress) and then I went over the raised areas with Nuvo Embellishment Mousse (Cornflower Blue).  To me, it resembled stars in the night sky😀.

Once these were adhered to my black card base (die cut using the Sue Wilson die), I began building my layers of flowers and greenery along the sides of the gates.  I die cut several of the dies from the Funky Floral set from white cardstock and colored them with Copic markers.  Although it's hard to tell in the photo, I added Spectrum Noir Sparkle marker to the grass.

Now it's your turn to play along.  You have until Sunday, Sept 30 to upload your crafty project to the Scrapy Land Challenge.  It can be anything from CAS to grungy to mixed media and everything in between.


The count down has begun.... only two more challenges before we celebrate our 100th Challenge!  Mark your calendars for Oct 17 because you're definitely going to want to get in on the fun and win some fabulous prizes!


Wednesday, November 23, 2016

Reindeer in the Woods


Christmas is almost here, so I'm creating lots of Christmas cards at the moment.  The one I have to share with you today features the Reindeer die from Die-Versions and a layering stamp set by Hero Arts.

I started out by stamping the trees in different colors of green to see which combination I liked the best.  I ended up using Memento Ink (Cottage Ivy, Bamboo Leaves) and Brilliance (Pearlescent Ivy).  The top layer for the trees was stamped with VersaMark and heat set with White Spark embossing powder from Sparkle N Sprinkle.  The background of falling snow was also stamped using one of the stamps from the Hero Arts set.

The snowy banks were hand cut (although the trees ended up covering up most of the banks) and then heat embossed with Sparkle embossing powder.  I added Nuvo Glitter Drops (White Blizzard) for more definition of the banks.


The reindeer was die cut from white cardstock.  I colored his hoofs with a Copic marker and then began adding flock to various the rest of the die cut.  His antlers are covered with Buff flock, his tail with Snow White flock, and his body with Amber Wheat flock.  He is so soft to touch.  Unfortunately the reindeer is temporarily out of stock.

Hope this gives you some more Christmas card ideas. :-)

Tuesday, January 27, 2015

Game On!


This card was made for my favorite gamer using the new Level Up clear stamps and coordinating Game Controller die sets from My Favorite Things (MFT).  As soon as I saw this set, I knew I had to have it and that it would get lots of use :-).

To start off, I die cut the large controller out of black fun foam and then black cardstock.  The fun foam serves a dual purpose of both adding dimension as well as supplying my shadow.  The individual controller buttons were die cut from various pieces of scraps and adhered onto the front.

The sentiment was heat set using Hero Arts White embossing powder and then die cut using the MFT Fishtail Flags Stax.  The dots on the fishtail were added using a Paper Smooches die (Dots and Dashes) and the circle was die cut using a Little B die (Nesting Circles) to mimic the dots on the fish tale.  A Spellbinders M-Bossabilities embossing folder (Garden Lattice) gave the black card base some visual interest.

inside
For the inside of the card, I used the smaller game controller and die cut it in white fun foam and white cardstock.  Scraps were also used to create the knobs and buttons on this controller as well.  Again, the fun foam adds dimension as well as a shadow for this smaller die cut.

The sentiment, which was stamped onto a Spellbinders Labels Twenty Five die cut, was heat set with Sparkle N Sprinkle Black Detail embossing power.

Coincidentally, my design replicates the MFT Sketch challenge this week, so I am entering it in the MFT Sketch Challenge.  I'm also entering the Cut It Up Challenge (embossing, die cut).

Tuesday, February 4, 2014

Published: Rubber Stamp Madness


I'm so excited to have a card published in the Spring 2014 edition of Rubber Stamp Madness, the original stamping magazine.   It's located on pages 23 and 24 and is titled "Old School and Cool".


Here's how I made it.  The background is Tim Holtz's Marbled Stain technique and was created using Distress Stains (Picket Fence, Barn Door, Rusty Hinge, Mustard Seed) and Perfect Pearl Mist (Perfect Pearl).

I stamped the Hero Arts image twice, once directly onto the newly created background and once onto a vintage book page so I could fussy cut out the "typewriter paper".  I heat embossed the sentiment with Gathered Twigs Distress Ink.  Then I cut a slit in the typewriter image where the paper would come through and slid the vintage book paper through.  The idea of using buttons and twine as spools of ribbon came to me during a creative burst :-).


I also embellished the inside a bit.  A page from a vintage book was used to frame the space for a message.  The message area was created using the Cherish punch from Martha Stewart.  A bit more twine carries the old fashioned theme from the front to the inside.

I have to add that I was just as excited seeing the label on the magazine.  It said "Artist-Anne Temple".  How cool is that!

Friday, July 26, 2013

Hip Hip Hooray


One of the Sweet Spots released this month from Die-Versions is "Hip Hip Hooray".  I was in a restaurant in Franklin, TN and the first thing you see when you walk in is a sign that reads "Hip Hip Hooray - the Gang's All Here".  As soon as I saw it, I knew what I wanted to do with this new Sweet Spot.


This easel card used a lot of stamps (six in total) and quite a bit of masking, but it was fun to create.  I started off by cutting the sweet spot in fabric (just to see if it would work.  I didn't have any problems but you might if there were more intricate details.)  Then I scribbled a Spica glitter pen on the letters for a bit of bling.  Next I started stamping and masking to create my scene.  All of the images were stamped with Memento Black Tuxedo and colored with Koh-I-Nor woodless pencils for a more vintage feel.


The first stamp with the three ladies sitting in front and the man in the back to the right are by River City Rubber Works.  The man and woman image in the back on the left is from I Brake for Stamps and the trees/shrubs in the very back are by Beeswax Stamps.  The large watermarked sentiment is an older background stamp by Hero Arts and the "Happy Birthday you old bird" is retired stamp from Prickley Pear.  The rest of the sentiment was die cut from the Die-Versions Mister Micro font.

Want to see more great projects from the DV Dynamos?  Then check out the Die-Versions Blog and the DV Facebook page.

Monday, December 3, 2012

Are You Old School?


Yep, I'm pretty old school in a number of ways :-).  I still remember ribbon typewriters and what a pain they were to use when (not if) you made a mistake.  This cute image and sentiment are part of a set from Hero Arts.

In order to create the background, I used Tim Holtz's Marbled Stain technique using Distress Stains (picket fence, barn door, rusty hinge, mustard seed) and then spritzed it with Perfect Pearl Mist (perfect pearl).  In addition to stamping the image onto my background, I also stamped it onto a very old and fragile book page so I could fussy cut out the "typewriter paper".  Then I stamped my image onto the book page.  I also cut a small slit so that the paper feeds up from the typewriter (just like it would on a real typewriter).  I added a couple of buttons for the typewriter ribbon spools and some twine for the typewriter ribbon.   The "hi" buttons are Echo Park (For the Record) alpha stickers and are embellished with Epiphany Crafts bubble domes to make them look more like typewriter keys.  A bit more twine and the front is complete.  I also embellished the inside with a bit of twine and another piece of an old book page.   I created an area for a written message and decorated the edges with a Martha Stewart punch (Cherish).