Showing posts with label tutorial. Show all posts

Wednesday, October 2, 2019

Grateful {Scrapy Land #123}


Hey everyone, it's the first Wednesday of the month and I've created this fall card for the Scrapy Land Challenge #123 that begins today.  The winner of this challenge will receive a $15 gift certificate to Scrapy Land!

I used the following dies in this home decor piece:

Concord & 9th: Autumn Harvest Masking Dies
Concord & 9th: Autumn Harvest stamp set
Sizzix: Ticket Fold A Long

A number of people asked how I created my Rolled Edge Frame cards that I recently created, that I decided to do a tutorial on it.  Once you see how easy it is, you'll be amazed.  It's one of those techniques that is so easy but has a huge WOW factor that makes it look like it took forever and is so complicated 😀.


To start off, you will need two sheets of double sided paper or cardstock that are the same and a third sheet that coordinates.  They all need to be cut the same size.  This one is 8.5" x 6.5" and the previous ones I created were 9" x 7" and 5" x 7".  You could also create a square frame as well.

The patterned paper I decided to use was not double sided, so I photocopied them using my color printer.  Instant double sided paper 😁.


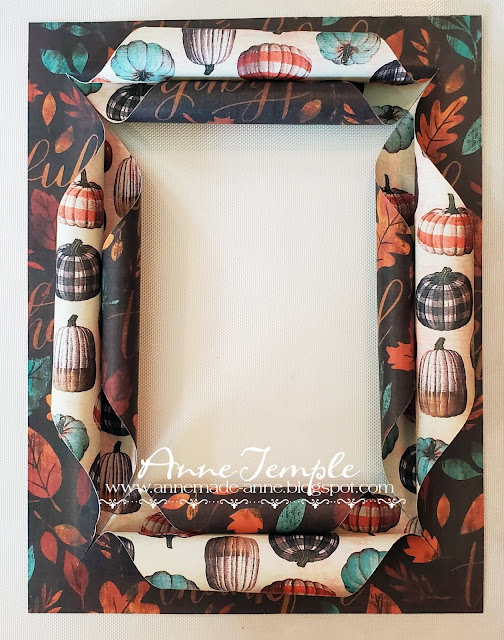
Take the two sheets that are the same and position them so that the same patterned paper is facing each other.  As you can see in the photo above, the 'pumpkin' side of the paper is facing each other.  (If you alined these together with your hands, you would see that the 'thankful' paper is on the front and back and you wouldn't see the 'pumpkin' papers at all.  I hope that makes sense.)

The two pieces that are on the "inside" will be what will be showing once you have rolled the edges (this will become more clear a little bit later.)


Now you have two options: you can either do the next step separately to each sheet of patterned paper or you can adhere the two sheets together before beginning the next step.

If you adhere the two pieces together beforehand, be sure to ONLY add adhesive around the very edges.

Now you are ready to create the rolled frame.  I prefer to adhere both pieces beforehand, so that's what I did and that's how the instructions are written.  If you decide to do each sheet separately, then adhere the two sheets together (only along the edges) after you have rolled all eight points.


Place your paper onto a cutting mat and using a ruler and an X-acto knife, cut a large X in the center of your papers.

Leave approximately 1" from each point for a margin.  So starting approximately 1" from one point, cut through the paper (or both papers if you adhered them together in the previous step) diagonally to the opposite corner, stopping approximately 1" from the end of the point.  Repeat this step so that you have created an X.

Time to begin rolling your edges.


Begin by lightly spritzing the top layer with water. Take one of the points and begin rolling it toward the outside of the cardstock using a pencil (or other rounded object).  If you like a tighter roll, leave the pencil in there for a few seconds more as the water dries. If you like it looser, then take the pencil out as soon as you have finished rolling.  You can roll all the way to the end of the cut line, or stop a little short of the cut.  It's personal preference.


Continue rolling until all four points have been rolled.  You do not need to spritz your paper with water each time.  As you can see above, now the inside 'pumpkin' paper is showing.

Now you should lightly spritz the inside points and roll with a pencil, as you did above.


This is what your rolled frame should look like once you have rolled all 8 points.  As you can see, the second rolled edge shows the patterned paper that was on the back.  At this point, you can leave the rolled edges as is or you can also add a bit of adhesive or a glue dot underneath if you want them to stay more tightly rolled.


Now it's time to add the final piece of patterned paper/cardstock to the back and begin decorating the inside of your frame.


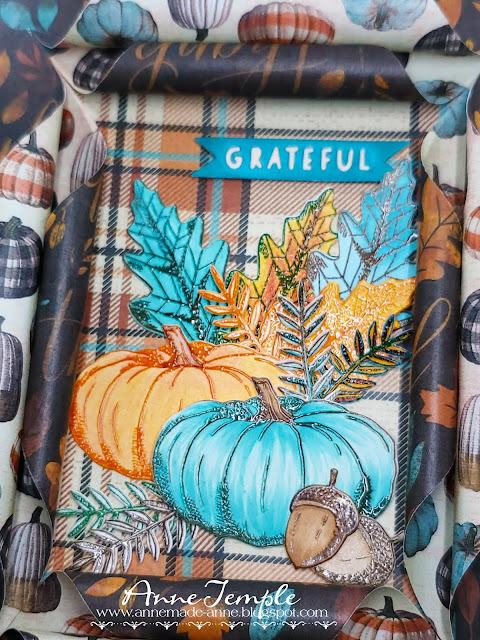
Using the stamp and die cut set from Concord & 9th (anything will work), I stamped multiple colors of the images.  I colored my stamped images with a combination of Copic markers and colored pencils.


One trick I used was to leave the stamps placed on my stamp positioner until after I finished coloring the images (and before die cutting the images out).  I placed the stamped and colored images back onto the stamp positioner and stamped the image again using VersaMark (be sure to clean your stamps before doing this step though 😀).  Then I heat set them with Clear embossing powder.  This gives lots of details and added dimension. 

Now you're ready to die cut the stamped images. I love how these dies have a cut line that is right on the edge of the die, so you don't have a white border around your die cut.  These are super easy to line up for perfect cuts each time.


As a finishing touch, I cut four strips of black cardstock, each 1/4" thick, metered the corners, and adhered it to the edges of my rolled frame.


In order to make this truly a piece of home decor that would stand upright on it own, I created an easel backing for it.  This is another super easy thing to do for any card or home decor you want to display.

You want to cut a piece of cardstock 7.5" in length by however wide your card is, or a tad shorter).  In my case, this project is 6.5" wide, so my width was 6.25".  Score at 3", 6", 6.5", and 7".  Create an accordion fold at the bottom and adhere to the back side of your project.

Here's a final look at my completed project:


Wow, this was a LONG post 😁.  Now it's your turn to join us and upload your creation to the Scrapy Land Challenge #123.  It can be anything from a CAS card to mixed media, a scrapbook layout to altered art, or anything in between.  The theme is always anything goes using any brand of die that Scrapy Land sells.  You have until Oct 13th.  We can't wait to see what you create 😀!

Until next time......


Wednesday, November 1, 2017

Nativity Globe {Scrapy Land #77}


Wow, it's already November and that means Thanksgiving (in the US)  and Christmas are just around the corner!  It also the first Wednesday of the month and time for a new Scrapy Land Challenge.  The theme is always Anything Goes using any brand of die that Scrapy Land sells.

The following dies were used to create this card.


Die-Versions:  Nativity Ornament
Die-Versions: Noel Sweet Wordlet
Tonic Studios: Ribbon and Bows layering set


These are the steps I used to create this card:
1.     Die cut the Nativity Ornament from white cardstock.  Cut off the ornament topper and bow to make it a circle.
2.     Apply VersaMark to the top of the die cut, cover with Sparkle embossing powder and heat set.
3.     Die cut the base portion of the Snow globe die set twice from white cardstock.
4.     Spritz both of the bases with a combination of Walnut Ink and Terra Cotta Walnut Ink.  Continue lightly spritzing each color until you are happy with the results.  Once the paper is dry, you can highlight the lines on the base with a Copic marker (or your favorite marker).
5.     Die cut the globe portion of the Snow Globe set twice, one from white cardstock and one from black cardstock.
6.     Using the Direct to Paper method, cover the black globe circle with Opalite (Glacier Blue).  Make sure to get good coverage.
7.     Adhere the embossed Nativity scene to the Opalite enhanced globe.  Insert the globe into the stand and add a piece of tape to the back to hold the two pieces together.
8.     Die cut the plate label from the Snow Globe set twice from white cardstock.
9.     Apply VersaMark to each of these plate labels, cover with Sparkle embossing powder, and heat set. Add two “nails” to the plate label with a marker.
10.  Die cut the Noel Sweet Wordlet from white cardstock.
11.  Using the Direct to Paper method, apply Encore! gold metallic ink to the die cut.
12.  Adhere to one of the plate labels created above.
13.  Adhere the completed plate label to the snow globe base.
14.  Die cut the patterned paper using the Tonic Studios layering die set.
15.  Cut a piece of black cardstock 4 ½” x 12” and score at the 6” mark for a top folding card base.
16.  Temporarily adhere the larger layering die on top of the folded card base.  The top of the die should be slightly above the card fold.  Once you have the die positioned correctly, die cut to create a shaped card.
17.  Apply Opalite ink around the edges of the cardstock. Make sure your strip is wider than the openings in the patterned paper previously die cut.
18.  Place the patterned paper die cut over the front of the card base and make sure all the peek-a-boo openings are covered with Opalite ink.  Then adhere to the card front.
19.  Adhere the finished globe on top of the patterned paper.
20.  Take a small strip of ribbon, tie into a knot and adhere to the top of the card with a small glue dot.

Now it's your turn.  You have until November 12 to join us for the Scrapy Land Challenge.  Be sure to check out what the rest of the team has done to inspire you too.


Monday, June 19, 2017

Swallowtail Butterflies


Today I am showcasing the new Swallowtail Butterflies stamp set from Sparkle N Sprinkle.  This set was designed so that you could do two-step stamping, plus lots of other techniques.  I had so much fun trying out various techniques with this set!  This is a long post with lots of step by step photos, so grab a drink and let's get started.

The first technique I want to show is an oldie but goodie called the "Kissing" Stamp Technique.  It's best to use pigment inks with this technique as the ink dries slower.  Start off by inking up the solid stamp.  I am using the larger of the two solid butterflies here.  Next, ink up a detailed stamp.  I am using the Crackle Background stamp.

The photo below shows each individual stamp ready to "kiss" each other.


Place one stamp on top of the other and press down slightly (just as you would if it were a piece of paper).

The results are that the ink from the detailed stamp transfers to the solid stamp.

Now press this two toned stamp onto your cardstock:

Here is another example using both the large and small solid stamps:


You can stamp the two toned detailed stamp to create a fun background for a future project:

This example shows that you can do triple "kissing" as well.  The first two steps are the as above.

Then take a third color and ink up the detailed butterfly stamp that comes with this set.  Press it on top of the two toned solid stamp and this is the result before it is stamped onto cardstock:

And this is how it looks on white cardstock:

I had lots of fun playing.  Bronze Splendor glitter was added to each of the butterflies bodies and each of the butterflies were heat embossed using Clear embossing powder:

First and second generation stamping of the "Triple Kissed" stamp:

First and second generation using the small butterfly and regular "Kissing":

Distress Oxides and regular stamping with the large detailed butterfly:


This one shows the traditional two-step stamping technique.  Ink the solid stamp with one color, stamp onto cardstock.  Ink the second, detailed butterfly stamp with a contrasting color and stamp on top of the solid butterfly on the cardstock.


For the completed card, I chose one butterfly from each of the techniques I used and adhered them onto my background.  The background was created by first die cutting a Spellbinders die (Tropical Paradise) from cardstock.  I die cut it from white cardstock and then used one of the same inks I used to create the butterflies to add color (using the direct to paper method).

I then die cut a piece of Super Adhesive Sheet using the frame die, which is part of the Spellbinders set.  I adhered the colored leaves die cut on top of the die cut frame and then filled in the remaining areas with Margarita velvet glitter.

The sentiment was stamped with the same color pigment ink and then heat set with Clear embossing powder.  This was die cut using a Sue Wilson die (Italian Collection - Umbria).  Three small dots were added using Nuvo Jewel Drops (Key Lime).

I hope you've enjoyed seeing these older techniques being used again and that they inspire you to try them again as well.


Monday, April 18, 2016

Thinking About You


This month at Sparkle N Sprinkle, the designers are combining SNS products with chipboard from Want 2 Scrap.  For today's card, I used the painting with embossing powder technique on both the bird and the background.  This post is photo heavy with step by steps of how the chipboard was painted. 

To start off, I usually add White embossing powder to the naked chipboard.  If you are using brighter colors, this allows the truer color to show; otherwise it is a darker shade because of the brown base.

The background for my bird is the Fleur de Lis Nestaboard and I chose three different colors of blue to create the sky: Bracing Blue, By the Lake, and Sky Blue Spark.  I used the Stampendous Boss Gloss Embossing Ink on top of the heat set White embossed background.  If you look closely (you can click on the image to enlarge it), this embossing ink doesn't go on smoothly on top of an already heat embossed area like VersaMark does; it creates little puddles of ink.  For this background, I was fine with these dots (or puddled areas) as it reminded me of white clouds peeking through.  If you don't want the dots (or puddles), then you should use a different embossing ink.  (Note: If it's the first coat of embossing ink, this works just like any other brand of embossing ink and it's super easy to apply with the dauber top.)

Now it's time to start painting the chipboard bird.  This is actually a large piece with multiple birds called Birds of a Feather,  but I cut off the one I wanted.  I started out by adding color to the branch he was sitting on using Coffee embossing powder.  
Next came the leaves with Emerald embossing powder used for the base.   I used the VersaMarker to draw in the veins before adding Forest Green embossing powder.
For the bird, Concord was used for his body and feet, Red Apple for his head and wings, and Platinum for his beak.  I heat set each color before adding the next color.  Then I added a few details using a permanent fine tip marker.
The card base was die cut using a Sue Wilson Designs die (Noble die-Double Pierced Rectangle, Set B).  The center portion was then dry embossed using a Sue Wilson Designs embossing folder (Rambling Blossoms) and then I did a faux letterpress technique (from Sue Wilson) on top of the dry embossing. 

The thin frame, which gets cut when you use several of the dies from this set together, was pop dotted with dimensional tape and the center dry embossed, faux letterpressed paned was recessed.  The sentiment is also a die cut and is from Lawn Fawn (Thinking About You Border die).

Hope you enjoyed the process and it inspires you to try this technique too.