Showing posts with label 3D. Show all posts

Friday, July 12, 2019

I Love Pizza {Scrappers Delights Progressive Challenge)


Scrapper's Delights hosts a Progressive Freebie Challenge on Facebook each month and this month the image is this cutie called I Love Pizza!


When I saw her, I knew I wanted to create a mini pizza box to go along with her.  (These are SO simple to make.  You can find the directions here.)  I decided to use a basic cream cardstock to create my pizza box.  I found several free pizza themed clip art to embellish my box with.


One of the things I love about digis is the ability to layer the images on top of one another (using the .png version).  That's exactly what I did.  I used one of the free clip arts as my background for her and then layered her on top.  I also printed the same background piece again for the inside bottom of the box.


I colored her with Copic markers and added a touch of Spectrum Noir Sparkle markers to her hair and on the star on the pizza box.  You can really see the sparkle on the angled photo.


Wednesday, July 3, 2019

Believe in Magic {Scrapy Land #117}


Happy Wednesday and Happy July!  It's time for a brand new Scrapy Land Challenge.  Did you know that not only does Scrapy Land sell dies, they also sell Lavinia stamps and pattern papers? I'm loving these new stamps and today I created a three dimensional framed piece using dies and stamps.

The following products were used:


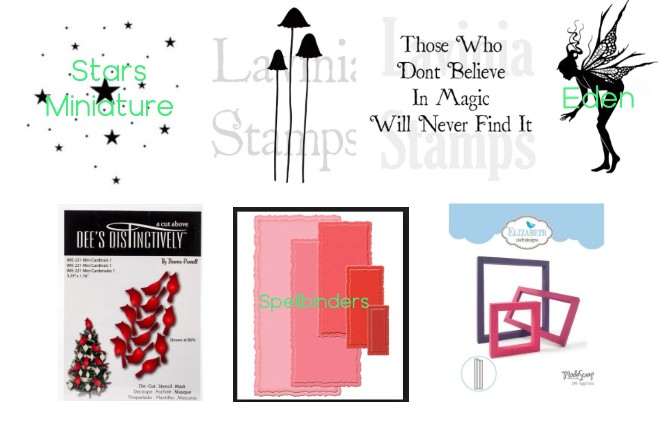
Lavinia stamps: Stars Miniature, Quirky Mushrooms, Believe In Magic, Eden
Dee's Distinctively: Mini Cardinals 1 (this, this, and this would also work)
Spellbinders: Deckled Mega Rectangles Small (any type of rectangle would work, or you could also create your own deckled frame using this Frantic Stamper die set.
Elizabeth Craft Designs: Happy Frame


I started out by stamping Eden into dark blue cardstock with VersaMark and then heat setting her with white embossing powder that has sparkly glitter added to it.  Next I masked the Quirky Mushroom stamps so that only one would stamp.  I stamped with VersaMark again and heat embossed with a bright green yellow embossing powder that also had glitter in it.  (The photo looks like it has tiny holes, but that's the way the glitter reflected off my camera lens).


I wanted my sentiment to be arranged differently than the stamp....so I cut it apart.  Normally I would try to mask it, but the way this stamp was designed and what I had in my head wouldn't let me do that 😲.  I heat embossed my newly created design with the same sparkly yellow green embossing powder.

I also stamped the (now) single word "Believe" in VersaMark randomly in the background to create a type of watermark.  When you let it dry naturally, it automatically drys darker that cardstock (love that!).

Next up, I die cut the bird and colored it with Copics. (Yes, I know that's not exactly what a cardinal looks like, but we are in a fairy world with this project 😁.)  After it was colored, I added a small pop dot to the back, so it would appear that he is perched on the mushroom and she is reaching out to pet him.

For the frame around the image, I used Spellbinders die and die cut the middle out (and saved for a later project).  Next I randomly stamped my stars around the frame and embossed them with a sparkly yellow embossing powder.

Then I began to make my 3D frame.  I played around with the die until I had it the size I wanted and then put it together.  I didn't want the top edges to be plain cardstock, so I took a border die and die cut a "stencil".  I added Distress Oxides through my newly created stencil to finish up the frame.  Finally, I adhered the focal image to a piece of patterned cardstock and then adhered this to the back of the 3D frame.  Now it's ready to be displayed - or given as a gift.  I haven't decided yet.😀

Now it's your turn to play along with us for the Scrapy Land Challenge #117.  The theme is always Anything Goes using any brand of die that Scrapy Land sells.  You can find the list of all the products here.  You have until July 14 to play along and have a chance to win one of two $10 gift certificates to do some shopping at Scrapy Land!

If you are loving the Lavinia stamps as much as I am, come back tomorrow for another project I created using different Lavinia stamps 😊.

Until next time.....


Wednesday, April 6, 2016

Exploding Hexagon Baby Card {Scrapy Land #39}


Exploding hexagon box card open


Can you believe it's already April?  Time does fly!!  That means is also time for a new Scrapy Land Challenge.  The theme for this first Wednesday challenge is Anything Goes using any brand of die that Scrapy Land sells.

Exploding hexagon box card closed


The following dies were used to create this 3D card:


Die-Versions: Sweet Wordlets - Welcome
Die-Versions: Sweet Wordlets - Sweet
Die-Versions: Sweet Wordlets -  Baby
Die-Versions: Sweet Wordlets - It's A Boy Girl
Die-Versions: Lacey Dots
Die-Namites: Baby Clothesline
Cheery Lynn Designs: Victoria Picket Fence
Cheery Lynn Designs: Garden Gate


I saw this idea on a card making Facebook group that I belong to.  They found the tutorial for the Exploding Hexagon Carousel Box and the template here.


I made this card for a friend's baby shower and I have to say it was a big hit.  Although it may look complicated, it's actually very easy to make.  The hardest part for me was cutting my lines straight.  You could use a paper cutter or an electronic cutting devise, but I used plain old scissors.  The above photo is the card completely open.

I used Die-Versions Sweet Wordlets to go around the outside panels to spell out "Welcome Sweet Baby" and the Die-Namites Baby Clothesline for the inside panels.  These were cut out of white cardstock and colored with Spectrum Noir Sparkle markers.


I don't have a baby crib die, so I used the Cheery Lynn fence and gate dies to create my own crib.

The little decorations on the crib (the anchor and hearts) are some of the negative pieces from the Baby Clothesline die cut.

The outside of the box was decorated with another Sweet Wordlets die, a lacey border strip and some ribbon.  I also added a personal note on the bottom of the box.  You could also make one of the panels a pocket and add your note there as well.

This was really fun to create and I can see lots of themes that this exploding hexagon box could be used for, not just a baby card.

You have until April 17 to upload your creation to the Scrapy Land Challenge.  Be sure to visit the Scrapy Land blog to see what the rest of the very talented Design Team members have created for you.