Showing posts with label Prismacolor pencils. Show all posts

Thursday, January 16, 2020

Dream {Lavinia World #18}


Hey everyone, so happy that you're here.  Today is the beginning of a new Lavinia World Challenges #18.  The theme is always Anything Goes using a stamped image (no digis please).  You can enter our challenge either through our Challenge Blog, or through our Anything Lavinia Facebook Group.  We'd love to have you join us in both places!  The winner of the challenge wins a $15 gift code to go shopping at Lavinia World.

This project was created using the following stamps:


This is a fairly simple card to create.  I started out by die cutting the center from a piece of light kraft cardstock using a My Favorite Things die (Tall Snow Globe).  Save the die cut for a future project and use the negative piece.  Using the same die, I cut out the shape again, only using a darker shade of kraft cardstock.

Using a stamp positioner, I stamped the Fairy Bridge first using VersaFine Clair ink (Pinecone) onto the darker shaded die cut.  I then cleaned the stamp, inked it up with VersaMark and heat set it with Clear embossing powder.  I stamped the bridge a second time on scrap paper to create a mask.

Temporarily adhere the mask on top of the stamped bridge and then stamp the Fir Tree in the background.  I stamped it a couple of times with VersaFine Clair (Green Oasis) to make sure everything stamped ok. 


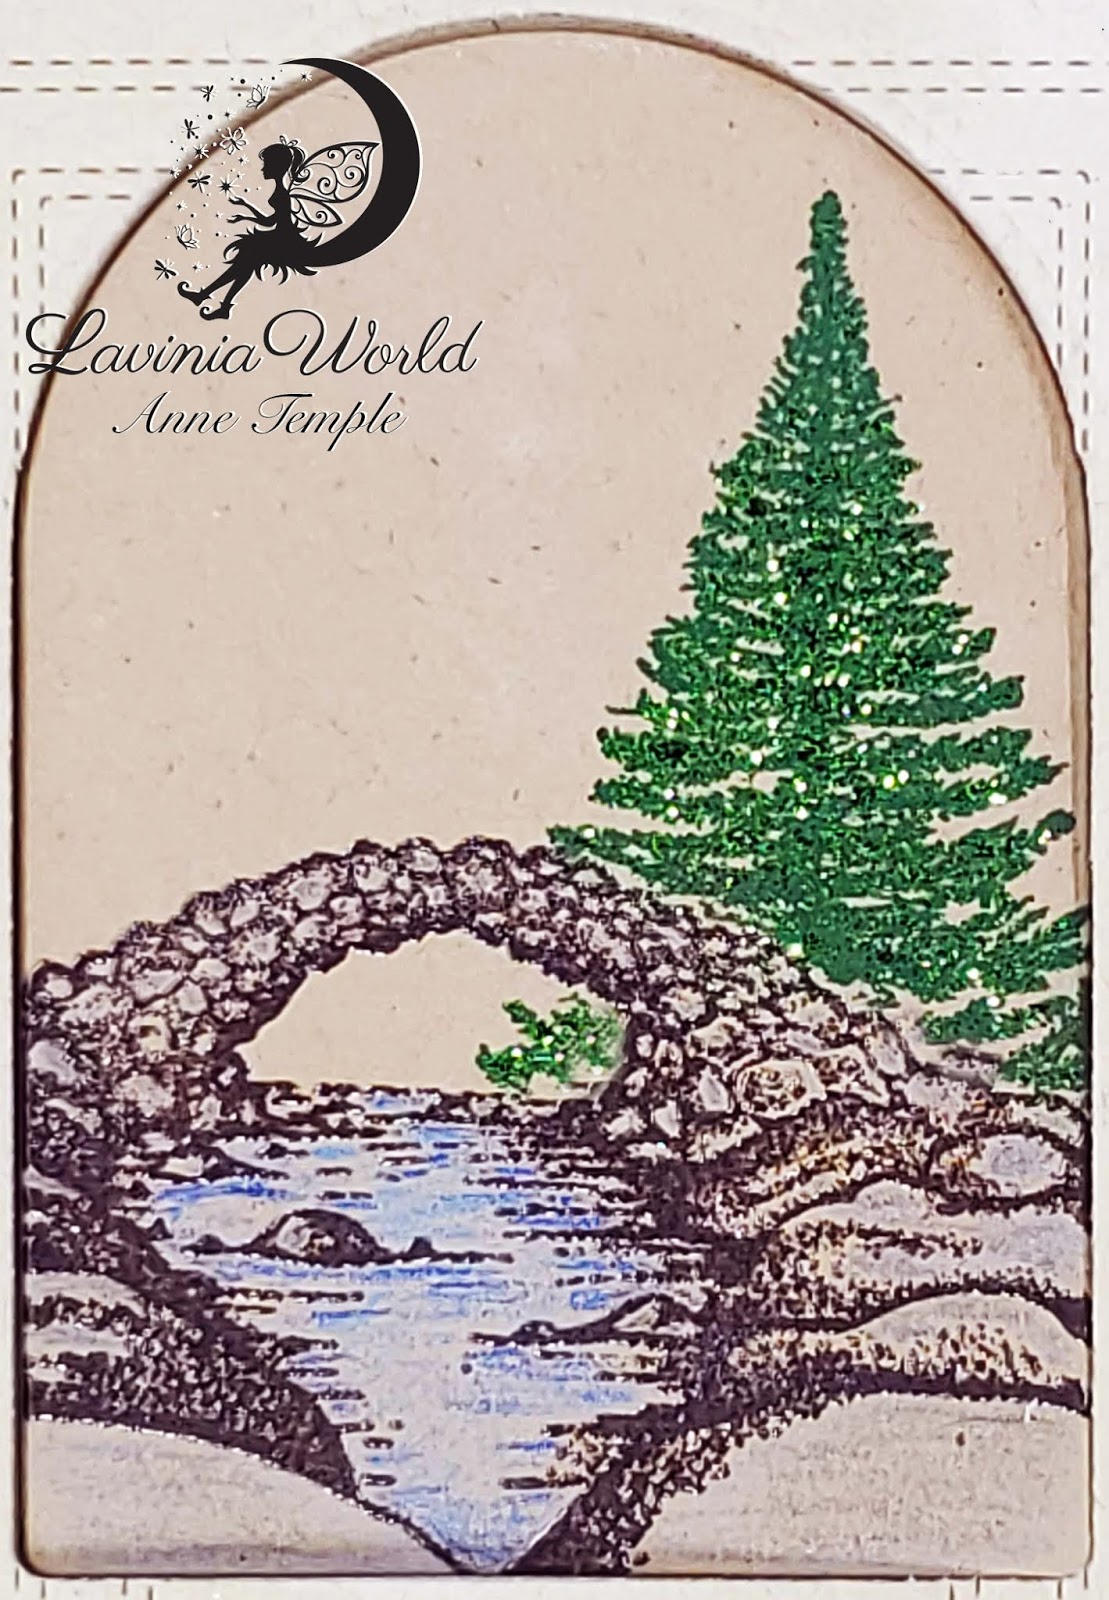
Next I brought out my colored pencils and shaded the water and the rocks.  I added green glitter to the Fir Tree for a bit of sparkle (and it also gives it a little more shading).

Taking the negative piece of lighter kraft cardstock, I ran it through my die cutting machine using a Law Fawn die (Just Stitching Double rectangles).  This die adds stitching, but doesn't actually cut anything out.  I used all the dies in the set.

I added pop dots to the negative piece and adhered it to my card base.  Next I added adhesive to the stamped focal point and dropped it down in the opening.  It's easier to do it this way as I don't have to worry about centering the focal point exactly in the right spot.  This way automatically does it for me 😀.

Lastly, I die cut my sentiment using a Simon Says Stamp die (dream) from black cardstock and adhered it under my focal point.

I think this would make a great card for a guy and you can add any sentiment you wish.

Now it's your turn!  Share your projects with us on the Challenge BlogFacebookInstagram, and our Anything Lavinia Facebook group:

Anything Lavinia


STORE ** CHALLENGE ** FACEBOOK ** INSTAGRAM

Like us on Facebook
Follow us on Instagram: LaviniaWorldStore

Don't forget to include #laviniaworldstore on your projects and tag us at @laviniaworldstore so we can be sure to see and comment on your Lavinia projects!


You have until Monday, Jan 27 to enter in either Lavinia World Challenges or Anything Lavinia.  We can't wait to see what you share with us!! Don't forget, the winner will receive a $15 gift code to do some shopping at Lavinia World.


Until next time.....

Monday, January 6, 2020

Tea Time {Jan's Digi Shop}


Hey everyone, welcome to Jan's Digi Stamp Challenges #5.  I have a new project featuring this digi stamp set from Jan's Digi Shop called Tea Time 3240J

This is such a fun set to use, with so many options.  I decided to create a birthday card combining many of the images.


After designing my card on the computer and using digital papers for my background and frames, I changed the colors of the sentiments to a dark burgundy.  The Brew-tea-ful is actually two-toned, but this was really hard to capture on the photo.  Once I was happy with everything, I printed it out and added color with colored pencils.  Glitter was also added to the flowers.  Here is a close up so you can see them better.


Now it's your turn to come play with us.  Jan's Digi Stamp Challenges will be held the first and third Monday of every month.  Winners will be chosen randomly and will have two weeks to collect their prize.  (All the details are under the Challenge Guidelines tab at the top of the Challenge Blog page.)

Come get social with us:
Facebook - Shopping - Pinterest - Challenges

Love Jan's digi images?  Want to be a part of this amazing team?  Good news - we're having a Design Team call.  Details can be found here.  Good luck!!


Until next time.....


Friday, January 3, 2020

Chibi BFF {Scrapper's Delights}


Hey everyone, it's the first Friday of the the new year and that means it's time for the Chibi New Release from Scrapper's Delights.  Right now there's a sale going on.  You can get 40% off your order (no minimums). What a great deal!

I'm using the Chibi BFF image for my project.


After printing out the image and sentiment, I colored the girls with Copic markers.  The background was created using colored pencils.  A sweet little charm was added as the finishing touch.

Be sure to check out what the rest of the team created on the Scrapper's Delights Inspiration Blog and join us on our Facebook Fan Page.

I'll be sharing the Anime New Release from Scrapper's Delights on the last Friday of the month (Jan 31).


Until next time.....


Monday, June 26, 2017

Tropical Mermaid Alana


Today's card showcases the Tropical Mermaid Alana stamp set from Sparkle N Sprinkle.  I used the digi version of the stamp set and my background paper is also digi paper (Digi4002FS Watercolor Paper Blue). 

I brought in the digi paper first onto my Word document and then inserted the .png version of the image and layered it on top of the digi paper.  The image portion stayed white while the rest of the background was the digi paper.  I then changed the shape and added a silver border before printing the entire thing and fussy cutting it out.  

The image was colored with Copic markers. Shimmering Sea glitter and Sea Spray glitter accents her body.  Oceanic glass glitter was used to accent the sea floor and Neptune Nuvo Crystal Drops accent the water bubbles.
The sentiment was printed at the same time and die cut using a Sizzix die (Tim Holtz Labels).  While the die cut was still in the die, I outlined the inside of the die using a Sakura glue pen and then covered the glue line with Sea Spray glitter.  The small images inside the sentiment were colored with colored pencils.
A strip of 1/2" Tear-ific Tape and  1/8" Tear-ific Tape were added to the front panel and covered with more Oceanic glass glitter.  The sentiment was then pop dotted on top of these strips.


Friday, March 17, 2017

Irish Blessing


Happy St. Patrick's Day!  Today is the day that everyone has a wee bit of Irish in them 😀.  I have one more St. Patrick's Day card to share with you today called Irish Blessings from Sparkle N Sprinkle.

One of the fun things about this card is that it contains a hidden message tag:


I started out by stamping the image with VersaMark and then heat setting it with Coffee embossing powder.  Prismacolored pencils and Koh-I-Noor colored pencils were used to color the image.  The shamrocks and the inside of the lucky horseshoes have a touch of Spirited Green glitter for added bling.

The die cut is from Tonic Studios that I altered.  It's called It's The Little Things Flip Flop die set, but I cut off the flip part and used the main portion of the die.  I die cut this from cream colored cardstock and applied Nuvo Embellishment Mousse (Spring Green) to it with my fingertip.  This set also comes with the cut out frame, which I heat embossed with Irish Spring embossing powder.


The hidden message was stamped with VersaMark and heat embossed with Black Detail embossing powder.  I distressed the edges using a Versamarker embossing pen and heat set more Irish Spring embossing powder.  The tag was also covered with Spring Green Nuvo Mousse.

The pattered cardstock is digi paper from Echo Park (St. Patrick's Day Mini theme).


This is one of the other sentiment that comes with the Irish Blessings stamp set.  Although I did not incorporate it in my card today, it is one of my favorite Irish quotes and it is my wish for you today.


Monday, March 6, 2017

Bonnet Bouquet


Today I'd like to share an acetate card with you featuring the newly released Bonnet Bouquet stamp set from Sparkle N Sprinkle.

The front of this mixed media card was created with Embossable Clear Acetate sheets, Tonic Studios die (Mixed Edge Rectangles Layering Basics die set), and Super Thick Silver embossing powder.

To start off, I sprinkled some Super Thick Silver embossing powder onto the embossable acetate and heat set it from the bottom.  Don't try this with regular acetate as the heat will curl and melt the acetate.


The image was stamped with Memento Ink (Tuxedo Black) and colored with Copics and colored pencils.  Various glitters were used to accent the flower centers: Sunny Daze, Guava Nectar, Orchid, and Raspberry Soda.  Princess Anna Royal glitter was used to accent the ribbon and bow.

I then die cut a couple frames using the Tonic Studios die set.  I love that they have little notches on each side of the dies so you can line them up properly and cut out an even frame.

I also die cut another piece of navy cardstock to fit inside the smaller of the two frames.  I stamped the sentiment and the single flower (multiple times) with VersaMark and then heat set it with White Detail embossing powder.

I fiddled around with the placement so that the flowers would show through the frame on the front and not be obscured with some of the Super Thick Silver embossing powder.  Once I was happy with how it looked from the front, I adhered this piece to the inside of the card.

On the front of the card (the acetate), I adhered the frames and made sure the smaller of the two frames was positioned over the inside piece.  I then adhered the fussy cut image on top.  You still see the white flowers peeking around the edges of the focal image, but you don't see the sentiment until you open the card.

Tuesday, February 28, 2017

Patriotic Girlfriends {Sparkle N Sprinkle New Reveal Blog Hop}


Welcome to the ALL NEW 
Sparkle N Sprinkle
 March Reveal Blog Hop!


NEW STORE - NEW BLOG - NEW PRODUCT LINES!


There are FOUR new rubber stamp sets being released this month, plus a new Digi Papers set, and a Digi Only Bundle set full of lots of extras.   

The sets are:


Flower Silhouettes - 824  (digi version - DIGI824BG)

Patriotic Girlfriends - 827  (digi version - DIGI827J)

Irish Blessings - St. Patrick's Day - 834  (digi version  DIGI834B - includes additional images)

Bonnet Bouquet - 838  (digi version - DIGI838J)

DIGI3130FS - Blue Pansies Digi Bundle Pack   (includes lots of images, decoupage sheets, sentiments, and papers)

DIGI4002FS - Digi Watercolor Papers: Blue 


When you purchase the digital versions of any of the SNS rubber sets, you are getting lots of extras that are not available otherwise.  These extras can include additional images, sentiments, digi papers, or decoupage sheets that not available with the rubber version.  

Every new digi set purchased always includes the following:
 ~ black and white images
~ colored images
  ~ .jpeg format (white background) 
~ .png format (transparent background) 
 ~ a cut file to use with your electronic cutting machines!


You're definitely going to want both the rubber versions AND the digi versions of all our new releases.


The new sets are 20% off until March 3, 2017, so after the blog hop, hop on over to the NEW STORE and have fun shopping - be sure to check out the OTHER amazing new products as well! With names like TONIC and STAMPENDOUS and HOUSE MOUSE, you're sure to fill that cart up quickly!


SNS also has a brand new blogwhich can be found here!


On March 3, ONE GRAND PRIZE WINNER will be selected from the comments left on all the Designers' blogs listed below.  Please leave a comment with each designer to be eligible for the Grand Prize (checked for compliance).  The Grand Prize Winner will be announced on the SNS Facebook page and the SNS New Blog.  


The Blog Hop Order this month is:

Anne (you are here)
Jess
Eret
Donna
Shona
Diane
Chris
Belinda

(*Tip: if you have difficulty with a particular link, try clicking on the Designer's blog title to send you to their Home page.)


We hope you enjoy the New Reveal Blog Hop as much as we do.  Thanks for joining us and remember to comment on each of the Designers' blogs to be eligible for the Grand Prize.  
 Wonder who the Mystery Host will be this month????


Have you checked out the SNS YouTube Channel featuring Demo Donna?  If not, then you are in for a real treat.  Subscribe today to get all the latest Demo Donna tips and techniques!


Now for a bit about my project:


  I created my own version of a Z fold card using the Patriotic Girlfriends.  

Here's what it looks like open:


I started out by stamping the image with Memento Tuxedo Black Ink and then coloring the image with Copic markers.  I also added some shading and highlights with colored pencils.  The stars on the flag were given a bit of bling with Sparkling Snow glitter.   This was adhered to a piece of blue cardstock die cut from a Tonic Studios die (Mixed Edge Rectangles Layering Basics die set).  This set has small notches on the sides of each die to make it easier to line up and cut out straight frames 😀.


On the first portion of the Z fold band, I stamped the sentiment with VersaMark and heat embossed Firecracker Red embossing powder.  The Bursting Stars die cut, by Die-Versions, was also heat embossed with Firecracker Red.  I used the stars (negative pieces from the die cut) on the second portion of the Z fold band.


I stamped "America", also part of the stamp set, with Memento Ink (Lady Bug).  Then I colored it with Copics and used colored pencils for highlights.  

After it was colored, I added VersaMark on top and then heat set it with Sparkle embossing powder.  I pop dotted the sentiment to the USA die cut, by Die-Versions.  The die cut was colored with Copics and Sparkling Snow glitter adds bling to the stars.  

Here is one more look at my version of the Z fold completely open: 


Now it's time for you to visit Jess's blog.  I know she has something really special to share with you.

Happy Hopping and don't forget to leave a comment on everyone's blog for you chance to win all the new rubber stamp sets revealed this month.


Wednesday, July 31, 2013

Pink Angel


I think this new Noel Angel stamp set from Sparkle N Sprinkle is so versatile and can be used to so many occasions besides Christmas.  That's what I did here.  I didn't add a sentiment because I thought this would be a good Thinking of You or Sympathy card.

I stamped the images with VersaMark and then heat set them with Vintage embossing powder. I then colored both the angel and the flower corner pieces with Prismacolor colored pencils and fussy cut them out.

To create the glittery background, I cut a piece of Sticky paper to the size I wanted and adhered Navy glitter to the entire surface.  It makes a very sparkly background.  The frame around the angel is a die cut by Cheery Lynn Designs.  I adhered the corner pieces on top of the die cut frame for nice embellishments.

Wednesday, March 24, 2010

Hang on to You

This stamp is from Inky Antics and I used Prisma colored pencils and gamsol odorless mineral spirits (both of which can be found at your local craft store) to color in all the details. Using odorless mineral spirits can be tricky because you don't want to saturate the paper stump you use to blend in the colors; otherwise it looks greasy (and I'm sure you know how I know this...). The colors are muted greens and yellows, for the most part, because I was going for a soft look.  On the inside of the card I stamped a couple more monkeys and the saying "I think I'll hang on to you".  (This was for an anniversary card.)   For the center square, I double stamped the image, colored and cut out the monkey and pop dotted him for a 3 dimensional look.  On a separate piece of paper, I stamped the name, tore the paper all around the edges and pop dotted it for emphasis.

Thursday, March 4, 2010

Flowers

I'm trying to get an early start on my Mother's Day cards even though I haven't made my St. Patty's Day or Easter cards yet.  Since my mother-in-law's favorite color is purple, this is what I created for her.  The stamped image came from Unity Stamps; Spellbinders oval and scalloped oval dies were used to cut out the image.  Prismacolor pencils and OMS (odorless mineral spirits) were used for the coloring.  I also added a few Distress stickles (thanks for the reminder Donna) to the center of the flowers.  The background strip was punched out with one of the many new Martha Stewart punch around the page punches on the market.