Showing posts with label Simon Says Stamp. Show all posts

Wednesday, March 17, 2021

Wooly Lucky to Have You As A Friend {DRU Inspiration}


Hey everyone, I'm up today on the DRU Inspiration Blog.  Since it's St. Patrick's Day today, I wanted to share a cute card with you. 


Before we get started though, I'd like to remind everyone that the DRU Inpsiration team is having a DT Call. You can find out all the details HERE. The call closes today, so don't wait to apply.


Now for more info about my card.  I used the following products from Dies R Us: 


To start off, I die cut the next to largest banner twice, once from a dark shade of green cardstock and once from a lighter shade of green.

Next, using the shamrock die from the Pot o Gold die set, I cut out several shamrocks from the lighter color cardstock. I wanted to use the negative space for today's project, so save those shamrocks for a future project. I then adhered the two banners together. 


I had a cute little St Patrick's Day stamp set that I used for the front of the card. After stamping the image, I fussy cut it out and colored it with Copic markers.  I added Fairy Hugs  Shamrock glitter to the shamrocks on his blanket.


I wanted a bit more bling, so I die cut the largest banner from white cardstock and added more of the Shamrock glitter to the edges.


While die cutting this last piece the negative portion from the die cut gave me the idea of using it for my sentiment. So I flipped it over to create a space below my focal point.


Here's one final look of today's project.


Don't forget to come join in the fun at the Dies R Us Challenge Blog.  There's a new challenge theme offered on the 1st and 15th of each month and one lucky randomly drawn winner will receive a $10 gift certificate to the Dies R Us Store.  For your convenience, all the important Dies R Us links are provided below.

click below for:


Remember, today is the last day to apply for the DRU Inspiration DT Call! 


So glad you stopped by,

Monday, December 28, 2020

Dream {Fairy Stamper}


Today's Fairy Stamper project is another quick and easy one.

The focal panel showcases the Fairy Hugs Stardust stamp.


To create the galaxy effect on my oval focal panel, I used a variety of Nuvo Embellishment Mousse colors on black cardstock.  Once I was happy with the look, I stamped the Stardust image multiple times with VersaMark and then heat embossed it with a yellow sparkle embossing powder.

The blue panel behind the focal panel carries the Stardust theme as well.  I stamped the image several times around the edges with VersaMark and allowed it to dry naturally.  I love how it leaves a watermark image where you stamp.

The yellow panel was dry embossed using a Crafters Companion embossing folder (Distress) and my sentiment is a die cut that I added Fairy Hugs Glitter Powder (Pixie Dust) to for added sparkle.

Come join our Fairy Stamper Facebook group to see all the latest inspiration from the design team and from the members.  This is YOUR group where you can ask questions, get inspired, and share your projects with us!


Until next time,

Thursday, January 16, 2020

Dream {Lavinia World #18}


Hey everyone, so happy that you're here.  Today is the beginning of a new Lavinia World Challenges #18.  The theme is always Anything Goes using a stamped image (no digis please).  You can enter our challenge either through our Challenge Blog, or through our Anything Lavinia Facebook Group.  We'd love to have you join us in both places!  The winner of the challenge wins a $15 gift code to go shopping at Lavinia World.

This project was created using the following stamps:


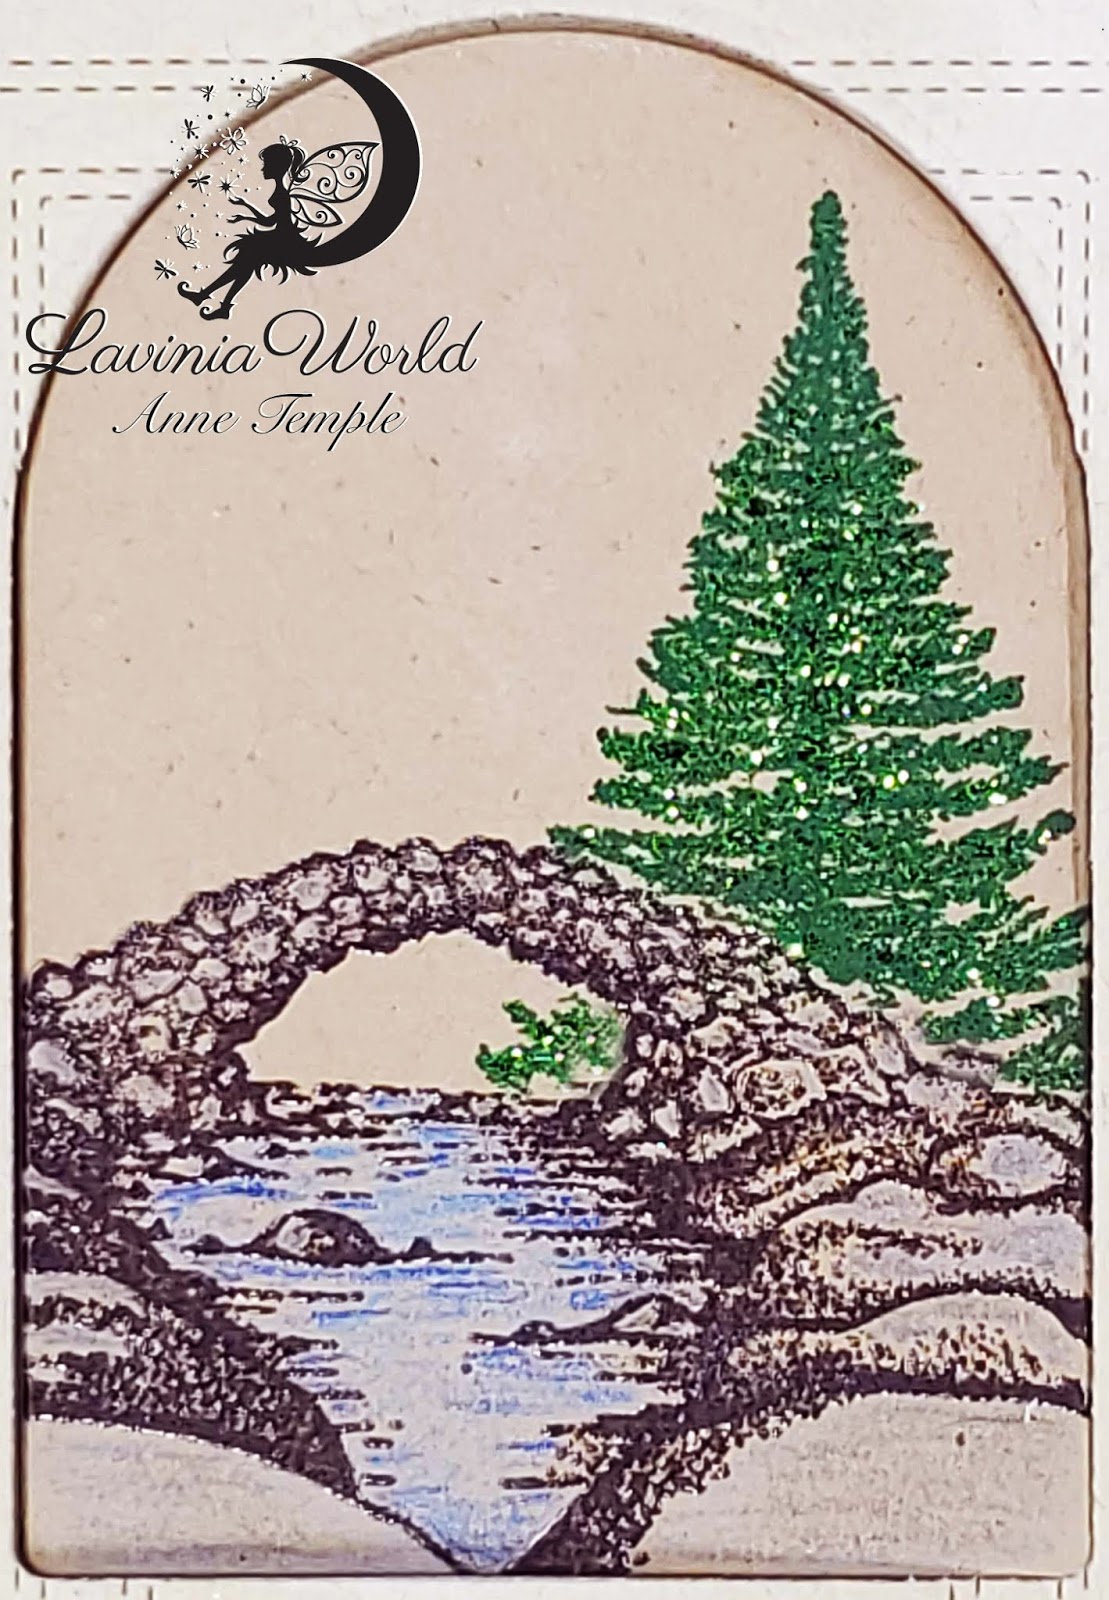
This is a fairly simple card to create.  I started out by die cutting the center from a piece of light kraft cardstock using a My Favorite Things die (Tall Snow Globe).  Save the die cut for a future project and use the negative piece.  Using the same die, I cut out the shape again, only using a darker shade of kraft cardstock.

Using a stamp positioner, I stamped the Fairy Bridge first using VersaFine Clair ink (Pinecone) onto the darker shaded die cut.  I then cleaned the stamp, inked it up with VersaMark and heat set it with Clear embossing powder.  I stamped the bridge a second time on scrap paper to create a mask.

Temporarily adhere the mask on top of the stamped bridge and then stamp the Fir Tree in the background.  I stamped it a couple of times with VersaFine Clair (Green Oasis) to make sure everything stamped ok. 


Next I brought out my colored pencils and shaded the water and the rocks.  I added green glitter to the Fir Tree for a bit of sparkle (and it also gives it a little more shading).

Taking the negative piece of lighter kraft cardstock, I ran it through my die cutting machine using a Law Fawn die (Just Stitching Double rectangles).  This die adds stitching, but doesn't actually cut anything out.  I used all the dies in the set.

I added pop dots to the negative piece and adhered it to my card base.  Next I added adhesive to the stamped focal point and dropped it down in the opening.  It's easier to do it this way as I don't have to worry about centering the focal point exactly in the right spot.  This way automatically does it for me 😀.

Lastly, I die cut my sentiment using a Simon Says Stamp die (dream) from black cardstock and adhered it under my focal point.

I think this would make a great card for a guy and you can add any sentiment you wish.

Now it's your turn!  Share your projects with us on the Challenge Blog, Facebook, Instagram, and our Anything Lavinia Facebook group:

Anything Lavinia


STORE ** CHALLENGE ** FACEBOOK ** INSTAGRAM

Like us on Facebook
Follow us on Instagram: LaviniaWorldStore

Don't forget to include #laviniaworldstore on your projects and tag us at @laviniaworldstore so we can be sure to see and comment on your Lavinia projects!


You have until Monday, Jan 27 to enter in either Lavinia World Challenges or Anything Lavinia.  We can't wait to see what you share with us!! Don't forget, the winner will receive a $15 gift code to do some shopping at Lavinia World.


Until next time.....

Thursday, August 29, 2019

Dream {Lavinia World #8}


Hey everyone, today is Thursday and that means it's time for a new bi-weekly challenge from Lavinia World Challenges! Submit your project by Sept 9 for a chance to win a $15 gift certificate to Lavinia World.  Your chances of winning doubles if you use a Lavinia stamp 😀.

I created a fun shaker card for this challenge and used the following Lavinia stamps:

Rory & Darcy Set

Cherry Blossom Tree


I started out by creating my background panel using Canvas paper (normally used for acrylic and oil paints) and Nuvo Shimmer Powder.  Using this type of paper gives it more of a handmade paper look in person.  To get this look, I heavily spritzed the paper with water and then began adding the Shimmer powders.  I then used my handy crafting tool (my finger) and moved the water and powder around.  Pretty quickly the paper begins to pill and the top layer begins to rub off.  I kept going until I was happy with the results and then I let it dry overnight.  I brushed off some of the larger pill that fell off and I left the remaining ones.  This is what makes it look more like handmade papers.

Since the paper definitely has texture, you'll want to stamp your images using some sort of stamp positioner (like the Tim Holtz Stamp Platform or a Misti) because it will most likely take more than one stamping to get full coverage.  I did need to stamp each image several times using Versafine Claire Nocturne ink.  I added the ground using a Copic marker.

Once this was completed, I created my shaker box and decorated the front using a Sue Wilson Designs nesting frame set (Noble Dies-Double Pierced Rectangles, Set B).  I wanted these to have a bit of shimmer so I heat embossed them with an embossing powder that also included glitter in it.  My sentiment is also a die cut, from Simon Says Stamp.

Now it's your turn. 😁  Be sure to check out the AMAZING projects by the rest of the team and get social with us.

STORE ** CHALLENGE ** FACEBOOK ** INSTAGRAM 

Like us on Facebook
Follow us on Instagram: LaviniaWorldStore

Don't forget to include #laviniaworldstore on your projects and tag us at @laviniaworldstore so we can be sure to see and comment on your Lavinia projects!


Until next time.....


Friday, June 21, 2019

Anime Bill and Jill


Welcome to the monthly Scrapper's Delights Anime New Release for June!  This month we are having it a week early to coincide with our Sponsor Spotlight featured on Passionate Paper Creations (on Facebook).


There are five new images, plus the Cancer VIP Deal image.  The Zodiac VIP Deal is the best deal because not only do you get all five of the new Anime images, you also get the VIP image and lots of other elements (31 to be exact) that go with it.


For today's project, I combined three of the five new images: Anime Jill, Anime Bill, and the School Lockers.  The images are colored with Copic markers and then added behind a frame (as if this photo was in a year book).

The negative portion of a Sue Wilson die cut (Noble dies-Ornate Pierced Rectangles) was used to create the frame.  The stitched circle die cut is from Simon Says Stamp and was die cut from some Tonic Studios Craft Perfect embossed papers.  The sentiment is a die cut from Tonic Studios and was die cut from white cardstock and then color was added using the direct-to-paper method and Versafine Clair ink (Paradise).  I then heat embossed it with Clear embossing powder.  A few Nuvo Sequins (Rose Gold) were added as a finishing touch.

Here is a Sneak Peek for the upcoming Chibi New Release on July 5:


Be sure to check out what the rest of the team created on the Scrapper's Delights Inspiration Blog and join us on our Facebook Fan Page.


Until next time....


Wednesday, May 15, 2019

Birthday Kitties {Scrapy Land #114}


Hey everyone, it's Wednesday so that means it's time for a new Scrapy Land Challenge.  The theme is Anything Goes using any brand of die that Scrapy Land sells.

I needed a birthday card that had to be mailed, so I wanted it pretty flat to fit in a regular A2 size envelope.

Dies used:
Tonic Studios, Tutti Designs, My Favorite Things


I started out by stamping this cute image from Newton's Nook (Newton's Birthday Trio) onto white cardstock and coloring it with Copic markers.  I added Glossy Accents to each of the speech bubbles and die cut the grass using an older My Favorite Things die.  (You can find lots of grass dies here.)  The grass was also die cut from a scrap of white cardstock and colored with Copic markers.

The layers were created using a couple different nesting dies.  The stitched dies are Tutti Designs (Nested Stitched Rectangles) and the small scalloped layers are by Tonic Studios (Mixed Edge Rectangle Layering Basics).  Any of these dies would also work.

Now it's your turn to play along with us.  You have until May 12 to join us and have a chance to win one of two gift certificates to Scrapy Land.  All the details can be found on the Scrapy Land Challenge blog.


Wednesday, January 16, 2019

Hugs {Scrapy Land #106}


Hey everyone.  time for a brand new Scrapy Land Challenge.  The theme is always Anything Goes using any brand of die that Scrapy Land sells.

Today's card was a lot of fun to make.  I saw a tutorial where you stack stencils on top of each other to create a unique background and I knew I wanted to try that. (You can find the tutorial here.) I started off with white cardstock, stenciled VersaFine Clair ink through a Tonic Studios stencil (Mesh Panel) and then layered a Tim Holtz stencil (Scribbles) on top of that and added a different color of Versafine Clair ink.  The remaining white areas was a little too bright, so I lightly blended more VersaFine Clair onto the whole thing.

Once this was completed, I die cut the cardstock using a stitched rectangle set that I own.  Any of these would work just as well.


Next up was deciding what to have as my focal point.  I created some flowers using a Heartfelt Creations stamp set and coordinating dies (Blazing Poppy Petals).  Any brand of die that creates flowers will work.  The ones that you can form and add dimension work even better.  Color was added to each flower using various VersaFine Clair inks (Summertime, Golden Meadow, Twilight, Cheerful, Charming Pink, Glamorous) and then I die cut them using the coordinating die. Once my flowers were layered and given dimension, I added some Prills to the centers.


The flowers are layered on top of a Sue Wilson oval (Rose Oval). I die cut the center of the oval using one of the dies in the set to have it open and then, using the same die, die cut a piece of velum to add back to the center.  This allow the background to still show through, but blurs it enough so that you can see the sentiment.

The sentiment is part of a four die set from Avery Elle (Sentimentals) and was die cut from vellum.  I added more VersaFine Clair to the back side for color.

The card base was die cut from coordinating cardstock using a Sue Wilson Designs die (Noble dies-Double Pierced Rectangles).

Now it's your turn to submit an entry (or two) and have a chance of winning one of two gift certificates to go shopping at Scrapy Land.  We love seeing all types of projects....CAS to scrapbooking to mixed media to journaling to.......well, you get the idea 😀.  You have until Feb 3 to join us for the Scrapy Land Challenge #106.


Wednesday, August 15, 2018

Christmas Elf {Scrapy Land #96}

front
inside


August is just flying by.  It's already the third Wednesday of the month and that means it's time for a brand new Scrapy Land Challenge.  The theme is always Anything Goes using any brand of die that Scrapy Land sells.

I've created a cute Christmas card to add to my pile.  I'm (very) slowing beginning to work on my Christmas cards.

The following dies were used to create my Christmas card, along with a couple different stamp sets and an embossing folder.


Die-Versions: Tannenbaum (any of these would work as well)
Elizabeth Craft Designs: Entwined Ovals
Tutti Designs: Dotted Nesting Rectangles

I stared out by die cutting the Yupo paper with the Tannenbaum die and coloring it with Zig Clean Color Real Brush watercolor markers.  All the ornaments and string of lights have added dimension and shine from using various colors of Nuvo Crystal Drops.   The outside edge of the die cut was colored using a Krylon Gold Leafing pen.  I dry embossed the front of the card base using a Crafters Companion embossing folder (Wood Grain) before adhering the the Tannenbaum die cut.

The elf is from a Simon Says Stamp set (Naughty and Nice Elves) and was colored with Copic markers.  He was then pop dotted in front of the Christmas tree.

The inside of the card uses a stamp set from Heartfelt Creations (Noel Sentiments).  This was stamped on to a piece of white cardstock die cut using the Dotted Nesting Rectangles using Versafine Clair ink and then heat embossed with Clear embossing powder.  (If you haven't tried this new ink yet, I highly recommend it!  I only have this Twilight color, but I want/need them all :-). ) The Entwined Ovals die cut was then adhered to complete the inside of the card.


October 17, 2018

We are getting closer and closer to our 100th Challenge Celebration!  Be sure to mark your calendars (Oct 17) for this special Challenge.  We have some great prizes and will share the details when it's closer to the 100th Challenge.

You have until Sept 2 to join us for the 96th Scrapy Land Challenge.  Upload your photo using the InLinkz button for your chance to win one of two gift certificates to go shopping at Scrapy Land.

Be sure to check out the amazing projects created by the rest of the team for added inspiration.  We can't wait to see what you create!


Wednesday, July 18, 2018

Aged to Perfection (Scrapy Land #94)

front


inside


Happy Wednesday! It's time for a new Scrapy Land Challenge and the theme is always Anything Goes using any brand of die that Scrapy Land sells.

The dies used for this card were:
Card Deco: Frame Card Stamp 4K
Sue Wilson Designs: New York Collection-Madison Square
Elizabeth Craft Designs: Stitched Square


I created this birthday card for a friend of mine using the Art Impression stamp set Big Birthday Wishes and colored i with Copic markers and adding touches of sparkle with Spectrum Noir Sparkle markers.  A few well placed Nuvo Crystal Drops help accent the dots of the birthday cake and the heart on the apron.

The mats for both the front and the inside images were die cut using the Sue Wilson die.  The card base was die cut using the Card Deco die.

Now it's your turn to join us  You have until July 29th to play along for your chance to win one of two gift certificates to Scrapy Land.