Showing posts with label smooch. Show all posts

Thursday, December 27, 2012

Party Time


It's time to start counting down till the New Year and to help you Die-Versions has some great New Year's dies.  Since Die-Versions dies are so die-verse (thanks Suz!) I decided to create a bithday themed card and layout with a couple of the December new release dies.

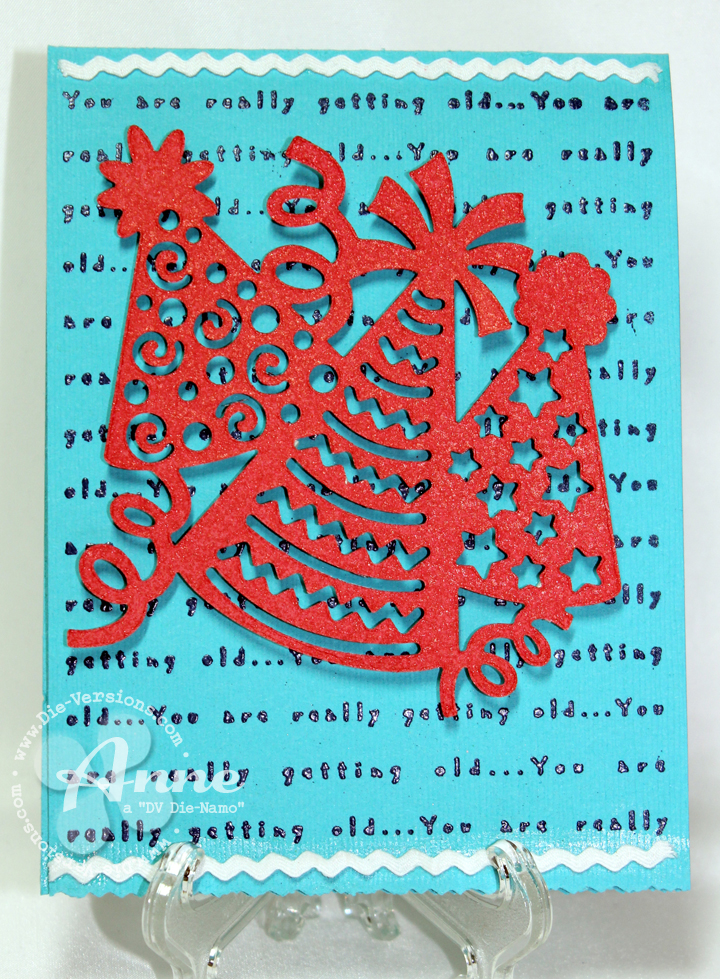
First up is the Party Hats and I created a simple and quick card for someone of any age.  (I really love that subtle background stamp from River City Rubber Works.)  I pop dotted the image for added dimension.  I didn't stop with decorating the outside either.  On the inside of the card, I used the Sparkler font and some of the negative portions for the hats.


 Next up are the Party Horns and again, I thought of birthday instead of New Year's celebrations.  Just shows how versatile these dies really are.  I created a layout of my husband's birthday a couple years ago (I'm really behind on my scrapbooking).  To create the title, I used the Party Pennants 1 banner and the Tick Tock font.  I carried the pennant idea down to anchor my party hats that are closer to the photos.

I also used all the negative portions of the die and colored them with Smooch inks.  The finishing touch is some tomato red tinsel glitter from Sparkle N Sprinkle for lots of bling and added dimension.

Head on over to the Die-Versions Blog to see the fabulous New Year's projects the rest of the team created!

Tuesday, December 4, 2012

Give Thanks


Although the Christmas season is fully upon us, I wanted to share one more fall card.  The technique I used to create this is called a Tunnel card.  It's fun and easy to do.  You could even make up a bunch ahead of time and slip in the perfect Die-Version's Sweet Spot when you needed it (since all the Sweet Spots are the same size).  Even though I created a fall card with the Give Thanks Sweet Spot, it would be perfect for any time of the year.  I added a bit of twine and vintage buttons and my card is all set.

Don't forget to visit the Die-Versions Blog for lots of great inspiration.

Tuesday, October 2, 2012

Christmas Eve Scene


I was so surprised and excited to see my card as the one used on the newsletter email announcing all the October new release dies from Die-Versions.  If you haven't signed up for the newsletter, you definitely should.  The signup is located on the bottom right of the Die-Versions' home page.  If you are signed up, then you already know the new release is here.

This is the Christmas Eve Scene, one of the new Whispers dies.  It's such a versatile die because you can make something quick and easy, something in between, or something very detailed - it's up to you.  I cut the image out twice, once in dark blue cardstock and once in white so I could use some of the negative pieces.  I also cut a scalloped circle in light blue patterned paper for the background.  The white pieces were given a bit of shine with Smooch pearlized ink (Illuminate) and the moon was painted with Smooch's gold lame.

To see more examples from the new release, head on over to the Die-Versions blog.  The rest of the design team have created some wonderful projects!

I'm also entering this in the following challenge: Oozak (die cuts/punch).

Friday, August 3, 2012

Fisherman's Delight


I'm so excited to say that my card using Pattie's Creations Fisherman's Delight was selected to be published in the Designed to Color June/July 2012 edition.  This is a new magazine that is both in print (by subscription) and online.  One of the conditions of being published is that I couldn't share my project until 30 days after publication.  So I'm sharing it with you now.

The image is colored with Copic markers and fussy cut out so I could pop dot the fish for extra dimension.  I also applied Shimmerz (Angel Wings) paint to the fish for a more realistic look.   Lifestyle Crafts Nesting Labels 7 were used for my mats and distressed with Distress Ink (Brushed Corduroy).  The sentiment is a rubber stamp by Unity Stamps that has been stamped on a Sizzix Movers and Shapers (Mini Ticket set) die cut.  The wires one each side of the image are actually Christmas ornament hooks that I picked up after Christmas because I thought they would look cool on a card.  Added a bit of ribbon, and a perfect card for any fisherman.  One more quick note - when I showed the card to my husband, he said "hey, those are my boots!"  Yep, I got the color idea from a pair of rubber boots he has.  Inspiration is everywhere.

I'm also entering this in the following challenge: Simon Says (sentiment).


Copics used: YG93, YG97, C3, YG99    Y23, YR21, E31, E35, E15, E18    R02, R05, R35, C00, C2, YG91, YG93
papers: first mat and card base: Creative Memories; middle panel- from stash, manufacturer unknown
other: Christmas ornament hooks, ribbon, pop dots


Monday, July 30, 2012

Suzie's Summer


Time for a new Digi Makeover Challenge.  The theme this week is Endless Summer.  Who better to show us a fun summer activity than Suzie the fairy from Paper Makeup Stamps?


Suzie is colored with Copic markers and fussy cut out because I wanted her to look like she's underwater.  I also added Stickles (star dust) to her wings and Glossy Accents to her scuba mask.  Smooch pearlescent ink (illuminate) was added to the sentiment, which comes with the image.  Both layers were cut using Lifestyle Crafts' Nesting Flower dies (I call them the wonky circles).  Spellbinders' M-Bossabilities (Sea Beauty) was used to emboss the first layer.  A few under the sea embellishments and some twine were added to complete the card.


Head on over to the Digi Makeover Challenge blog and show us your endless summer project.  Don't forget to visit the rest of the digi makeup artists while you're there and be sure to say a special hello to this week's guest designer, Sammi (aka Sammibug).

I'm entering this in the following challenge: Simon Says (use a sentiment).

Copics used: E70, E71, E77, RV95   YR04, YR07, YR09, R14, R17, R46   R02   Y08, Y17   RV00, R11   B0000, BG01    E13, E15, E17, E29

Friday, July 20, 2012

Happy Spring


inside


This card was created using one of the older jumbo Stampendous cling stamps that I fussy cut out and colored with Smooch pearlescent inks.  The frame and larger butterflies are dies from Cheery Lynn Designs and the small butterflies are the "negative" portions of a Memory Box border die.  I continued the theme on the inside as well.


Monday, April 30, 2012

Brandt


This week's Digi Makeover Challenge is a sketch and I used Brandt Fairy and sentiment from Paper Makeup Stamps.


I adhered to the sketch pretty closely, although I made my circle much larger as I made a 5"x5" square card.  Brandt is colored with Copic markers and I used Smooch Pearlized Ink (azure, siren) on the sentiment.  The border is by Memory Box (Sanibel border)  and I distressed everything with Distress Inks (Faded Jeans).  The backing papers are from Authentique and the card base is from Bazzill.

Be sure to check out what the rest of the design team has created for you.  You have one week to upload your project to the Digi Makeover Challenge blog.  Be sure to use a digi on your project.

Copics used: E00, E01, E11    B12, B14, B26    YR12, YR24, E35    Y000, Y00    Y02, Y04, Y06, Y08    E55, E34

Monday, April 23, 2012

Monster of a Gift


It's time for a new challenge from Paper Makeup Stamps' Digi Makeover Challenge.  This week's challenge is for something we all need to have on hand:  a birthday card.


Monster of a Gift from Paper Makeup Stamps is a perfect choice, because everybody likes gifts, even monsters.  The image is colored with Copic markers and fussy cut out so I could pop dot it above my background.  I created the background by stamping an older Hero Arts rubber stamp with a glue pad and sprinkling Stampendous glitter (sea green) all over.  Smooch (illuminated) was painted on the monster's spots for a shimmery effect.   I added some paper floss and a button, and I now have one more birthday card in my stash.

You have one week to upload your birthday creation to the Digi Makeover Challenge blog.  The rules are listed right before the Mr. Linky button, but are pretty simple, with the main one being that you must use a digi image for our challenges.

Copics used: BV13, BV17, Y08   G14, G17, G19    Y14, Y15

Monday, April 16, 2012

Dream


Today's Paper Makeup Stamps' Digi Makeover Challenge is to make a pocket card.


Once I decided to use this Word Art from Paper Makeup Stamps, I designed a criss-cross type of card to fit this rectangle.  I added glitter to the edges by first applying double sided tape (so I would have straighter lines) and then I added PK Glitz glitter as well as some rick rack ribbon.  I also changed the colors of the word art by using my Gimp software (it's like Paint.net, but for a Mac).  I still wanted a bit more sparkle, so I outlined the letters of "dream" in coordinating Spica glitter pens and used Smooch Pearlized Ink (siren) to bling up the heart.

Once I had my pocket made, I wanted to make a basic card shape so I could add a note to the recipient on the inside.  I hand stitched along one corner and added buttons to finish it off.

You have one week to upload your pocket card to the Digi Makeover Challenge link button.  Don't forget you must use a digi for our challenges.  Check out what great pocket card ideas the rest of the team came up with too.

Monday, March 19, 2012

Chomp


Challenge #28 from the Digi Makeover Challenge team is from an Inspirational photo: spring colors


I thought Chomps, from Paper Makeup Stamps, was just the cutest thing eating a flower.   I've been seeing a number of white on white projects lately and that's what I decided to do for this spring card.

After coloring Chomps with Copics, I fussy cut him out and adhered him to my first layer.  This was actually a piece of junk mail that I had received a few days earlier.  (For once, something useful.)  The background was plain cream, so I added clouds and a sky with chalks.  This is matted onto a piece of white copy paper spritzed with Smooch Spritz (vanilla ice), which looks very shimmery behind Chomps. The green strip is distressed with Paper Soft Colors (lime green) and the brads are colored with Copics to match the pink flower Chomps is eating.  The base cardstock is embossed with leaves, although they are difficult to see.

Head on over to the Digi Makeover Challenge blog to enter your photo inspired project.  Don't forget, you must use a digi and follow this week's theme.  Check out the rest of the design team's creations for lots more inspiration.

I'm entering this in the following challenge: Mark's Finest Papers (CAS).


Copics used: YR00, YR01, YR02, YR07    YG0000, YG01,  R24, R37, R89    YG03, YG45    RV04, RV09, Y02, Y06, G17    B05
Smooch: Gold Lame, Illuminate

Friday, March 16, 2012

Does this color make me look fat?


I had a little time to do a fun card (non design team) and I decided to try the bleach technique, which is also the challenge at Blockhead Stamps this month.  This is the first time I've tried this technique and I learned a few things, including that all black cardstock isn't created equally.  The first piece of black cardstock I tried was cheap and didn't bleach evenly.  As a result, the color was blotchy too.   I also discovered that embossing ink works much better than watermark ink (Versamark) because it holds more of the embossing powder and you get a sharper outline.   Lastly, you need to be patient.   After coloring the image, it didn't pop - at all!  It looked quite dull in fact.  I didn't have water based markers, so I tried pigment and dye ink markers (all waterproof), Smooch pearlized inks, and Distress Inks with a water brush.  All of them looked dull.

Since I wasn't getting anywhere, I walked away for a few hours.  When I came back to my craft room, the colors were much brighter.  And I was much happier.  Not only did I do the ladybugs, a rubber stamp from Unity Stamps, I also stamped and bleached one of the Unity butterflies (I'll didn't have time to create a card with this one, but I will soon because it's gorgeous!).  Out of all the different inks I tried, I liked the Marvy dye based markers and the Smooch pearlized inks the best, as these were the brightest.  I used both on this card.  I also used Smooch Spritz on my sentiment tab.

This was an interesting technique to try and I would like to do it again with water-based markers to see if there is a difference.  Have you tried this technique before?


Wednesday, March 14, 2012

Forever Friends


It's the second Wednesday of the month and that means you have a chance to be a Dude Time Doodles guest designer plus get this free image by Bonibleaux Designs.  You have one week to pick up Forever Friends, but if you forget, you can still purchase this cute couple in the store.  Head on over now, so you won't kick yourself later.  You could be our next guest dt - how cool it that!?


Monday, March 12, 2012

Tiny Dancer


The Digi Makeover Challenge for this week is to use a critter.  There are several to choose from  at Paper Makeup Stamps.  After much debate, I decided on Lucy Mouse.


After coloring her with my Copic markers, the 80's song "Tiny Dancer" by Elton John popped into my head and, as they say, the rest is history.  The background mats were cut using Scrap-Mart's Label 1 dies (#3,4,5) and the largest and smallest embossed with a Cuttlebug embossing folder (hounds tooth) and the middle panel was white cardstock spritzed with Walnut Ink.  The tiles are from Doodlebug Design and are in various shades of lavender, the tiny rick rack is from Really Reasonable Ribbon, and the card base is from Basic Grey.

I can't wait to see what type of Critter you use to enter the challenge.  You have one week to upload your critter to the Digi Makeover Challenge blog.  Don't forget: 1) it must be a digi image; 2) follow this week's theme; 3) if you use a Paper Makeup Stamp digi image, the winner's prize will be larger; and 4) be sure to visit the rest of the team to see what critters they have used to inspire you (not required, but we'd all love it if you left us comments :-) telling us what you think.)

Copics used: R81, C1, C2    V04, V05    


Thursday, December 15, 2011

Yoo Hoo Presents


Who wouldn't want to get presents from this cute little guy?  Yoo Hoo Presents from Stamping Dragon Designs is all decked out in his Santa hat and is ready to start handing out the goodies he brought.  Hope you get what you wanted.

Copic markers were used to color this image, liquid applique was used on the hat, and Smooch Pearlized inks were used for the ornaments.  The paper is from Echo Park.

There's still time to enter the current challenge (Bling It Christmas) going on at Stamping with the Dragon and be sure to visit the rest of the team to see what they've come up with too.

Couple of other bits of information for you:
  ~ head on over to Stamping Dragon Designs as Janette is doing the 12 Days of Giveaways and giving away one free thing each day for 12 days.
  ~ there is a 40% off sale of EVERYTHING at the Stamping Dragons Designs store, so go shopping!
  ~ a design team call is going on now.  Head on over to the Stamping with the Dragon challenge blog for all the details.  You'll be able to pick up a free image of Rupert and then apply by 12/23/11.  Good luck to all who submit their application.  This is a great team to be on.

Monday, November 28, 2011

Wrapped with Love


Are you ready for a sketch challenge?  That's what we've got for you from the Digi Makeover Challenge this week.  The Color Kid, Gift Wrapper from Paper Makeup Stamps' November digi release, was my inspiration for this challenge and she's colored with Copic markers and cut out with Spellbinder's (Large Labels #4).  The scalloped card base as well as the background paper was die cut using Lifestyle Crafts Scalloped Squares (#10, #11).  Smooch Pearlized ink (siren) was used on the heart in the sentiment, which comes with the image.


You'll definitely want to see what the rest of the Digi Makeup Artists came up with for you today, so be sure to visit them too (blog addresses are on my sidebar).

The Rules
- You must use a digital image on your entry
(hey, it is a digi challenge after all)
- The challenge will be every Monday
- A winner will be selected every week by random.org
- The winner will get to choose any 3 digi images from PMS as their prize. If the winner used a PMS image on their entry, they'll get 2 bonus images (for a total of 5!)
- You may enter as many times as you want, there is no limit; however, you may not link back to old posts (prior to the challenge post)
- You may combine our challenge with any other challenge you like
- Please post a link directly to your individual blog post usingInLinkz (the blue frog) so we can find and admire your creation!


Copics used: B91, B93, B95   R35, R37, R39, R89    E00, E21, E31    E25, E27, E29    T4, T5, T6    Y28, Y21    Y02, Y04, Y06, Y08    E33, E99, E19    E40


Thursday, November 24, 2011

Patches


It's time for a new challenge at Stamping with the Dragon and here are the details:


SPONSOR: STAMP FAIRY

Theme: Anything goes - Christmas

Prize : $10 gift certificate

stampfairy_minibanner.png


Everyone on the design team was given Patches to play with and let me tell you, every one of us came up with something different.  You'll definitely want to check them all out.

All the papers that I used to create my card are from Echo Park, but not all are from the same collection.  After printing and coloring Patches with Copic markers and glossy accents on the ornament, I fussy cut him out so I could adhere him on my Spellbinder's ornament.   I also used just a touch of Smooch pearlized ink (gold lame) for the ornament top.   As some of you know, I don't like to throw anything out.  The "Merry Christmas" sentiment is a perfect example.  It's actually the name of the paper collection on the tag that everyone cuts off at the bottom of each sheet.  It was the perfect size, so I cut it out and pop dotted it onto my ornament.  I used a brad to attach the ornament to my velvet ribbon and let it hang naturally (so it can swing just like a real ornament.  At least it won't break if it hits the ground.).  For the inside of the card, I cut out a smaller Spellbinder's ornament to add a written note.

Now it's your turn to get busy and upload your Christmas creation to the Stamping with the Dragon challenge blog.  What better way to get those Christmas cards ready before the last minute.

Copics used: YG67   E07, E08, E09    R24, R27, R29

Monday, November 21, 2011

Moody Girls for Reading


Monday, Monday and that means it's time for a new Digi Makeover Challenge.  The challenge this week is a color challenge:


The rules are pretty simple and are in detail at the challenge blog, but the main ones are that you must use a digi, you need to follow the challenge as stated, and you should have fun.  You don't have to use a Paper Makeup Stamps digi, but you get extra prizes if you do.


Since one of my other favorite things to do (besides making cards) is to read, I choose the Moody for Reading digi image for this color challenge.  Wonder what book she's reading today?  She's colored with Copic markers with touches of Smooch Pearlized ink on her jacket and hat and Spica glitter pens for accents.


You have one week (until Sunday, 11/27) to upload your color creation to the  Digi Makeover Challenge.  Don't forget to see all the other awesome creations by the Digi Makeup Artists (they are on the blog, or you can see the individual blog addresses on my sidebar).