Saturday, September 16, 2023

Autumn Greetings


Hey everyone, I had so much fun playing with the new Hero Arts monthly project kit. The classic kit includes inks, a die, layering stencils, stamps, and more.

For this project, I die cut everything in white cardstock and blended the inks that came in this kit. I kept the negative piece from the die cut and inked it yellow and then stamped my sentiment.

I wanted a faux shaker card, so I added dimensional tape to the focal layer so that  the greeting was recessed onto the card base. I added some sequins and a cute button to my sentiment strip.

I'm entering this into the Stay Crafty with a Blog Named Hero: September 2023 Challenge.


Until next time,


Friday, July 21, 2023

Hugs


Stitching on card fronts is all the rage right now. This one is by Concord and 9th. This set (dies and coordinating stamps) was one of the many things we received in the C9 Summer Camp 2023 Event kit.  If you haven't joined one of their virtual events, I highly recommend it. 👍


Until next time,


Thursday, July 20, 2023

Birthday Wishes


Love this new stencil/die/stamp bundle from Concord and 9th called Cottage Garden. I created this fun shaker card using the stencil and dies. The frame is from PinkFresh and the sentiment is by Taylored Expressions.

After completing the stenciling, I die cut the frame from the center and added clear packaging over it to hold my sequins and taped the edges to the back.  Then I adhered the remainder of my stenciling to a card base and popped up the center with adhesive foam.

I also die cut the flower using the C9 die set and added it to the front of my shaker.  The sentiment completes the card.


Until next time,


Wednesday, July 12, 2023

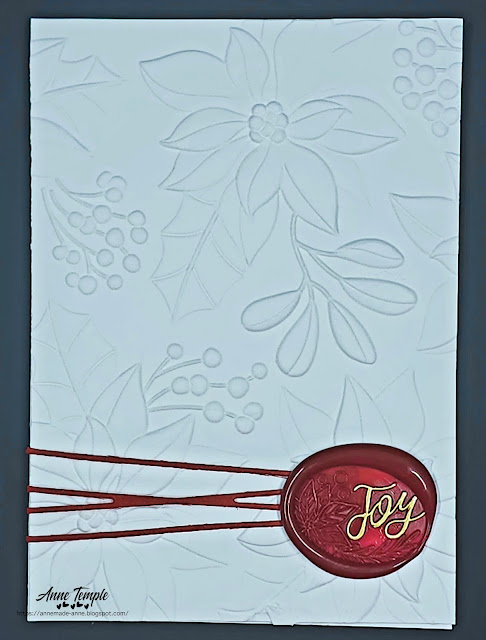
Joy


I have a CAS Christmas card to share with you today, all made with Spellbinders products. The card front was embossed using the Scenic Poinsettias 3D embossing folder , the "twine" is a die (Sealed Twine), and the wax seal is from their new Wax Seal club of the month. The camera didn't quite capture the depth of the dimension from this folder. It is really fabulous in person.

I played with wax seals when i was a teenager, using the old dripping candle to make the puddles instead of the wax beads. It's just as fun now as it was back then, only easier because you are melting the wax beads in a little spoon.

So, my first Christmas card of the year is now done! One down and tons to go 😄.


Until next time,


Monday, July 10, 2023

Needle Little Love?


This fun slimline card was created using one of the Concord and 9th dies that came in the C9 Summer Camp 2023 kit. 

I die cut the cactus a couple of times so that I could add more "arms" to it. The pot was also die cut several times to give added dimension. Such a fun die set to use.


Until next time,


Friday, July 7, 2023

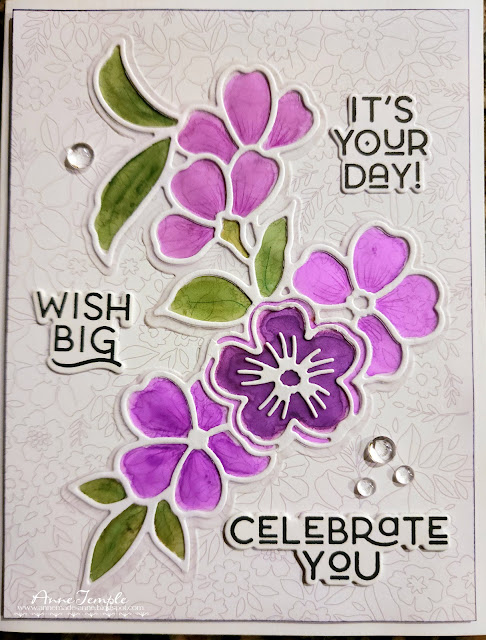
Celebrate You


 This birthday card combines several different companies for a fun mash-up. The flowers are by Altenew and I die cut the background of the flowers out of velum and colored with Copic markers. Then the flower outline was adhered on top of the velum. 

The background paper is by Honey Bee Stamps and all of the sentiments are from Taylored Expressions.


Until next time,


Thursday, July 6, 2023

Thank You


This quick and easy card uses the negative portion of a die cut. I participated in the Concord and 9th C9 Summer Camp 2023 event (my third) a couple of weeks ago and one of the projects needed a couple of black "thank you" die cuts. I though it would make a cool card front to repeat the sentiment. I saved all the little inside letter pieces so I could add them back to the card front. 

To create this, I ink blended their new Dragonfruit ink to a 4.25x5.5 card base. I went from dark to light and then dark again.  I love all the C9 inks and this one is so vibrant.

Once the card front was inked up, I adhered the black negative piece, along with all the little pieces. I also die cut the sentiment out of white to adhere into one of the negative spaces.

Easy peasy! The only hard thing about this card is making sure your thank and you is evenly spaced on the cardstock. I eyeballed that, so it was even easier 😆.


Until next time,


Wednesday, July 5, 2023

For You


This card uses a technique that I haven't done in a while: adding ink directly to an embossing folder.

This is a 3D embossing folder from Altenew that I added ink directly to the folder before sending it through my machine. I love how it adds color to the debossed area and leaves the cardstock color in the embossed areas.

The layered flowers are also by Altenew (Zinnia Layered die set). I went with tone on tone, adding a bit of inking on the edges, and some sparkle in the centers. 

Unfortunately I don't know the name of the manufacturer of sentiment die, as it was given to me. I really like the font though. As you can see, I die cut it twice so that I could add a shadow layer.


Until next time,