Thursday, November 29, 2012

sale


Enabler alert:

20% OFF Sale at Pattie's Creations Digital Images from November 30th to December 8th!!!
Come on over and browse our shop to see which images you would like. Use the CODE ALLIE2
at checkout to receive your discount!!!


Tuesday, November 27, 2012

Elmer Elf


Welcome to the final New Release Blog Hop from Dude Time Doodles.  There are four new images that will be available in the DTD store until Dec. 15, when the store closes for good.  So if there are any dudes you've been wanting to get, now's the time!

I've chose Elmer Elf for my project and colored him with Copic markers.  The one thing that I couldn't get a good photo of is the glitter border around the entire card.  It really sparkles and adds just the right touch (at least I think so).

If you arrived here from Kevin, you're on the right track.  But if you are new to our blog hop, there is no specific beginning or ending.  You just continue until you've stopped and visited all the Dude/Dudettes.  Don't forget to leave a comment as one of us is the Mystery Host and a winner of DTD image will be chosen from comments left on that person's posting.

Here is the list, in case you get lost along the way:


Crafty Girl, our guest designer


Your next stop is Tammy and I know she has something wonderful for you.  Happy hopping and don't forget to leave all of us some good lovin' (comments) and maybe become a follower if you haven't already.  Even though we won't be designing any more projects specifically for Dude Time Doodles, we'll still be creating lots of great stuff that you won't want to miss.


Grand 2013


Did you see the new Black Friday die release from Die-Versions?  If not, you need to go check them out (after you finish reading my post of course :-P).

This is the new Grand 2013 die and boy, is it grand!  I thought it would be fun to create a birthday calendar using this die.  I'm planning on writing my friends and family's name on the corresponding line for the date and month.  Now there won't be any excuse for me not sending out happy birthday wishes.  I created my own glitter papers (see my post using the Ornament Trio die on 11/20, for details on how to make your own) in both red and silver.  As you can see, I die cut the silver and used the red for the background.


The digital image calendar is by Clear Dollar Stamps and it's so versatile and I printed one for each month, although I'm only showing a couple so you get the idea.   I added stickers that I've had in my stash for ages to the centers of each month.

I also think this die would be great on a layout - maybe celebrating the beginning of the New Year, or the Fourth of July perhaps.  This is for the upcoming New Year and I incorporated the Die-Versions' New Years Collage die with my design.

When I first saw this die, I knew I wanted to try something totally different and I'm SO happy that it worked out!  I created my own stencil with chipboard so I could use embossing paste.  It works the same way as a metal stencil and embossing paste does.  (Except that I couldn't re-use it again.  If I had been a bit neater, then it probably could have been reused after everything was dry).


You can really see the dimension the embossing paste gave the layout and how crisp everything turned out.  Originally, I was planning on adding some color to this after it dried, but I liked it so much in white, that I left it as is and then worked up the layout using white accents.  I did spritz it with Perfect Pearls for a bit of shimmer though (that's what the small splotches are - not embossing paste).  Sometimes I can spritz and get a nice fine mist and other times I get splotches - I prefer the fine mist!


Now you need to visit the Die-Versions store and the Die-Versions Blog to see all the Black Friday dies and projects.


Monday, November 26, 2012

Good Luck


I created a bookmark using the Sparkle N Sprinkle Asian-Leaf Robe set, combining three of the images together.  I colored the Gingko leaves with Copic markers as well as portions of the robe (you should color before applying other materials).  Then I began by adding several different glitters to various parts of the robe and the sentiment: Black Suede, Cyclamen, Hanauma Bay, and Evening Glow.  I really wish you could see these glitters in person!  The computer screen doesn't do them justice at all.


I used Graphic 45's Bird Song collection for this stamp set and they are perfect for these stamps.  I also wanted to show you the back of the bookmark, since the papers are so gorgeous.

One last embellishment was the handmade tassel for the top.  I based it on this you tube video from Craft Dee BowZ, even though I don't have this product (yet).


Friday, November 23, 2012

Scotty


front of card (closed)
The theme for this week's challenge from Pattie's Creations is all about Harvest Time and/or  Thanksgiving.  The sponsor for this challenge is Dude Time Doodles and I've chosen Scotty Scarecrow to work with.

easel card - opened
I tried something different for the background.  After printing put the image and cutting it out with Spellbinders Grand Labels Twenty Three (#1, 2, 3 - assumes #1 is the smallest), I lightly went over the entire thing with my water brush and Distress Inks (Ripe Persimmon and Scattered Straw), including the image itself.  Next, I used Copic markers and colored the image as I usually would.  The colors from the Distress Inks came through the alcohol inks in exactly the way I was hoping.  (I think in the back of my mind I was thinking of old feed sacks that people then used for quilts, etc.  Although this is WAY before my time, I inherited some old quilts that have feed sack material in them.)


I used bits of straw for his hair and created an easel card.  The sentiment is the negative portion of the Giving Thanks die from Die-Versions.

Now it's your turn to show us your Harvest/Thanksgiving projects.  Remember, there needs to be an image on the project (either stamped or digital) and you have two weeks to upload your creation to the Pattie's Creations Design Challenge blog.  Be sure to visit the other design team members to see what they've created for you as well.


Wednesday, November 21, 2012

Howard Ho Ho Zzzz


The Dude Time Doodles Inspiration Challenge this week is all about the Holidays.


Howard Ho Ho Zzzz is doing the honors today, but he's all tired out after eating a huge meal.  He's wearing his favorite Christmas tee shirt (paper pieced from digi papers from Create with TLC) and is asleep on the couch (also paper pieced with papers from Basic Grey).  The rest of the image is colored with Copic markers and Lifestyle Crafts (nesting scalloped ovals) die was used to cut the image.  Diamond Dust covers the furry parts of the Santa hat for added sparkle.

This card is also an interactive card - meaning the recipient does more than just open the card.  In this case, they will need to pull out the tag to read the sentiment.  The sentiment is also from Create with TLC and is cut out with a Spellbinders die.  As an added bonus, the sentiment tag becomes a gift tag (I stamped "To:  From:" on the back side).  Pretty cool, huh?!

Head on over to the DTD challenge blog and upload your favorite holiday creation (and remember, it's got to be for a dude).  Sadly, this is our last challenge for Dude Time Doodles, so be sure to leave some love for the rest of the team.  DTD will be back one last time next week with our final New Release Blog Hop with four new images that you won't want to miss.

Hope everyone in the US has a Happy Thanksgiving tomorrow.

Copics used: E50, E51, E53    BV20, BV23    R14, R24, R39    B91, B95    E30, E31    W7, W9    E37    E89, E79    T1, T3    B34, B37, B39

Tuesday, November 20, 2012

Ornament Trio


I have to tell you the new Ornament Trio from Die-Versions is so fun and versatile.  So many different ideas popped into my head and they all yelled for LOTS of glitter (and it was everywhere!)  Here are a couple of ideas.

For my first project, I created three separate panels from cryogen cardstock and punched out the branches for the ornaments to be hung from.  The ornaments are glittered in red from glitter paper that I created myself.  If you haven't made your own glitter paper, it's really easy and there are lots of different ways to do it.  For this one, I ran a scrap of white cardstock through my Xyron machine and then applied lots of glitter.  You'll want to burnish it into the paper using a bone folder or your finger to make sure the glitter is adhered really well.  Then I ran it through my die cutting machine like normal.  I also traced the die cut ornament on to patterned paper and fussy cut that out, leaving a slight lip all the way around.  I adhered this to the back of the glittered die cut for some contrast.


The second idea is a candle and I based my method on a "Stamping on Candles" tutorial.  Instead of stamping an image, I die-cut the tissue paper with the Ornament Trio die and then colored them with Copic markers.  I added some ribbon at the bottom and held it in place with push pins.

Don't forget to visit the Die-Versions Blog for lots more inspiration.


Monday, November 19, 2012

Creative


I love this Gingko Leaves stamp from Sparkle N Sprinkle.  You can either purchase it as a set (Leaf Robe set) or individually.  The sentiment is part of the set.  After stamping the image with VersaMark, I heat embossed it with SNS Forest Green embossing powder and fussy cut it out.

I wanted to do something a little different and decided to create a shaker card since I hadn't done one in quite a while.  (Although I generally feel that "less is more", that's not the case when adding glitter to the inside of the shaker.  I added what I thought was quite a bit of the SNS Cyclamen glitter, but I should have added a LOT more.)

I also created my own glitter paper using the negative portion of a Spellbinders die left over from a different project, my Xyron machine, and Sparkle N Sprinkle Cyclamen glitter.  Add a double bow and you're all set.


Friday, November 16, 2012

DIY Embossing Folder

For my Winter Wonderland Blog Hop post for SNS, please click here, or scroll down.


Here's a fun (and easy) way to coordinate your embossing folders with your dies - create your own out of chipboard.  This is the Die-Versions Sweet Petite Snowflake taken to a whole different level.

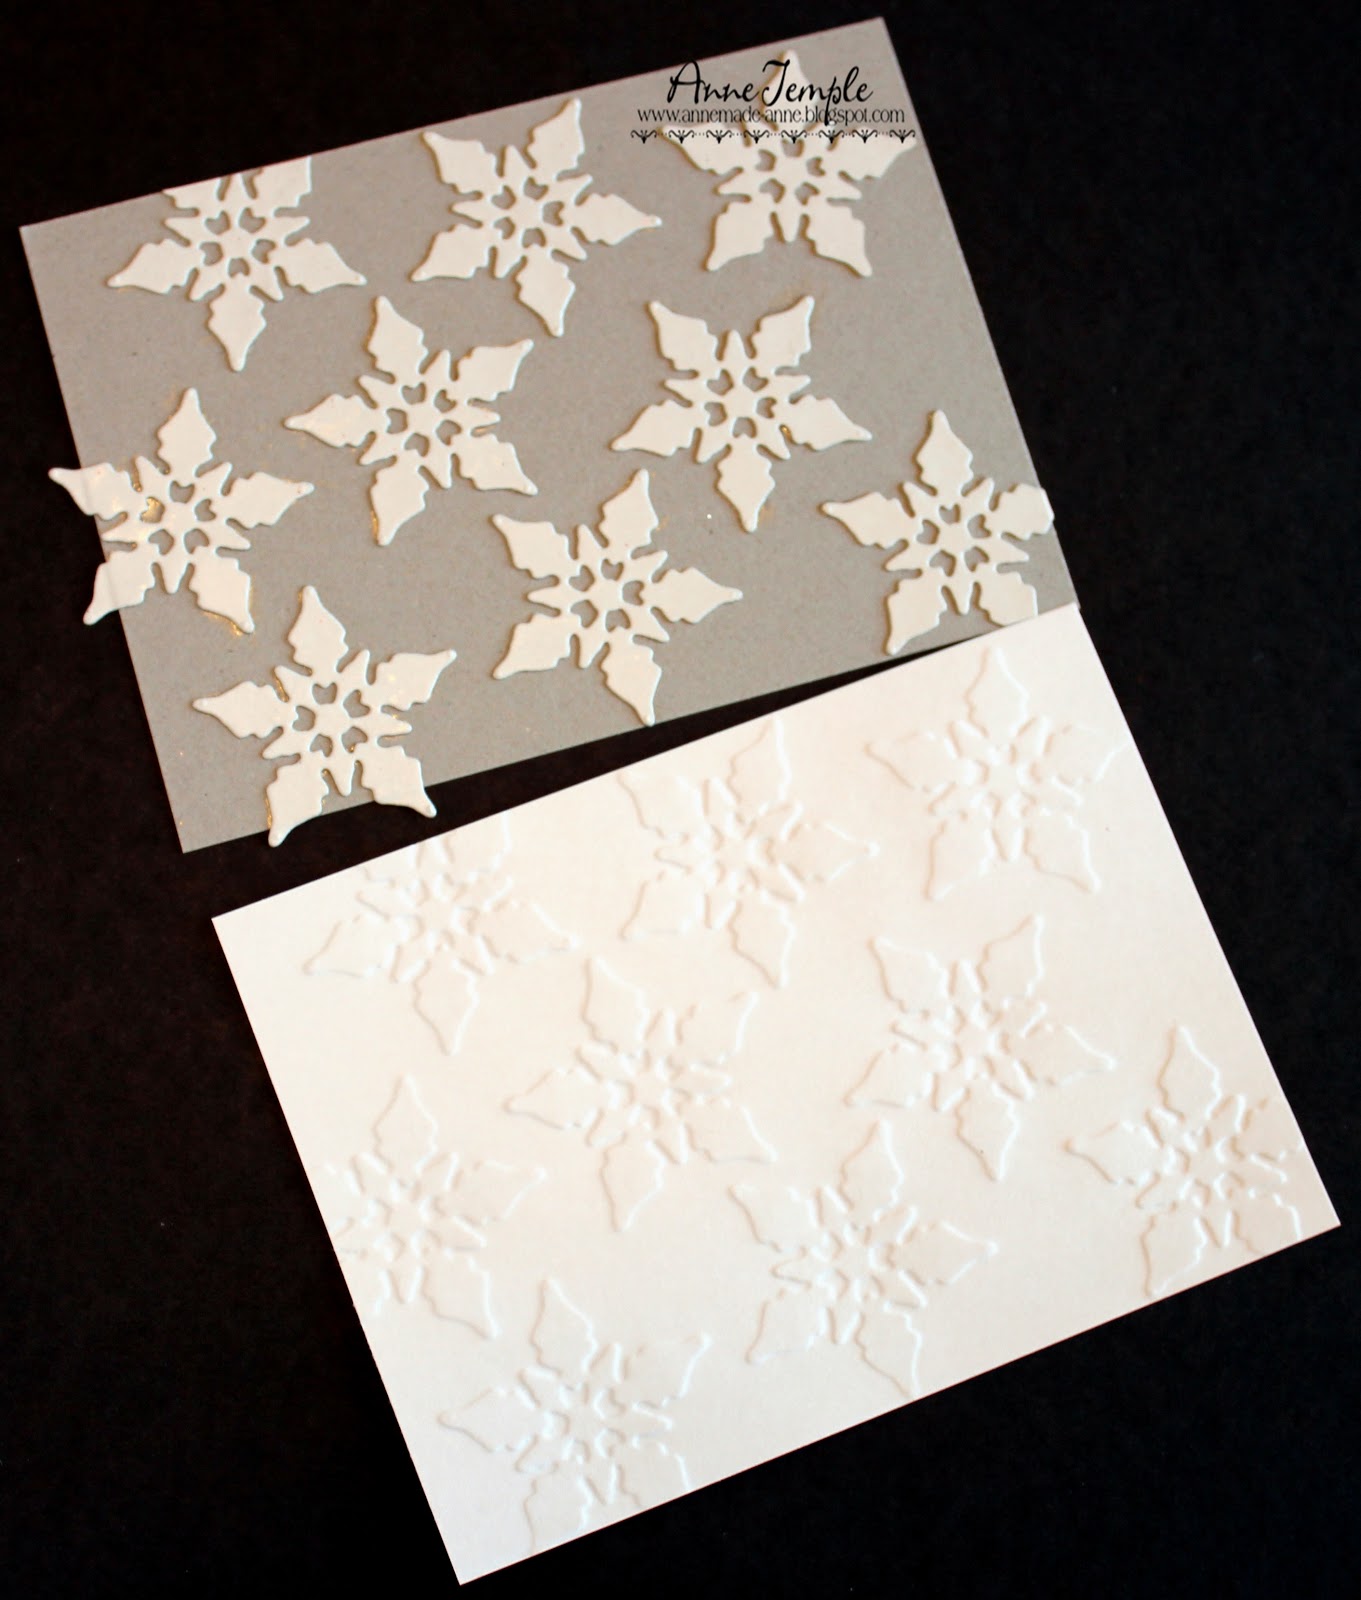
As you can see in the first photo, I cut several snowflake images out of chipboard and adhered them to another piece of chipboard.   I left a couple of the edges on the sides so you could see how to trim them to the size of your base chipboard.  Run it through your machine as you would any other embossing folder.


Next, I inked up the cardstock using Distress Inks (Peacock Feathers) and spritzed it with Perfect Pearl mist.


For the finished project, I die cut out a square and frame and sandwiched silver glitter between two acetate panels.  Then I pop dotted the entire frame above my background.  I added a stamped sentiment, a couple of gems, and some Washi tape to complete another Christmas card.

Hope I've gotten the wheels rolling and you are now thinking about your dies in a whole new light.  The Die-Versions Sweet Petites and perfect for this technique.  Head on over to the Die-Versions Blog to see other great ideas too (I know Gail also created an embossing folder and it's nothing like this one.)

Wednesday, November 14, 2012

Woofie's Flat Backed Treat Box


Welcome to Sparkle N Sprinkle's Winter Wonderland blog hop.  Hopefully you arrived from Brigita's blog.  If not then you may want to start at the beginning at Sparkle N Sprinkle's blog so you will become eligible for the six fabulous prizes that are available.  You need to leave a comment with each of us to be eligible for a prize.

Since this is my first blog hop with Sparkle N Sprinkle, I wanted to create something other than a card.
Using the digi image, Woofie Under the Christmas Tree, I created a flat backed treat box following the tutorial on Splitcoast Stampers.  I did alter it a little to have a larger back to accomodate my stamped image.


The image was printed twice and colored with Copics.  I colored the dog in the present with the lid, the bone, and the ball and fussy cut out these so I could pop dot them onto the original for more dimension.  I also added a bit of bling (Celestial glitter) to the star and flocking (Snow White) to the hat.  You can check out the details on this and all the other projects in the SNS Art Gallery (you can also type in my name under the search feature and it will pull up every project that I've designed for SNS.)


 Here's the complete list of all the designers:


Anne Temple  www.annemade-anne.blogspot.com (you're here)
Charmagne Welch-Rivera   www.sanurascraps.blogspot.com


As there are quite a few designers, you have 4 days to go through our Winter Wonderland Blog Hop.  To be eligible for the Grand Prize, you need to leave a comment with EACH of us and then follow the directions on the last blog (Brenda's blog).  There will also be winners of mini prizes, which will be selected from comments made on three different Mystery Designers blogs.  Your next stop is Karin.      Thanks so much for stopping by and happy hopping!

Patty and Paul Pilgrim


Meet Patty Pilgrim and Paul Pilgrim.  They want to invite you to join us for the Freebie challenge at Dude Time Doodles this week.  You can pick up either one as this week's freebie.  Then create something with either one to join our challenge.  The winner will receive an image from the Dude Time Doodles store.

This was a pretty quick tag to make.  I heat embossed the sentiment first and then  used several different Distress Inks to create my background.  Once I was happy with that, I stamped different images with Picket Fence Distress Stain and Black Soot ink.  Finally,  I liberally spritzed it with Smooch Spritz.  Added just a touch of ribbon at the bottom, and it's all set.

Be sure to check out the other fun creations using these two characters created by the rest of the Dudettes.

Tuesday, November 13, 2012

Snowflakes


Using the new Die-Versions sweet petite Snowflake die, I created this sparkly monochromatic Christmas card. (It's much brighter in person, but I left the photo on the darker side so you could see all the shimmery goodness of each snowflake.)  After adhering glitter to adhesive paper, I cut out each individual snowflake and adhered them to a background panel that I embossed with a embossing plate.  I also pop dotted this entire panel for a bit more interest.  I added my sentiment, ribbon, and gems to the centers and created a quick and easy card.  If you want to see how I created my own embossing folder using this die, head back here on Friday for an easy tutorial.  The possibilities are endless using this technique.

Don't forget to head on over to the Die-Versions blog for LOTS more great inspiration!

Friday, November 9, 2012

Word verification


Sorry y'all, but I had to turn on the word verification.  I'm being bombarded with comments that are really ads for lots of different things.  I've been getting over 100 a day for the last several weeks.

My plan is to leave it on for a few days and then turn it back off.  I think word verification is a necessary evil to combat situations like this.  Hope you understand and will still leave me comments when you can.

Update:  these unwanted ads stopped immediately!  Will keep word verification on for a few more days.

Mushroom Birdhouse


Welcome to the new term of challenges at Pattie's Creations and be sure to welcome our two new design team members too - Bettina and Jackie.

This week's challenge is all about birthdays - everyone has them and most everyone needs to have a stash of cards ready to send out at the last minute (at least if you're like me).


I chose the Mushroom Birdhouse at Pattie's Etsy store to create a special birthday card for a friend of mine who loves Pattie's images.   The image is colored with Copic markers and the embossed panel is from Cuttlebug.  I created this glittery panel by inking up the embossing folder with VersaMark, running it through my machine, and then covering it with Sparkle N Sprinkle's Sangria Star embossing powder.  This embossing powder has the glitter mixed right in, so no extra steps are needed to create lots of bling.  I also embossed my brads the same way (dip them in VersaMark, then the embossing powder, and heat to set.  Be sure to hold them with a long clip so you don't burn your fingers.)

You have two weeks to upload your birthday creations to Pattie's Creations Design Challenge.  Don't forget to check out the rest of the design team's creations too.


Wednesday, November 7, 2012

Heath Hunter


The first Wednesday challenge from Dude Time Doodles is all about Fall Colors.  Heath Hunter is decked out in his autumn finery and all ready to go hunting.

Heath's jacket and hat are paper pieced and I added liquid applique to the hat flaps and the sleeves to resemble shearling.   He's colored with Copic markers and fussy cut out.  Added a few other dies and the scene is set for whatever comes Heath's way (preferably clay pidgins).

Don't forget to check out what the rest of the Dude/Dudettes have created for your fall viewing pleasure.


Copics used: YR14, YR18    E00, E21, E11, R20    E74, E49, E79    B16, B18, B39, B63    YG93, YG97, C3, YG99    E18, E49, C1, C3, T3    RV11, R85    E35, E25