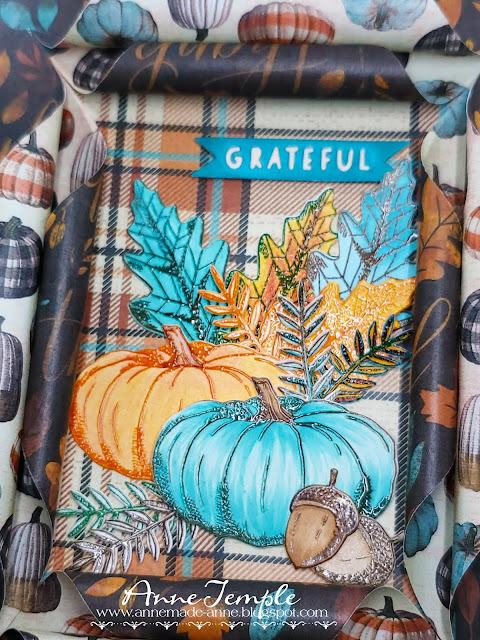
Hey everyone, it's the first Wednesday of the month and I've created this fall card for the Scrapy Land Challenge #123 that begins today. The winner of this challenge will receive a $15 gift certificate to Scrapy Land!
I used the following dies in this home decor piece:
 |
Concord & 9th: Autumn Harvest Masking Dies
Concord & 9th: Autumn Harvest stamp set
Sizzix: Ticket Fold A Long
|
A number of people asked how I created my Rolled Edge Frame cards that I recently created, that I decided to do a tutorial on it. Once you see how easy it is, you'll be amazed. It's one of those techniques that is so easy but has a huge WOW factor that makes it look like it took forever and is so complicated 😀.
To start off, you will need two sheets of double sided paper or cardstock that are the same and a third sheet that coordinates. They all need to be cut the same size. This one is 8.5" x 6.5" and the previous ones I created were 9" x 7" and 5" x 7". You could also create a square frame as well.
The patterned paper I decided to use was not double sided, so I photocopied them using my color printer. Instant double sided paper 😁.
Take the two sheets that are the same and position them so that the same patterned paper is facing each other. As you can see in the photo above, the 'pumpkin' side of the paper is facing each other. (If you alined these together with your hands, you would see that the 'thankful' paper is on the front and back and you wouldn't see the 'pumpkin' papers at all. I hope that makes sense.)
The two pieces that are on the "inside" will be what will be showing once you have rolled the edges (this will become more clear a little bit later.)
Now you have two options: you can either do the next step separately to each sheet of patterned paper or you can adhere the two sheets together before beginning the next step.
If you adhere the two pieces together beforehand, be sure to ONLY add adhesive around the very edges.
Now you are ready to create the rolled frame. I prefer to adhere both pieces beforehand, so that's what I did and that's how the instructions are written. If you decide to do each sheet separately, then adhere the two sheets together (only along the edges) after you have rolled all eight points.
Place your paper onto a cutting mat and using a ruler and an X-acto knife, cut a large X in the center of your papers.
Leave approximately 1" from each point for a margin. So starting approximately 1" from one point, cut through the paper (or both papers if you adhered them together in the previous step) diagonally to the opposite corner, stopping approximately 1" from the end of the point. Repeat this step so that you have created an X.
Time to begin rolling your edges.
Begin by lightly spritzing the top layer with water. Take one of the points and begin rolling it toward the outside of the cardstock using a pencil (or other rounded object). If you like a tighter roll, leave the pencil in there for a few seconds more as the water dries. If you like it looser, then take the pencil out as soon as you have finished rolling. You can roll all the way to the end of the cut line, or stop a little short of the cut. It's personal preference.
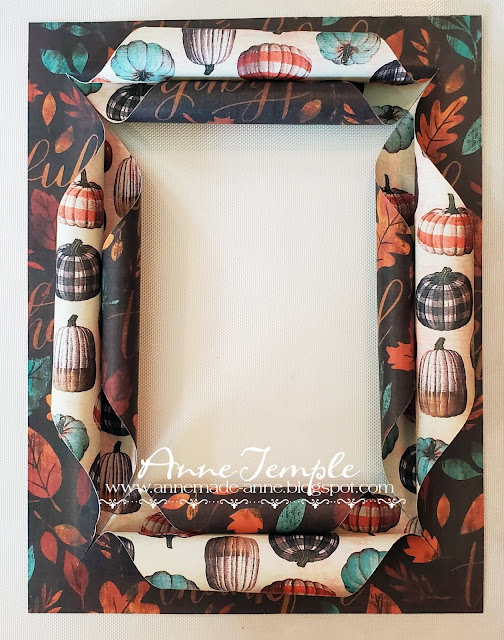
Continue rolling until all four points have been rolled. You do not need to spritz your paper with water each time. As you can see above, now the inside 'pumpkin' paper is showing.
Now you should lightly spritz the inside points and roll with a pencil, as you did above.
This is what your rolled frame should look like once you have rolled all 8 points. As you can see, the second rolled edge shows the patterned paper that was on the back. At this point, you can leave the rolled edges as is or you can also add a bit of adhesive or a glue dot underneath if you want them to stay more tightly rolled.
Now it's time to add the final piece of patterned paper/cardstock to the back and begin decorating the inside of your frame.
Using the stamp and die cut set from Concord & 9th (anything will work), I stamped multiple colors of the images. I colored my stamped images with a combination of Copic markers and colored pencils.
One trick I used was to leave the stamps placed on my stamp positioner until after I finished coloring the images (and before die cutting the images out). I placed the stamped and colored images back onto the stamp positioner and stamped the image again using VersaMark (be sure to clean your stamps before doing this step though 😀). Then I heat set them with Clear embossing powder. This gives lots of details and added dimension.
Now you're ready to die cut the stamped images. I love how these dies have a cut line that is right on the edge of the die, so you don't have a white border around your die cut. These are super easy to line up for perfect cuts each time.
As a finishing touch, I cut four strips of black cardstock, each 1/4" thick, metered the corners, and adhered it to the edges of my rolled frame.

 In order to make this truly a piece of home decor that would stand upright on it own, I created an easel backing for it. This is another super easy thing to do for any card or home decor you want to display.
You want to cut a piece of cardstock 7.5" in length by however wide your card is, or a tad shorter). In my case, this project is 6.5" wide, so my width was 6.25". Score at 3", 6", 6.5", and 7". Create an accordion fold at the bottom and adhere to the back side of your project.
Here's a final look at my completed project:
Wow, this was a LONG post 😁. Now it's your turn to join us and upload your creation to the Scrapy Land Challenge #123. It can be anything from a CAS card to mixed media, a scrapbook layout to altered art, or anything in between. The theme is always anything goes using any brand of die that Scrapy Land sells. You have until Oct 13th. We can't wait to see what you create 😀!
Until next time......


10 comments:
This is gorgeous Anne! Thanks for the tutorial for the frame - it really is a big wow factor!
Gorgeous card Anne! And thanks for the tutorial! I have done a single frame like this years ago but it really helps to see you clear instructions and pix on how to do the double one!
STUNNING!!!! Love your card Anne and the way you made it is wonderful. Thanks for the tutorial.
Lynn
Wow! I love the frame you made on this gorgeous fall card! I love blue pumpkins and I try to get one every year, but they aren't always available! Thank you so much for doing the tutorial on how to make the frame! I think you will see a lot of cards popping up with your frame on it now!
Woww, Anne! This is abs fantastic. Thank you si much for sharing the technique, indeed really not that hard to do and the final effect is wooooowwwwwwww! Your card looks fantastic! Hugs
This is so pretty, Anne. Those papers are so rich and lush. Thank you so much for including the tutorial. I am going to have to try this now!
Absolutely stunning, Anne, and the color combo is magnificent! Beautiful paper choices. Love your instructions on the rolled frame. I'm going to try that. Thanks. Did you know that turquoise pumpkins are the symbol for non-sugar treats at trick-or-treating homes? My grandson, who is a Type 1 diabetic, learned about that and, for the last few years, my daughter sets out the turquoise pumpkin every Halloween night and passes out only non-candy treats. Every diabetic child in town comes to her house because it's become so well known as a "diabetic friendly house."
how Lovely! Thanks for the fantastic tutorial!
Woww , what a great tutorial Anne !!!! Thanks so much for this !!! Gorgeous card ! Love it !!!!
Wonderful colorful fall home decor piece, Anne! I love the colors and creative design! I appreciate your blog post with a great useful tutorial! Thank you for your inspiration! Hugs and Happy Fall!
Post a Comment