Friday, July 19, 2013

Frankie


Die-Versions new release this month is all about sports.  Can you guess which sports themed die I used to create this Halloween card?  I'll give you a hint - it's the negative portion of the die cut.

Believe it or not - it's the Basketball Hoop die!  One of the first things I do when I get a new die is to cut it out from scraps of cardstock.  It helps me in the creative process.  The first thing I thought of when I saw this negative image was Frankenstein!  I set it aside for several days, but it kept drawing me back.  So I decided to go with it and Googled images of Frankenstein.  This one with Boris Karloff was one of them.  I printed it out (a couple of times) to get the sizing right and drew in the bolts on the side of his neck.  I also tweaked his hair around the edges, filling in the white space with dark Copics.

I love being able to use my supplies in ways other than they what they were originally intended for.  This might be way out there - but I love how it turned out.  Who would have thought a sports die would become Frankenstein!  I hope this starts you looking at your dies and stamps in a whole new light.  You might be surprised what you discover.

Wednesday, July 17, 2013

Chalkboard Swirls


This is one of the new stamp sets from Sparkle N Sprinkle called Swirls.  Since the Chalkboard technique is so popular right now, I wanted to try it out and thought this would be a great stamp set to use.  And since there wasn't a tutorial on how to do this in the Sparkle N Sprinkle Tips and Techniques section, I decided to make one showing how easy this technique actually is.

First off, you need to gather your supplies.  These include VersaMark ink pad, Staz On Cotton White ink pad, VersaMarker, White Detail embossing powder, the Swirls stamp set (or stamp set of your choice), acrylic block, a ruler, and black (or dark colored) cardstock.

I attached the cling stamps to my acrylic block together so I would have the arrangement that I liked and so that it would make the inking step easier.  You can see this in the photo on the right.

Now you're ready to begin.  Start off by inking both stamps with VersaMark and cover with White Detail embossing powder.  Heat set.

It should look like the photo on the right after heat setting.  This is one of the few techniques that you don't need to worry about stray flakes of embossing powder on your background.  It just adds more interest to the final piece.

Next, take your ruler and VersaMarker and draw lines around the edges of the cardstock. Add White Detail embossing powder and heat set.

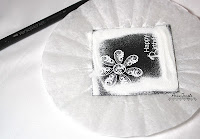
Once this has been heat set, you're ready to add the shadow (or chalk outline).  Ink up the stamps again with Staz On Cotton White.  Stamp on top of, but slightly offset, the embossed images.

You can see where I offset the stamps slightly up and to the right of the embossed images.


This gives you the chalky appearance of a chalkboard.  To enhance this illusion, take your finger and smudge white ink onto the card in a couple places.


Now you are ready to finish your card.  I die cut the MFT party banner and embossed Sparkle embossing powder all over.  No matter how many times I tried to get the sparkly effect to show in a photo, I couldn't.  You'll have to trust me that it looks really sparkly and cool in person.  It's iridescent and takes on the color of your background.  I also stamped the small hearts from the Love Fairy stamp set with Cotton White and did 2nd generation stamping, so they were more muted.

To continue the school theme, I added ribbon on top of the banner with alphabet letters on it, the red patterned paper also has old school "learning how to write" letters on it,  and I made a couple cute little pencils.  These are so easy and fun to make.  I saw them on a blog, but I don't remember who's.  If you know, please let me know so I can give them credit.  To make these, take a rounded toothpick, cut it in half and use markers to color it like a pencil.  So easy!!  I glued them down with a touch of Glossy Accents.

Thanks for sticking with me on this long post.  Hope it inspires you to try the Chalkboard technique too.

Monday, July 15, 2013

Hockey Anyone?


The theme this month for the Die-Versions new release is Sports and today I'm showcasing the cute Hockey Stick Sweet Petites.  Who better to introduce them to you than this cute little digi image from Hambo Stamps?  He's been colored with Copic markers.

I first die cut the Hockey Sticks out of chipboard and then plain copy paper.  I colored the copy paper die cuts with Copics to resemble the hockey stick in the image and then I glued them on top of the chipboard die cuts.  This gives them lots of added dimension and makes a great embellishment at the same time.

Head on over to the Die-Versions Blog and the DV Facebook page for more great projects.

Thursday, July 11, 2013

Macho Mania


After a month off, it's time for a new blog hop from Sparkle N Sprinkle.  The theme is Girly Girls and Macho Mania.  If you've followed my blog for any length of time, you'd know this would be a no-brainer for me.  I love doing masculine cards and have a very hard time making girly cards.

I chose the Country stamp set from Sparkle N Sprinkle for my project.  (If you need any cowboy themed stamps, this set has 21 different stamps.)  
I found a piece of old parchment paper when I was cleaning and thought it would be perfect for an old western WANTED type of fell.  The paper is not smooth, so when I heat embossed it with Black Detail embossing powder, you could see some of the ridges showing through.  I loved the way that looked, giving it more of a vintage feel.  After tearing around the image, I distressed it with Distress Ink.  The four brads, which hold the silhouette in place, are covered with Amber Wheat flock.The sentiment, which is also part of the set, is heat embossed with Brown Fizz embossing powder and the two brads are also covered with Brown Fizz.  Add a bit of jute, some cowboy paper, and that completes a masculine card fit for any cowboy at heart.  Hope this inspires you to make more guy cards - they are easy to do and fun!

I'm the first stop on the blog hop this month, but you may want to visit the  SNS Blog to see the complete lineup, prizes, and rules.  Remember to leave a comment with each of us in order to win one of several prizes.   Now it's time to round 'em up and head on over to see what Karin has created for your viewing pleasure.  


Wednesday, July 10, 2013

Noel Angel


Noel Angel is another new stamp set from Sparkle N Sprinkle.  Even though the included sentiments are Christmas themed, I think the image itself can be used for a variety of occasions.

I stamped the image and sentiment in VersaMark and applied Vintage embossing powder to the image and Gold Detail to the sentiment and heat set.  I wanted her dress to have a velvet look and feel, so I added Palm Leaf flock to accomplish this.  The rest of the image is colored with Copic markers.  Eggplant glitter was added to the flowers in her hair and the sash for a touch of bling.

Lifestyle Crafts Nesting Doily Oval die was used to cut the image out and I blended the background with Distress Inks (Shaded Lilac, Antique Linen).


Monday, July 8, 2013

Nothin' But Net


The Die-Versions July New Releases are now available and the theme is Sports.  I've created a center step card using the new Basketball and Net Whispers dies as my focal point and the Jersey Sweet Petite as an embellishment.  All the papers are from Echo Park (All Star) and the awesome basketball player is a digi stamp from Dude Time Doodles (which sadly, is no longer in business as they made great "manly" images).  Copic markers were used to give everything some color.   A Little Lime Die-Versions font created my title.

Head on over to the Die-Versions Blog and our DV Facebook page to see all the new releases for July and the awesome projects created by the design team.

Friday, July 5, 2013

Seahorses


Since I'm working with the Sweet Seahorse die from Die-Versions, I wanted to create some sort of underwater scene.   If you have been following me for a while, you know that I love trying new techniques.  I know this hair gel technique has been around for a bit, but this is the first time I've tried it.  I have to admit, this interactive portion of the card is really fun to play with.  You can move the bubbles in all sorts of configurations.

To create the frame around the seahorses, I applied Sparkling Sea Sparkle N Soft flocking to double sided tape.  Sea shells and coral brads complete the underwater feel.

Be sure to head back on Monday for the beginning of the Die-Versions July New Releases.  You won't be disappointed.

Wednesday, July 3, 2013

Butterfly Swirls


Sparkle N Sprinkle has recently released several new stamp sets.  This one is from the new Swirls set.  Viva Decor's Paper Soft Colors (Sunny Yellow and Magenta) were blended together to create the background.  Next I stamped the image in Jet Black Staz On and slightly offset Cotton White on top of the black.   

The sentiment, which is part of the set is stamped on a die cut from Simon Says Stamps dies and Opaline embossing powder was added on top for a shimmery look.  The final bit of sparkle comes from adhering 1/2" Tear-ific tape around the edges and covering it with Raspberry Soda glitter.