This is one of the new stamp sets from
Sparkle N Sprinkle called
Swirls. Since the Chalkboard technique is so popular right now, I wanted to try it out and thought this would be a great stamp set to use. And since there wasn't a tutorial on how to do this in the
Sparkle N Sprinkle Tips and Techniques section, I decided to make one showing how easy this technique actually is.
First off, you need to gather your supplies. These include
VersaMark ink pad,
Staz On Cotton White ink pad,
VersaMarker,
White Detail embossing powder, the Swirls stamp set (or stamp set of your choice), acrylic block, a ruler, and black (or dark colored) cardstock.
I attached the cling stamps to my acrylic block together so I would have the arrangement that I liked and so that it would make the inking step easier. You can see this in the photo on the right.
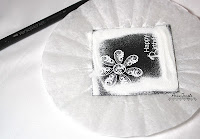
Now you're ready to begin. Start off by inking both stamps with VersaMark and cover with White Detail embossing powder. Heat set.


It should look like the photo on the right after heat setting. This is one of the few techniques that you don't need to worry about stray flakes of embossing powder on your background. It just adds more interest to the final piece.
Next, take your ruler and VersaMarker and draw lines around the edges of the cardstock. Add White Detail embossing powder and heat set.

Once this has been heat set, you're ready to add the shadow (or chalk outline). Ink up the stamps again with Staz On Cotton White. Stamp on top of, but slightly offset, the embossed images.
You can see where I offset the stamps slightly up and to the right of the embossed images.

This gives you the chalky appearance of a chalkboard. To enhance this illusion, take your finger and smudge white ink onto the card in a couple places.

Now you are ready to finish your card. I die cut the
MFT party banner and embossed
Sparkle embossing powder all over. No matter how many times I tried to get the sparkly effect to show in a photo, I couldn't. You'll have to trust me that it looks really sparkly and cool in person. It's iridescent and takes on the color of your background. I also stamped the small hearts from the
Love Fairy stamp set with Cotton White and did 2nd generation stamping, so they were more muted.
To continue the school theme, I added ribbon on top of the banner with alphabet letters on it, the red patterned paper also has old school "learning how to write" letters on it, and I made a couple cute little pencils. These are so easy and fun to make. I saw them on a blog, but I don't remember who's. If you know, please let me know so I can give them credit. To make these, take a rounded toothpick, cut it in half and use markers to color it like a pencil. So easy!! I glued them down with a touch of
Glossy Accents.
Thanks for sticking with me on this long post. Hope it inspires you to try the Chalkboard technique too.


 I stamped the images with VersaMark and then heat set them with Vintage embossing powder. I then colored both the angel and the flower corner pieces with Prismacolor colored pencils and fussy cut them out.


