Thursday, June 30, 2016

Wetlands {Sparkle N Sprinkle July Reveal}


Welcome to Sparkle N Sprinkle's
 July 1 New Reveal Blog Hop!


We have five new stamp sets to share with you today.  These new sets are 20% off until July 5.  So once you finish the blog hop, head on over to the store and start shopping.  All of the new sets are available on cling mounted rubber or as a digital image.  

We are happy to announce a new partnership with Bugaboo Digi Stamps beginning with this Reveal.  Now you will be able to get some of your favorite Bugaboo digi images in rubber!


The sets are:


(digi version DIGI787)
  Christmas Skates 789 (digi version DIGI789)
  Wetlands #1 790 (digi version DIGI790)
Wetlands #2 791 (digi version DIGI791)
Deer Duo 797 (digi version DIGI797)


On July 5th, ONE GRAND PRIZE WINNER will be selected from the comments left on the Designers' blogs listed below. Please leave a comment with each Designer in order to be eligible for the Grand Prize.  (Checked for compliance.)  You never know who the Mystery Designer will be that has the winning comment.

The Grand Prize Winner, which will be announced on the SNS Facebook page and on the SNS Blog, will receive ALL of the new stamp sets released this month (or the digi versions, if preferred).


The Blog Hop order this month is:

(*Tip: if you have difficulty with a particular link, try clicking on the Designer's blog title to send you to their Home page.)


We hope you enjoy the New Reveal Blog Hop as much as we do.  Thanks for joining us and remember to visit and comment on each of the eight Designers' blogs to be eligible for the Grand Prize. (Checked for compliance.) 
 Wonder who the Mystery Host will be this month????


The Sparkle N Sprinkle Creative Challenge also begins today.  There are lots of prizes and recognition badges.  Come check out how you can become a SNS Featured Artist as well.  The theme is always Anything Goes using Loose Glitter, Embossing Powder, and/or Flock.


Have you checked out the SNS YouTube Channel featuring Demo Donna?  If not, then you are in for a real treat.  Subscribe today to get all the latest Demo Donna tips and techniques!

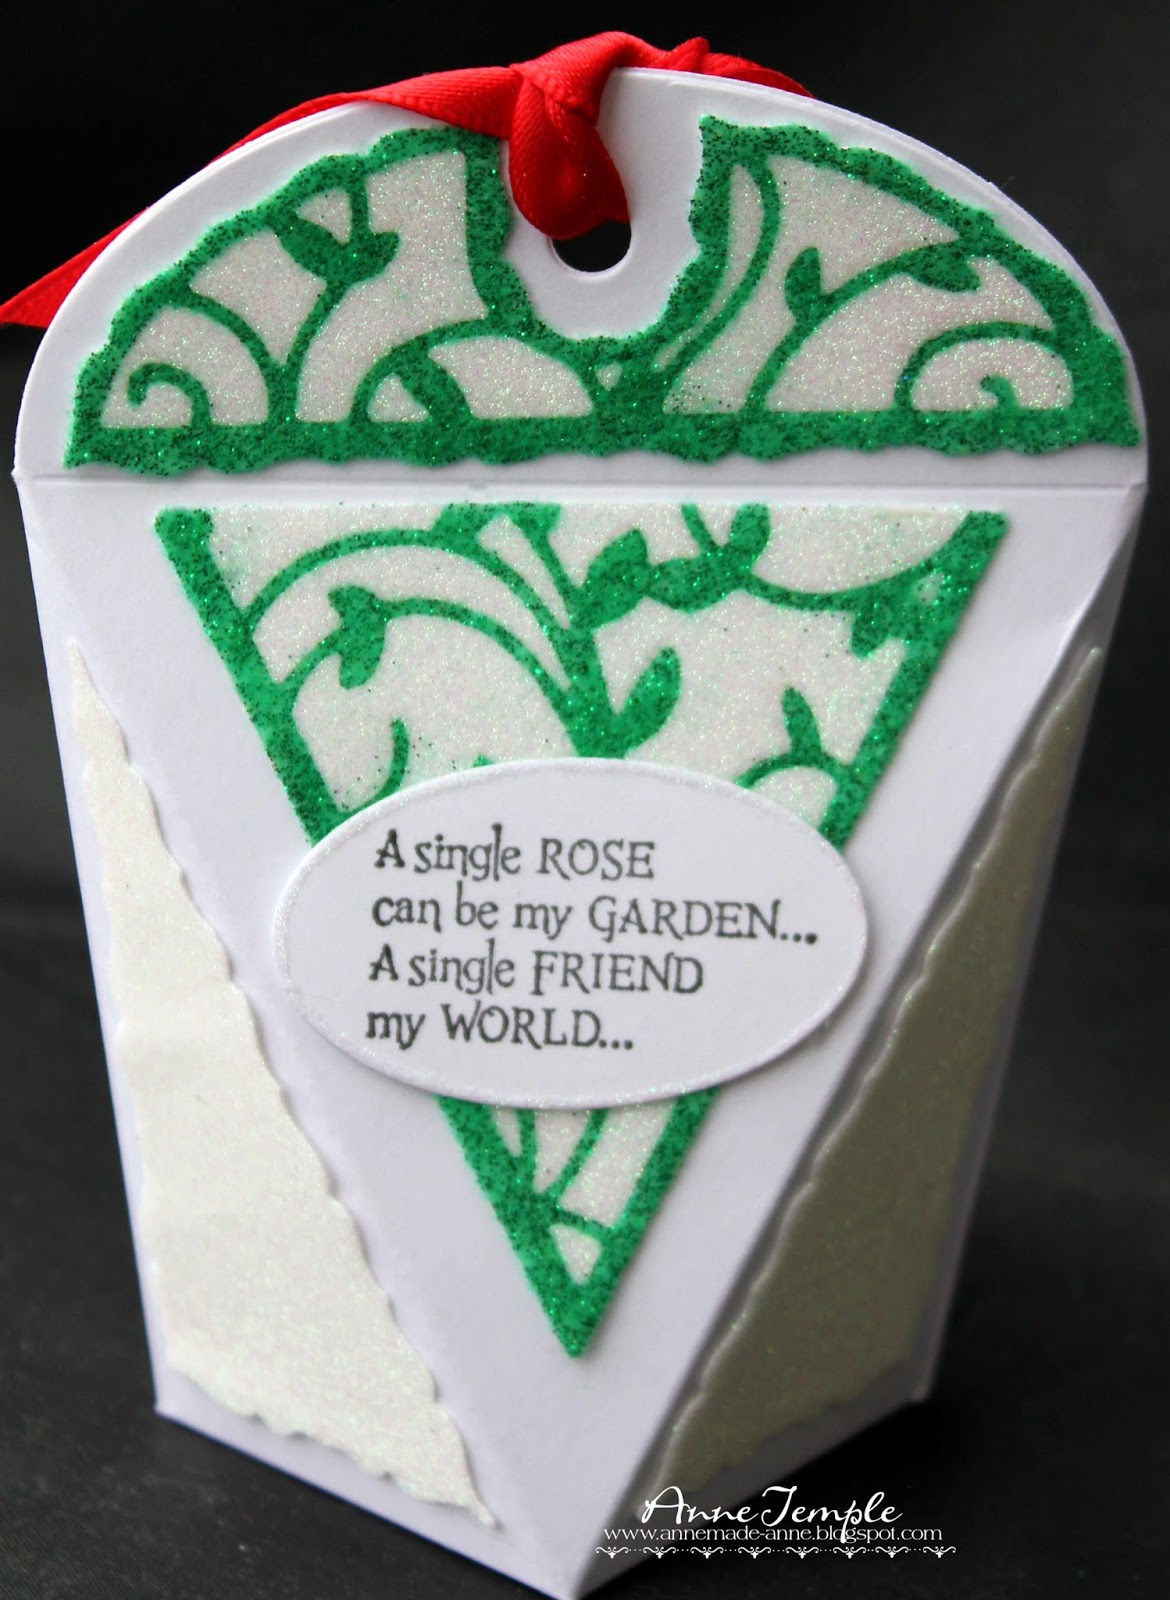
Now for a bit about my project.


My card features both of the new stamp sets released this month: Wetlands #1 and Wetlands #2.  I used the digi versions to create my scene and changed the colors that some of the images were printed in.


I then added Copic markers to create the water and Pan Pastels were used for the sky and the scalloped frame (Spellbinders-Grand Scallop).  Dimensional Glue was added to the leaves and then covered with Green Iris glitter.  This gives lots of dimension to the scene.  I also placed the ducks behind the leaves, giving even more of an impression that the leaves are in the foreground.

For the cattails, I combined Reeds 1 and 2 into one single clump and printed these separately from the rest of the scene.  I then fussy cut them out, added Dimensional Glue to the ends of the cattails and covered it with Dark Chocolate flock.  I also pop dotted the reeds.

The backing mat was dry embossed using a Sue Wilson Designs embossing folder (Climbing Vines).  The sentiment, which is part of the Wetlands #1 set, was printed out and die cut using an older Spellbinders die (Ribbon Tag Trio Two).  The edges of the die cut were distressed with Distress Ink (Blueprint Sketch).  I also added a strip of 1/4" Tear-ific Tape down the center of a strip of ribbon and covered it with Black Ice glitter.

Your next stop on the Sparkle N Sprinkle Monthly Blog Hop is Marie.  I know she has something special for you too.  Be sure to visit each of the Designers and leave a comment on their blogs for your chance to win all five of the new stamp sets revealed this month.

Happy Hopping!


Sunday, June 26, 2016

Hello


Today's card features a couple older Die-Versions dies and lots of embossing powders.  I die cut the Feather die several times to create the background and the Hello Express Edge was used to create the sentiment.  (Enabler alert: the Express Edge die is on the Farewell Sale list right now, so if you like it you need to get it before it's gone.)

To create the multi-colored feathers, I started out by covering the die cut with VersaMark and then I sprinkled on the various colors of embossing powders.  I did not heat set in between each color.  The embossing powders I used were all from Sparkle N Sprinkle (Black, Blueberry, Copper Mountain, Dust Storm).

Once the embossing powder was heat set and cooled, I then added some Rose Gold Velvet glitter to the top of the die cut.  I heat set this again from the bottom.  As you reheat the embossing powder, the glitter melts into the embossing powder.  This gives you a bolder strip of glitter versus using the glueless glitter technique, which has a more subtle glitter look.

For the Hello sentiment, I added a bit of bling using the Spectrum Noir Sparkle markers (Aquamarine) and then I covered it with Glossy Accents for a bolder, shiny look so that it would stand out a bit more.

Mixing and matching embossing powders is a fun and quick technique that will give you different results every time.  If you don't like how it came out, you can always sprinkle a little more embossing powder over the top and re-heat it.

Be sure to visit the rest of the Die-Versions team to see what they've created.  If you want to get a 15% discount on your total Die-Versions purchase, use the code anne15 during checkout.


Thursday, June 23, 2016

Good Fortune


Today's card features three Die-Versions dies: Oriental Dragon, Oriental Screen, and Fortune Cookie font.

To start out, the Dragon was die cut from white cardstock and then colored with Copic markers.  Sometimes, if I want ideas on how to color a specific image, I use Google Images to see what sparks my imagination.  (I especially use this when trying to color birds.)


Next, I used the glueless glitter technique and Clear embossing powder to add glitter (PK Glitz- Chinese Firecracker) to the Oriental Screen.  (I've had this glitter for quite some time, so I'm not sure if it's still available but I'm sure there are some great substitutes for it.)


For my sentiment, I die cut my letters from the Fortune Cookie font twice so that I could create a shadow effect.

A bit of twine and a lucky charm are the finishing touches for this card.

Don't forget to use the code anne15 to get 15% off your total purchase of Die-Version dies (based on the every day sales price).


Monday, June 20, 2016

Rose Stems


Today I'd like to share a project I created using the Tonic Studio Diamond Favor Squeeze Box die set and the single rose stamp from the Roses rubber stamp set from Sparkle N Sprinkle.   The squeeze box die set has a whopping 17 dies included so that you can mix and match inserts as well as cutting edges.  When you squeeze the sides of this box, it opens up into a square so that you can fill it with some little goodies.

front
I used some Super Adhesive Sheets and the kiss cut technique for each of the focal panels.  After die cutting and removing the background area release paper, I covered the adhesive with Cloud Nine velvet glitter, burnishing it in with my finger tip.  After removing the remaining release paper, I covered the adhesive with Sparkle N Soft flock (Glistening Emeralds) and burnished it in with my finger.  These panels are so soft and smooth that you can't help but run our fingers all over them.

For the Roses, I stamped both single stem roses that come in the stamp set, colored them with Copic markers, and then fussy cut each of them.  I added a bit of Bubble Gum glitter around the edges of the petals.

The four triangular side panels were also die cut from a Super Adhesive Sheet.  All were covered with Cloud Nine velvet glitter.

back
On the back side, I used a different cutting edge for the center panel, but used the same kiss cut technique and products as the front panels.

The sentiment, which is part of the stamp set, was stamped with black ink and heat embossed with Clear embossing powder.  I also used a Sakura glue pen to draw a fine line of glue around the edge of the die cut and added more Cloud Nine velvet glitter to give it a bit of sparkle.

This squeeze box is such a fun die cut and there are so many options for cutting it and so many ways you could embellish it.  I think it would make a great treat bag or gift bag.  It's approximately 4 1/2" tall once it's assembled (and assembling is so easy.)


Friday, June 17, 2016

Country Flowers


Country Flowers is one of the six new releases from Sparkle N Sprinkle this month.

I started out by stamping the image and coloring it with Copic markers.  Starfire glitter was added here and there on the flowers and to the word "honey" on the can.


To create the background, I used one of the inserts in the Tonic Studios Indulgence Thins Bottle Wrap die set.  I die cut the insert three times across my cardstock, leaving a small gap between each cut.  This is a tall die, measuring approximately 7 1/2" long.  I didn't want my card to be that big, so after die cutting the three panels, I cut the cardstock in half and then lined up the two ends to make this shorter.


Once that was completed, I used the glueless glitter technique and applied Clear embossing powder and then Sugar Plum glitter.  Since the insert only die cuts the holes out of your cardstock, I wanted a different color for my background.  2 1/2" Tear-ific Tape was applied to the back of the shortened panel and then I added Princess Anna Royal glitter to the front.  Since the adhesive is recessed, you need to burnish the glitter into the openings with your fingertip.

The sentiment, which is part of the set was trimmed with my deckle trimmer and then I added a thin line of glue with a Sakura glue pen.  Starfire glitter was then added to the glue.  A strip of ribbon and a bow on the side are my finishing touches to this very glittery and sparkly card.

Wednesday, June 15, 2016

Juke Box {Scrapy Land #44}


The third Wednesday of June is already here!  That means it's time for a new Scrapy Land Challenge.  The theme for this challenge is Masculine, plus use any brand of die that Scrapy Land sells.

These are the dies used to create this card:


Die-Versions: Retro Juke Box
Sue Wilson Designs: Noble Dies-Double Pierced Rectangles Set B
Die-Versions: Harmony
Sizzix: Balloons Step Up

This is actually a shaker card, but I think I used too much glitter in the shaker part.  It pretty much coated the inside of the acetate (even though I did all the things you can do to make it anti-static).  There are also some seed beads, music notes, and sequins in the shaker part too.  Oh well, my husband still loved his birthday card.

After die cutting the juke box, I colored it with Copic markers and added Silver Detail embossing powder to the "metal" areas of the juke box.  Once the Silver Detail embossing powder was cool to the touch, I applied VersaMark over the entire thing and heat set it again with Clear embossing powder.

The frame was heat set using Daffodil embossing powder.  I have a little confession/tip for you.  I had originally colored the music staff a bright yellow, but when I laid it on top of the bright yellow frame, it blended in too much.  So....I took an orange Copic and colored over the Clear embossing powder.  Some of the yellow shows through on the edges, but I was ok with that as it gives the music staff a two-toned look.  I could have gone over this area again with the Copic marker for more complete coverage, but I chose not to.

The birthday sentiment is actually part of the Balloons Step Up card (This particular set has 23 dies included with it.)  I adhered a strip of ribbon underneath the words so that they would pop more.  Both the sentiment and the random music notes from the Harmony die set were also heat embossed with Clear embossing powder.

Now wit's your turn to create a Masculine themed project.  I know lots of people this this is hard, but that's what challenges are for....to help you create outside your comfort zone :-).  You'll have until July 3rd to upload your project on the Scrapy Land Challenge.  The winner, chosen by the Design Team, will receive a $15 gift certificate to go shopping at Scrapy Land.


Monday, June 6, 2016

Roses


My project today uses both the digi version and the rubber stamp of the large rose in this Sparkle N Sprinkle Roses set.  I used the digi version to enlarge the blossom and stamped the rubber version on white cardstock to create my background mat.

The focal point was colored with Copic markers, fussy cut out, and then I applied Clear embossing powder, followed by Sparkle embossing powder.


This gives it a different look than if I only used the Sparkle embossing powder.  You can see the difference between the blossom, which looks shiny with bits of glitter embedded into it versus the bottom solid card mat, which just has Sparkle embossing powder adhered to it.  The blossom looks shiny and feels smooth whereas the bottom mat has more texture that you can both see and feel.

I die cut some glossy white cardstock from a Spellbinders die (Labels Twenty Eight) and then added Distress Ink (Abandoned Coral) over it.  To give it a textured look, I used a sea sponge over the base coat.  Nuvo Crystal Drops (Gloss White) were added to either side.

To create the patterned mat, I randomly stamped the rose image over a piece of white cardstock using Abandoned Coral Distress Ink.  While the ink was still wet, I added Clear embossing powder and heat set it.  Next I added color to the cardstock by applying Distress Ink (Squeezed Lemonade, Carved Pumpkin) with a blending tool.

The sentiment, which is part of the stamp set was stamped with Black Soot onto vellum and heat set with Clear embossing powder.  A strip of crinkle ribbon and bow add the finishing touches to this card.


Wednesday, June 1, 2016

Paradise {Scrapy Land #43}


Can you believe it's June 1st!?!  This year is flying by.  Since it's also the first Wednesday of the month, that means it's time for a new Scrapy Land Challenge.  The theme for the first challenge is always Anything Goes using any brand of die that Scrapy Land sells.


The following dies were used for today's card:


Die-Versions: Jumping Dolphins
Spellbinders: Opulent Ovals
Sue Wilson Designs: Noble dies-Double Pierced Rectangles, Set B

Today's project started out by using Copic markers to transform the Make It Crafty's Beach Digi Stamp into a sunset scene instead of a beach scene.


Once this was completed, I die cut the Opulent Ovals die from white cardstock and heat embossed the outer piece with Dark Night embossing powder.   Then I inserted the oval back into the frame.


The Jumping Dolphins die cut was also colored with Copics and a touch of glitter (Starfire) was added to the island trees and the stamen on the hibiscus.  I pop dotted this over the island scene and then added my die cut sea birds.

To finish it off, I die cut the yellow mat and the card base with two of the Sue Wilson die frames.

 I sure wish I was visiting this paradise about now.  How about you?

Be sure to visit the Scrapy Land Challenge blog to see what the rest of the team has created.  I know you won't be disappointed.  You'll have until June 12th to upload your project.  The winner, chosen by the Design Team, will receive a $15 gift certificate to go shopping at Scrapy Land.